Documenting a project
In application projects, you can document your methods as well as your classes, forms, tables, or fields. Creating documentation is particularly appropriate for projects being developed by multiple programmers and is generally good programming practice. Documentation can contain a description of an element as well as any information necessary to understand how the element functions in the application.
The following project elements accept documentation:
- Methods (database methods, component methods, project methods, form methods, 4D Mobile methods, and triggers)
- Classes
- Forms
- Tables and Fields
Your documentation files are written in Markdown syntax (.md files) using any editor that supports Markdown. They are stored as independant files within your project folder.
Documentation is displayed in the preview area (right-side panel) of the Explorer:

It can also be partially exposed as code editor tips.
Documentation files
Documentation file name
Documentation files have the same name as their attached element, with the ".md" extension. For example, the documentation file attached to the myMethod.4dm project method will be named myMethod.md.
In the Explorer, 4D automatically displays the documentation file with the same name as the selected element (see below).
Documentation file architecture
All documentation files are stored in the Documentation folder, located at the first level of the package folder.
The Documentation folder architecture is the following:
-
DocumentationClasses- myClass.md
DatabaseMethods- onStartup.md
- ...
Forms- loginDial.md
- ...
Methods- myMethod.md
- ...
TableForms- 1
- input.md
- ...
- ...
- 1
Triggers- table1.md
- ...
-
A project form and its project form method share the same documentation file for form and method.
-
A table form and its table form method share the same documentation file for form and method.
Renaming or deleting a documented element in your project will also rename or delete the element's associated Markdown file.
Documentation in the Explorer
Viewing documentation
To view documentation in the Explorer window:
- Make sure the preview area is displayed.
- Select the documented element in the Explorer list.
- Click the Documentation button located below the preview area.

-
If no documentation file was found for the selected element, a Create button is displayed (see below).
-
Otherwise, if a documentation file exists for the selected element, the contents are displayed in the area. The contents are not directly editable in the pane.
Editing documentation file
You can create and/or edit a Markdown documentation file from the Explorer window for the selected element.
If there is no documentation file for the selected element, you can:
- click on the Create button in the
Documentationpane or, - choose the Edit Documentation... option in the contextual menu or options menu of the Explorer.

4D automatically creates an appropriately named .md file with a basic template at the relevant location and opens it with your default Markdown editor.
If a documentation file already exists for the selected element, you can open it with your Markdown editor by choosing the Edit Documentation... option in the contextual menu or options menu of the Explorer.
Viewing documentation in the code editor
The 4D code editor displays a part of a method's documentation in its help tip.
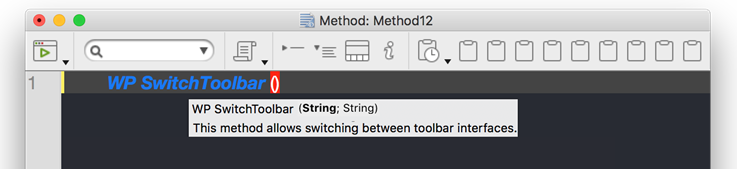
If a file named \<MethodName>.md exists in the \<package>/documentation folder, the code editor displays (by priority):
-
Any text entered in an HTML comment tag (
<!-- command documentation -->) at the top of the markdown file. -
Or, if no html comment tag is used, the first sentence after a
# Descriptiontag of the markdown file.
In this case, the first line contains the prototype of the method, automatically generated by the 4D code parser.
Otherwise, the code editor displays the block comment at the top of the method code.
Documentation file definition
4D uses a basic template to create new documentation files. This template suggests specific features that allow you to display information in the code editor.
However, you can use any supported Markdown tags.
New documentation files are created with the following default contents:

| Line | Description |
|---|---|
<!-- Type here your summary --> | HTML comment. Used in priority as the method description in the code editor tips |
| ## Description | Heading level 2 in Markdown. The first sentence after this tag is used as the method description in the code editor tips if HTML comment is not used |
| ## Example | Heading level 2, you can use this area to show sample code |
```4d Type here your example``` | Used to format 4D code examples (uses highlight.js library) |
Supported Markdown
- The title tag is supported:
# Title 1
## Title 2
### Title 3
- The style tags (italic, bold, strikethrough) are supported:
_italic_
**bold**
**_bold/italic_**
~~strikethrough~~
- The code block tag (```4d ... ```) is supported with 4D code highlight:
```4d
	var $txt : Text
	$txt:="Hello world!"
```
- The table tag is supported:
| Parameter | Type   | Description  |
| --------- | ------ | ------------ |
| wpArea    | Text |Write pro area|
| toolbar   | Text |Toolbar name  |
- The link tag is supported:
// Case 1
The [documentation](https://doc.4d.com) of the command ....

// Case 2
[4D blog][1]

[1]: https://blog.4d.com
- The image tags are supported:


[](https://blog.4d.com)

For more information, see the GitHub Markdown guide.
Example
In the WP SwitchToolbar.md file, you can write:
<!-- This method returns a different logo depending on the size parameter -->


GetLogo (size) -> logo


| Parameter | Type   | in/out | Description |
| --------- | ------ | ------ | ----------- |
| size      | Integer | in | Logo style selector (1 to 5)  |
| logo      | Picture | out | Selected logo |


## Description

This method returns a logo of a specific size, depending on the value of the *size* parameter.
1 = smallest size, 5 = largest size.

## Example

```4d
C_PICTURE($logo)
C_LONGINT($size)

//Get the largest logo
$logo:=GetLogo(5)
```
- Explorer view:
- Code editor view:
