Creador de aplicaciones
4D incluye un generador de aplicaciones para crear un paquete de proyecto (versión final). Este generador simplifica el proceso de finalización y despliegue de las aplicaciones compiladas en 4D. Maneja automáticamente las funcionalidades específicas de los distintos sistemas operativos y facilita el despliegue de aplicaciones cliente-servidor.
El generador de aplicaciones le permite:
- Crear una estructura o componente compilado, sin código interpretado,
- Generar una aplicación autónoma ejecutable, es decir, fusionada con 4D Volume Desktop, el motor de base de datos 4D,
- Generar diferentes aplicaciones a partir de la misma estructura compilada mediante un proyecto XML,
- Generar aplicaciones cliente-servidor homogéneas,
- Generar aplicaciones cliente-servidor con actualización automática de los componentes del cliente y del servidor.
- Guardar sus parámetros de generación para su uso futuro (botón Guardar los parámetros).
Las aplicaciones compiladas se basan en archivos .4dz que son de sólo lectura. Tenga en cuenta que el uso de comandos o funciones que modifican los archivos fuente (como
CREATE INDEXoCREATE TABLE(SQL)) no es posible por defecto en las aplicaciones compiladas. Sin embargo, puede crear aplicaciones específicas que soporten modificaciones locales utilizando la llave XMLPackProject(ver doc.4d.com).
Generalidades
Generar un paquete de proyecto puede realizarse utilizando:
- ya sea con el comando
BUILD APPLICATION, - o en la caja de diálogo Crear aplicación.
También puede descargar y utilizar Build4D, un componente que ofrece clases para compilar, crear y firmar proyectos 4D, incluso desde una aplicación sin interfaz.
Diálogo crear aplicación
Para mostrar la caja de diálogo Generar la aplicación, seleccione Diseño > Generar aplicación... en la barra de menús.

La caja de diálogo del generador de aplicaciones incluye varias páginas a las que se puede acceder mediante pestañas:
La generación sólo puede efectuarse una vez compilado el proyecto. Si selecciona este comando sin haber compilado previamente el proyecto, o si el código compilado no se corresponde con el código interpretado, aparece una caja de diálogo de advertencia que indica que el proyecto debe ser (re)compilado.
buildApp.4DSettings
Cada parámetro de generación de la aplicación se almacena como una llave XML en el archivo de proyecto de la aplicación llamado buildApp.4DSettings, ubicado en la carpeta Settings del proyecto.
Los parámetros por defecto se utilizan la primera vez que se utiliza la caja de diálogo del Generador de aplicaciones. El contenido del archivo proyecto se actualiza, si es necesario, al hacer clic en Construir o Guardar los parámetros. Puede definir varios archivos de parámetros XML para el mismo proyecto y utilizarlos con el comando BUILD APPLICATION.
Las llaves XML ofrecen opciones adicionales a las que se muestran en la caja de diálogo del Generador de aplicaciones. La descripción de estas llaves se detalla en el manual 4D XML Keys BuildApplication.
Archivo de historial
Cuando se crea una aplicación, 4D genera un archivo de registro llamado BuildApp.log.xml en la carpeta Logs del proyecto. El archivo de historial almacena la siguiente información para cada generación:
- El inicio y el fin de la generación de objetivos,
- El nombre y la ruta de acceso completa de los archivos generados,
- La fecha y la hora de la generación,
- Todos los errores que se han producido,
- Todo problema de firma (por ejemplo, un plug-in no firmado).
La comprobación de este archivo puede ayudarle a ahorrar tiempo durante los siguientes pasos de despliegue, por ejemplo si tiene intención de notarizar su aplicación en macOS.
Utilice la sentencia
Get 4D file(Build application log file)para obtener la ubicación del archivo de registro.
Nombre de la aplicación y carpeta de destino

Introduzca el nombre de la aplicación en Nombre de la aplicación.
Especifique la carpeta para la aplicación generada en la Carpeta de destino. Si la carpeta especificada no existe todavía, 4D creará una carpeta Build.
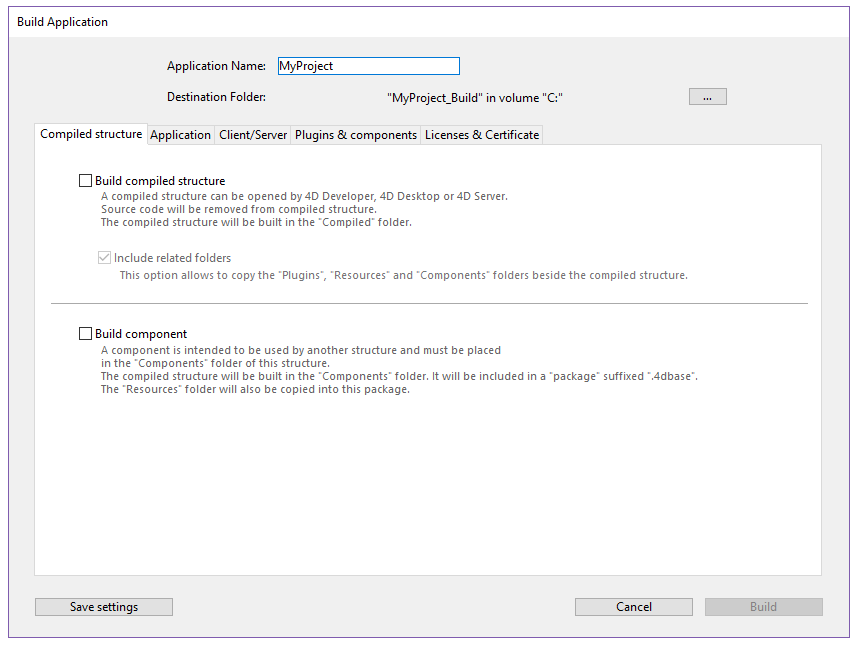
Página de estructura compilada
Esta pestaña le permite generar un archivo de estructura compilado estándar y/o un componente compilado:
Generar una estructura compilada
Genera una aplicación que sólo contiene código compilado.
Esta funcionalidad crea un archivo .4dz en una carpeta Compiled Database/<project name>. Por ejemplo, si ha llamado a su aplicación "MyProject", 4D creará:
<destination>/Compiled Database/MyProject/MyProject.4dz
Un archivo .4dz es esencialmente una versión comprimida (empaquetada) de la carpeta del proyecto. Un archivo .4dz es esencialmente una versión comprimida (empaquetada) de la carpeta del proyecto. Un archivo .4dz es esencialmente una versión comprimida (empaquetada) de la carpeta del proyecto.
Al generar archivos .4dz, 4D utiliza por defecto un formato zip estándar. La ventaja de este formato es que es fácilmente legible por cualquier herramienta unzip. Si no quiere utilizar este formato estándar, añada la llave XML
UseStandardZipFormatcon valorFalseen su archivobuildApp.4DSettings(para más información, vea el manual 4D XML Keys BuildApplication).
Incluir las carpetas asociadas
Cuando se marca esta opción, todas las carpetas relacionadas con el proyecto se copian en la carpeta Build como carpetas Components y Resources. Para más información sobre estas carpetas, consulte la descripción de la arquitectura del proyecto.
Generar un componente
Genera un componente compilado a partir de la estructura.
Un componente es un proyecto estándar 4D en el que se han desarrollado funcionalidades específicas. Una vez configurado e instalado en otro proyecto 4D (el proyecto de la aplicación local), sus funcionalidades son accesibles desde el proyecto local.
Si ha llamado a su aplicación MyComponent, 4D creará automáticamente una carpeta Components con la siguiente estructura:
<destination_folder>/Components/MyComponent.4dbase/Contents/.
The MyComponent.4dbase folder is the package folder of the compiled component.
The Contents folder contains:
- MyComponent.4DZ file - the compiled structure.
- Una carpeta Resources: todos los resources asociados se copian automáticamente en esta carpeta. Los otros componentes y/o carpetas de plugins no se copian (un componente no puede utilizar plugins u otros componentes).
- An Info.plist file - this file is required to build notarizeable and stapleable components for macOS (it is ignored on Windows). Si un archivo Info.plist ya existe en la raíz del componente está fusionado, de lo contrario se crea un archivo por defecto. Las siguientes llaves de Apple bundle están prellenadas:
CFBundleDisplayNameyCFBundleNamepara el nombre de la aplicación,NSHumanReadableCopyright, puede ser definido usando una llave XML.CFBundleShortVersionStringyCFBundleVersionpara la versión de la aplicación (x.x.x, p. ej., 1.0.5), puede ser definido usando una llave XML.
Página Application
Esta pestaña le permite crear una versión autónoma y monopuesto de su aplicación:
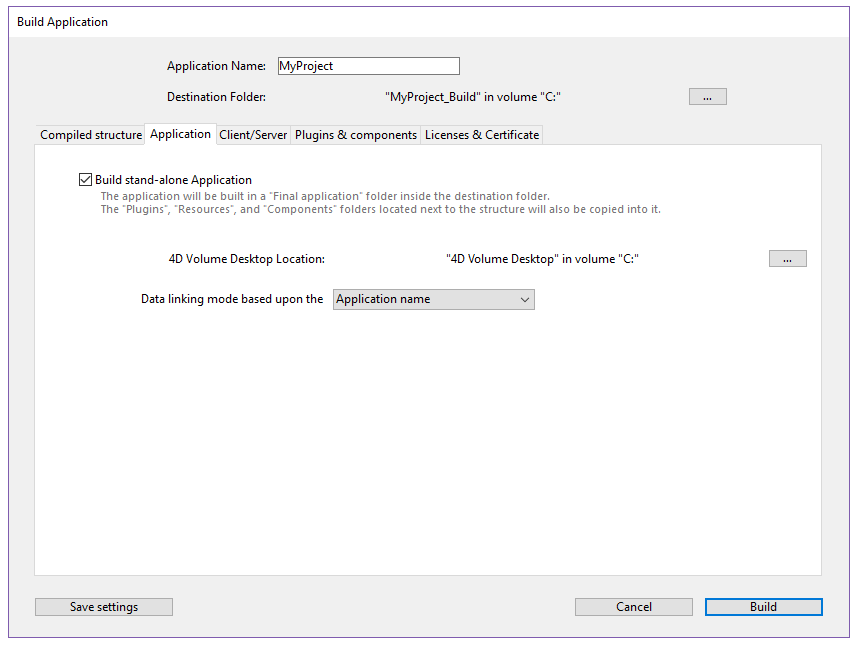
Crear una aplicación autónoma
Al marcar la opción Crear una aplicación autónoma y hacer clic en Generar se creará una aplicación autónoma (con doble clic) directamente desde su proyecto de aplicación. En Windows, esta función crea un archivo ejecutable (.exe). En macOS, se encarga de la creación de paquetes de software.
Las funcionalidades ofrecidas por el archivo 4D Volume Desktop están relacionadas con la oferta de productos a la que se ha suscrito. Las funcionalidades ofrecidas por el archivo 4D Volume Desktop están relacionadas con la oferta de productos a la que se ha suscrito. Para más información sobre este punto, consulte la documentación de ventas y el 4D Store.
- Puede definir un archivo de datos predeterminado o permitir a los usuarios crear y utilizar su propio archivo de datos.
- Puede incrustar una licencia de despliegue o dejar que el usuario final introduzca su licencia en el primer lanzamiento de la aplicación (ver Licencias más abajo).
Es posible automatizar la actualización de aplicaciones fusionadas de un solo usuario mediante una secuencia de comandos de lenguaje.
Ubicación de 4D Volume Desktop
Para crear una aplicación autónoma, primero debe designar la carpeta que contiene el archivo 4D Volume Desktop:
- Windows - la carpeta contiene los archivos 4D Volume Desktop.4DE, 4D Volume Desktop. RSR, así como varios archivos y carpetas necesarios para su funcionamiento. Estos elementos deben colocarse al mismo nivel que la carpeta seleccionada.
- macOS - 4D Volume Desktop se entrega en forma de un paquete de software estructurado que contiene varios archivos y carpetas genéricos.
Para seleccionar la carpeta 4D Volume Desktop, haga clic en el botón [...]. Aparece una caja de diálogo que le permite designar la carpeta de 4D Volume Desktop (Windows) o el paquete (macOS).
Una vez seleccionada la carpeta, se muestra su ruta completa y, si realmente contiene 4D Volume Desktop, se activa la opción de generación de una aplicación ejecutable.
El número de versión de 4D Volume Desktop debe coincidir con el número de versión de 4D Developer Edition. Por ejemplo, si utiliza 4D 20, debe seleccionar un 4D Volume Desktop 20.
Modo de enlace de datos
Esta opción permite elegir el modo de enlace entre la aplicación fusionada y el archivo de datos local. Hay dos modos de enlazar disponibles:
-
Por nombre de la aplicación (por defecto) - La aplicación 4D abre automáticamente el archivo de datos abierto más recientemente correspondiente al archivo de estructura. Esto le permite mover el paquete de aplicaciones libremente en el disco. Esta opción debería usarse generalmente para aplicaciones fusionadas, a menos que necesite específicamente duplicar su aplicación.
-
Por ruta de la aplicación - La aplicación 4D fusionada analizará el archivo lastDataPath.xml de la aplicación e intentará abrir el archivo de datos con un atributo "executablePath" que coincida con la ruta completa de la aplicación. Si se encuentra una entrada de este tipo, se abre su correspondiente archivo de datos (definido a través de su atributo "dataFilePath"). Si se encuentra una entrada de este tipo, se abre su correspondiente archivo de datos (definido a través de su atributo "dataFilePath").
Para más información sobre el modo de vinculación de datos, consulte la sección Último archivo de datos abierto.
Archivos generados
Al hacer clic en el botón Generar, 4D crea automáticamente una carpeta Final Application en la carpeta de destino definida. Dentro de la carpeta Final Application hay una subcarpeta con el nombre de la aplicación especificada.
Si ha especificado "MyProject" como nombre de la aplicación, encontrará los siguientes archivos en esta subcarpeta (MyProject):
- Windows
- MyProject.exe - Su ejecutable y un MyProject.rsr (los recursos de la aplicación)
- Las carpetas 4D Extensions y Resources, varias librerías (DLL), la carpeta Native Components y SASL Plugins - Archivos necesarios para el funcionamiento de la aplicación
- Una carpeta Database - Incluye una carpeta Resources y un archivo MyProject.4DZ. Constituyen la estructura compilada del proyecto, así como también la carpeta Resources. Nota: esta carpeta también contiene la carpeta Default Data, si se ha definido (ver Gestión de archivos de datos en las aplicaciones finales.
- (Opcional) Carpeta de componentes y/o carpeta Plugins - Contiene todos los componentes y/o archivos de plugins incluidos en el proyecto. Para más información sobre este punto, consulte la sección Plugins y componentes.
- (Opcional) Carpeta Licencias - Un archivo XML con los números de licencia integrados en la aplicación, si los hubiera. Para obtener más información sobre este punto, consulte la sección Licencias y certificados.
- Elementos adicionales añadidos a la carpeta 4D Volume Desktop, si los hay (ver Personalizar la carpeta 4D Volume Desktop).
Todos estos elementos deben estar en la misma carpeta para que el ejecutable funcione.
- macOS
- Un paquete de software llamado MyProject.app que contiene su aplicación y todos los elementos necesarios para su funcionamiento, incluyendo los plug-ins, componentes y licencias. Para más información sobre la integración de plug-ins y componentes, consulte la sección Plugins y componentes. Para obtener más información sobre la integración de licencias, consulte la sección Licencias y certificados. Nota: en macOS, el comando Application file del lenguaje 4D devuelve la ruta del archivo ApplicationName (ubicado en la carpeta Contents:macOS del paquete de software) y no la del archivo .comp (carpeta Contents:Resources del paquete de software).
Personalizar la carpeta 4D Volume Desktop
Cuando se construye una aplicación independiente, 4D copia el contenido de la carpeta 4D Volume Desktop en la carpeta Destination > Final Application. A continuación, podrá personalizar el contenido de la carpeta 4D Volume Desktop original según sus necesidades. Puede, por ejemplo:
- Instalar una versión de 4D Volume Desktop correspondiente a un lenguaje específico;
- Añadir una carpeta Plugins personalizada;
- Personalizar el contenido de la carpeta Resources.
Los paquetes macOS generados contienen los mismos elementos que las subcarpetas Windows. Para modificarlo, primero debe visualizar su contenido (Control+clic en el icono).
Ubicación de los archivos web
Si su aplicación ejecutable se utiliza como servidor web, los archivos y los archivos y carpetas requeridos por el servidor deben instalarse en ubicaciones específicas. Estos elementos son los siguientes:
- archivos cert.pem y key.pem (opcional): etos archivos se utilizan para las conexiones TLS y por los comandos de encriptación de datos,
- carpeta raíz web por defecto.
Los elementos deben ser instalados:
- En Windows: en la subcarpeta Final Application\MyProject\Database.
- En macOS: junto al paquete de software MyProject.app.
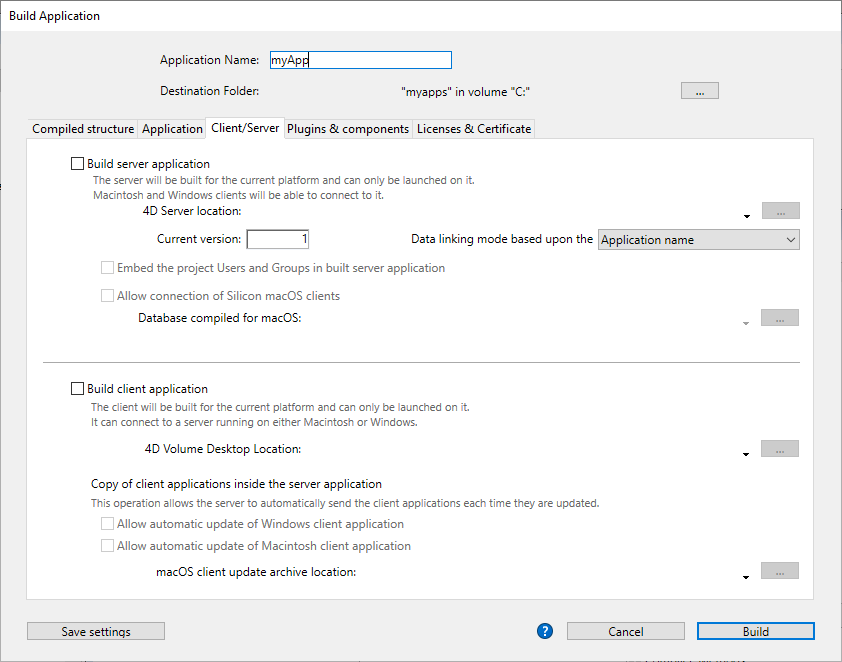
Página Cliente/Servidor
En esta pestaña, puede generar aplicaciones cliente y servidor personalizadas que son homogéneas, multiplataforma y con una opción de actualización automática.
¿Qué es una aplicación cliente/servidor?
Una aplicación cliente/servidor proviene de la combinación de tres elementos:
- Un proyecto 4D compilado,
- La aplicación 4D Server,
- La aplicación 4D Volumen Desktop (macOS y/o Windows).
Una vez generada, una aplicación cliente/servidor se compone de dos partes personalizadas: la parte Servidor (única) y la parte Cliente (a instalar en cada máquina cliente).
Si desea desplegar una aplicación cliente/servidor en un entorno heterogéneo (aplicaciones cliente ejecutándose en máquinas Intel/AMD y Apple Silicon), se recomienda compilar el proyecto para todos los procesadores en una máquina macOS, para que todas las aplicaciones clientes funcionen de forma nativa.
Además, se personaliza la aplicación cliente/servidor y se simplifica su manejo:
- Para lanzar la parte del servidor, el usuario simplemente hace doble clic en la aplicación servidor. No es necesario seleccionar el archivo proyecto.
- Para lanzar la parte cliente, el usuario simplemente hace doble clic en la aplicación cliente, que se conecta directamente a la aplicación servidor. No es necesario elegir un servidor en una caja de diálogo de conexión. Si desea que la aplicación cliente se conecte al servidor utilizando una dirección específica (distinta del nombre del servidor publicado en la subred), debe utilizar la llave XML
IPAddressen el archivo buildapp.4DSettings. Si la conexión falla, se pueden implementar mecanismos alternativos específicos. Puede "forzar" la visualización de la caja de diálogo de conexión estándar presionando la tecla Opción (macOS) o Alt (Windows) mientras inicia la aplicación cliente. Sólo la parte cliente puede conectarse a la parte del servidor correspondiente. Si un usuario intenta conectarse a la parte servidor utilizando una aplicación estándar 4D, se devuelve un mensaje de error y la conexión es imposible. - Una aplicación cliente/servidor puede configurarse para que la parte cliente se actualice automáticamente a través de la red. Sólo es necesario crear y distribuir una versión inicial de la aplicación cliente, las actualizaciones posteriores se gestionan mediante el mecanismo de actualización automática.
- También es posible automatizar la actualización de la parte del servidor a través del uso de una secuencia de comandos de lenguaje (SET UPDATE FOLDER y RESTART 4D.
Si quiere que las conexiones cliente/servidor se realicen en TLS, solo tiene que marcar la configuración apropiada. Si desea utilizar un certificado personalizado, por favor considere usar los CertificateAuthoritiesCertificates.
Construir aplicación servidor
Marque esta opción para generar la parte del servidor de su aplicación durante la fase de construcción. Debe designar la ubicación en su disco de la aplicación 4D Server que va a utilizar. Debe designar la ubicación en su disco de la aplicación 4D Server que va a utilizar.
Ubicación de 4D Server
Haga clic en el botón [...] y utilice la caja de diálogo Navegar carpeta para localizar la aplicación 4D Server. En macOS, debe seleccionar directamente el paquete 4D Server.
Versión actual
Se utiliza para indicar el número de versión actual de la aplicación generada. A continuación, podrá aceptar o rechazar las conexiones de las aplicaciones cliente en función de su número de versión. El intervalo de compatibilidad para las aplicaciones cliente y servidor se define mediante el uso de llaves XML específicas).
Integrar el proyecto Usuarios y Grupos en la aplicación servidor creada
Nota preliminar: en esta sección se utilizan los siguientes términos:
| Nombre | Definición |
|---|---|
| Archivo de directorio del proyecto | archivo directory.json ubicado en la carpeta Settings del proyecto |
| Archivo de directorio de la aplicación | archivo directory.json ubicado en la carpeta Settings del servidor 4D creado |
| Archivo de directorio de datos | archivo directory.json en la carpeta Data > Settings |
Cuando se marca esta opción, el archivo del directorio del proyecto se copia en el archivo del directorio de la aplicación en el momento de la generación.
Cuando ejecute una aplicación 4D Server generada:
- Si el servidor tiene un archivo de directorio de datos, se carga.
- Si el servidor no tiene un archivo de directorio de datos, se carga el archivo de directorio de la aplicación.
El archivo de directorio de la aplicación es de sólo lectura. Las modificaciones realizadas a los usuarios, grupos y permisos durante la ejecución del servidor se almacenan en el archivo del directorio de datos. Si ya no existe ningún archivo de directorio de datos, se creará automáticamente. Si el archivo del directorio de la aplicación estaba integrado, se duplica como archivo del directorio de datos.
La incorporación del archivo del directorio del proyecto le permite desplegar una aplicación cliente/servidor con una configuración básica de la seguridad de los usuarios y de los grupos. Las modificaciones posteriores se añaden al archivo del directorio de datos.
Autorizar la conexión de los clientes Silicon Mac
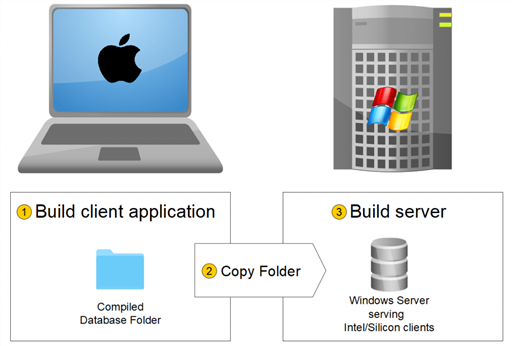
Cuando se cree un servidor en Windows, marque esta opción para permitir que los clientes Apple Silicon se conecten a su aplicación servidor. A continuación, puede especificar una ruta de acceso a la estructura compilada para Apple Silicon/Intel.
Para permitir a los clientes Apple Silicon conectarse a una aplicación servidor creada en Windows, primero debe crear una aplicación cliente en macOS, con un proyecto compilado para Apple Silicon e Intel. Esto crea automáticamente una estructura compilada, idéntica a la creada con la opción Build compiled structure (sin las carpetas asociadas).
A continuación, puede copiar esa estructura en su máquina Windows y utilizarla para construir la aplicación servidor:
Ubicación de la estructura compilada
Ruta de acceso a la estructura compilada de la aplicación cliente Apple Silicon/Intel utilizada para crear un servidor Windows (ver Permitir la conexión de clientes Silicon Mac).
Modo de enlace de datos
Esta opción permite elegir el modo de enlace entre la aplicación fusionada y el archivo de datos local. Hay dos modos de enlazar disponibles:
-
Por nombre de la aplicación (por defecto) - La aplicación 4D abre automáticamente el archivo de datos abierto más recientemente correspondiente al archivo de estructura. Esto le permite mover el paquete de aplicaciones libremente en el disco. Esta opción debería usarse generalmente para aplicaciones fusionadas, a menos que necesite específicamente duplicar su aplicación.
-
Por ruta de la aplicación - La aplicación 4D fusionada analizará el archivo lastDataPath.xml de la aplicación e intentará abrir el archivo de datos con un atributo "executablePath" que coincida con la ruta completa de la aplicación. Si se encuentra una entrada de este tipo, se abre su correspondiente archivo de datos (definido a través de su atributo "dataFilePath"). Si se encuentra una entrada de este tipo, se abre su correspondiente archivo de datos (definido a través de su atributo "dataFilePath").
Para más información sobre el modo de vinculación de datos, consulte la sección Último archivo de datos abierto.
Crear la aplicación cliente
Marque esta opción para generar la parte cliente de su aplicación durante la fase de construcción.
Puede marcar esta opción:
- junto con la opción Crear aplicación servidor para crear las partes servidor y cliente correspondientes para la plataforma actual y (opcionalmente) incluir los archivos de actualización automática,
- sin seleccionar la opción de Crear aplicación servidor, generalmente para construir el archivo de actualización que se seleccionará de la plataforma "concurrente" al crear la parte del servidor.
Ubicación de 4D Volume Desktop
Designa la ubicación en su disco de la aplicación 4D Volume Desktop que se utilizará para construir la parte cliente de su aplicación.
El número de versión de 4D Volume Desktop debe coincidir con el número de versión de 4D Developer Edition. Por ejemplo, si utiliza 4D 20, debe seleccionar un 4D Volume Desktop 20.
El 4D Volume Desktop debe corresponder a la plataforma actual (que será también la plataforma de la aplicación cliente). Si desea generar una aplicación cliente para la plataforma "concurrente", debe realizar una operación adicional utilizando una aplicación 4D que se ejecute en dicha plataforma.
Si desea que la aplicación cliente se conecte al servidor utilizando una dirección específica (distinta del nombre del servidor publicado en la subred), debe utilizar la llave XML IPAddress en el archivo buildapp.4DSettings. También puede implementar mecanismos específicos en caso de fallo de la conexión. También puede implementar mecanismos específicos en caso de fallo de la conexión. Para obtener más información sobre este archivo, consulte la descripción del comando BUILD APPLICATION.
Copia de las aplicaciones clientes en la aplicación servidor
Las opciones de esta área configuran el mecanismo para actualizar la(s) parte(s) cliente de sus aplicaciones cliente/servidor utilizando la red cada vez que se genera una nueva versión de la aplicación. Estas opciones sólo se activan cuando la opción Crear aplicación cliente está marcada.
- Permitir la actualización automática de la aplicación cliente Windows - Marque esta opción para construir un archivo
.4darchiveque puede ser enviado a sus aplicaciones cliente en la plataforma Windows en caso de actualización. - Permitir la actualización automática de la aplicación cliente Macintosh - Marque esta opción para construir un archivo
.4darchiveque puede ser enviado a sus aplicaciones cliente en la plataforma Macintosh en caso de actualización.
El archivo .4darchive se copia en la siguiente ubicación:
<ApplicationName>_Build/Client Server executable/Upgrade4DClient/
Seleccionar el archivo cliente para la plataforma concurrente
Puede marcar la opción Permitir la actualización automática... para las aplicaciones clientes ejecutadas en la plataforma concurrente. Esta opción sólo se activa si:
- la opción Crear aplicación servidor está marcada,
- la opción Permitir la actualización automática... para las aplicaciones clientes ejecutadas en la plataforma actual está marcada.
Esta funcionalidad requiere que haga clic en el botón [...] y designe la ubicación en su disco del archivo que se utilizará para la actualización. El archivo a seleccionar depende de la plataforma actual del servidor:
| Plataforma del servidor actual | Archivo requerido | Detalles |
|---|---|---|
| macOS | Windows 4D Volume Desktop o Windows client update archive | Por defecto, puede seleccionar la aplicación 4D Volume Desktop para Windows. Sin embargo, se recomienda seleccionar un archivo .4darchive creado previamente en Windows para garantizar una gestión adecuada de los iconos y conservar el archivo .exe firmado tras las actualizaciones. Para ello, presione Mayús mientras hace clic en [...] |
| Windows | macOS client update archive | Seleccione un archivo .4darchive firmado previamente creado en macOS |
Puede crear un archivo .4darchive específico en la plataforma concurrente seleccionando únicamente la opción Crear aplicación cliente y la opción apropiada Permitir actualización automática....
Visualización de la notificación de actualización
La notificación de actualización de la aplicación cliente se realiza automáticamente tras la actualización de la aplicación servidor.
Funciona de la siguiente manera: cuando se genera una nueva versión de la aplicación cliente/servidor utilizando el generador de aplicaciones, la nueva parte cliente se copia como un archivo comprimido en la subcarpeta Upgrade4DClient de la carpeta ApplicationName Server (en macOS, estas carpetas se incluyen en el paquete servidor). Si ha seguido el proceso de generación de una aplicación cliente multiplataforma, un archivo de actualización .4darchive está disponible para cada plataforma:
Para activar las notificaciones de actualización de la aplicación cliente, basta con sustituir la versión antigua de la aplicación servidor por la nueva y ejecutarla. El resto del proceso es automático.
Del lado del cliente, cuando la aplicación cliente "antigua" intenta conectarse a la aplicación servidor actualizada, se muestra una caja de diálogo en la máquina cliente, indicando que hay nueva versión disponible. El usuario puede actualizar su versión o cancelar la caja de diálogo.
- Si el usuario hace clic en OK, la nueva versión se descarga en el equipo cliente a través de la red. Una vez finalizada la descarga, se cierra la aplicación cliente antigua y se lanza la nueva versión, que se conecta al servidor. Una vez finalizada la descarga, se cierra la aplicación cliente antigua y se lanza la nueva versión, que se conecta al servidor.
- Si el usuario hace clic en Cancelar, la actualización se cancela; si la versión antigua de la aplicación cliente no está en el rango de versiones aceptadas por el servidor (consulte el siguiente párrafo), la aplicación se cierra y la conexión es impos En caso contrario (por defecto), se establece la conexión. En caso contrario (por defecto), se establece la conexión.
Forzar las actualizaciones automáticas
En algunos casos, es posible que desee evitar que las aplicaciones cliente puedan cancelar la descarga de la actualización. Por ejemplo, si ha utilizado una nueva versión de la aplicación fuente de 4D Server, la nueva versión de la aplicación cliente debe estar instalada en cada máquina cliente.
Para forzar la actualización, basta con excluir el número de versión actual de las aplicaciones cliente (X-1 y anteriores) en el rango de número de versión compatible con la aplicación servidor. En este caso, el mecanismo de actualización no permitirá que las aplicaciones cliente no actualizadas se conecten. En este caso, el mecanismo de actualización no permitirá que las aplicaciones cliente no actualizadas se conecten.
El número de versión actual se define en la página Cliente/Servidor del generador de la aplicación. Los intervalos de los números autorizados se definen en el proyecto de la aplicación vía las llaves XML específicas.
En caso de error
Si 4D no puede llevar a cabo la actualización de la aplicación cliente, la máquina cliente muestra el siguiente mensaje de error: La aplicación va a cerrar ahora."
Hay muchas causas posibles para este error. Cuando reciba este mensaje, es aconsejable que compruebe primero los siguientes parámetros:
- Nombres de ruta: compruebe la validez de los nombres de ruta definidos en el proyecto de la aplicación a través del diálogo del Generador de aplicaciones o mediante las llaves XML (por ejemplo, ClientMacFolderToWin). Más concretamente, compruebe los nombres de ruta de las versiones de 4D Volume Desktop.
- Privilegios lectura/escritura: en la máquina cliente, compruebe que el usuario actual tiene derechos de acceso de escritura para la actualización de la aplicación cliente.
Archivos generados
Una vez creada la aplicación cliente/servidor, encontrará una nueva carpeta en la carpeta de destino llamada Client Server executable. Esta carpeta contiene dos subcarpetas, <ApplicationName>Client y <ApplicationName>Server.
Estas carpetas no se generan si ocurre un error. En este caso, abra el archivo de historial para conocer la causa del error.
La carpeta <ApplicationName>Client contiene la parte cliente de la aplicación correspondiente a la plataforma de ejecución del generador de aplicaciones. Esta carpeta debe instalarse en cada máquina cliente. La carpeta <ApplicationName>Server contiene la parte del servidor de la aplicación.
El contenido de estas carpetas varía en función de la plataforma actual:
- Windows - Cada carpeta contiene el archivo ejecutable de la aplicación, denominado
<ApplicationName>Client.exepara la parte cliente y<ApplicationName>Server.exepara la parte servidor, así como los archivos .rsr correspondientes. Las carpetas también contienen varios archivos y carpetas necesarios para que las aplicaciones funcionen y elementos personalizados que pueden estar en las carpetas originales de 4D Volume Desktop y 4D Server. - macOS - Cada carpeta contiene únicamente el paquete de la aplicación, denominado
<ApplicationName>Clientpara la parte cliente y<ApplicationName>Serverpara la parte servidor. Cada paquete contiene todos los elementos necesarios para que la aplicación funcione. En macOS, un paquete se lanza haciendo doble clic en él.
Los paquetes macOS generados contienen los mismos elementos que las subcarpetas Windows. Puede visualizar su contenido (Control+clic en el icono) para poder modificarlo.
Si ha marcado la opción "Permitir la actualización automática de la aplicación cliente", se añade una subcarpeta adicional llamada Upgrade4DClient en la carpeta/paquete <ApplicationName>Server. Esta subcarpeta contiene la aplicación cliente en formato macOS y/o Windows como archivo comprimido. Esta subcarpeta contiene la aplicación cliente en formato macOS y/o Windows como archivo comprimido.
Ubicación de los archivos web
Si la parte servidor y/o la del cliente de su aplicación ejecutable se utiliza como servidor web, los archivos y carpetas requeridos por el servidor deben instalarse en ubicaciones específicas. Estos elementos son los siguientes:
- archivos cert.pem y key.pem (opcional): etos archivos se utilizan para las conexiones TLS y por los comandos de encriptación de datos,
- Carpeta raíz web por defecto (WebFolder).
Los elementos deben ser instalados:
-
en Windows
- Aplicación del servidor - en la subcarpeta
Client Server executable/<ApplicationName>Server/Server Database. - Aplicación cliente - en la subcarpeta
Client Server executable/<ApplicationName>Client.
- Aplicación del servidor - en la subcarpeta
-
en macOS
- Aplicación del servidor - junto al paquete de software
<ApplicationName>Server. - Aplicación cliente - junto al paquete de software
<ApplicationName>Cliente.
- Aplicación del servidor - junto al paquete de software
Integrar una aplicación cliente monopuesto
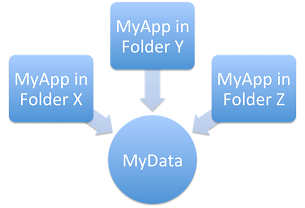
4D permite integrar una estructura compilada en la aplicación Cliente. Esta funcionalidad puede utilizarse, por ejemplo, para ofrecer a los usuarios una aplicación "portal", que da acceso a diferentes aplicaciones del servidor gracias al comando OPEN DATABASE que ejecuta un archivo .4dlink.
Para activar esta funcionalidad, añada las llaves DatabaseToEmbedInClientWinFolder y/o DatabaseToEmbedInClientMacFolder en el archivo de configuración buildApp. Cuando una de estas llaves está presente, el proceso de generación de la aplicación cliente genera una aplicación monopuesto: la estructura compilada, en lugar del archivo EnginedServer.4Dlink, se coloca en la carpeta "Database".
- Si existe una carpeta de datos por defecto en la aplicación monopuesto, se integra una licencia.
- Si no existe una carpeta de datos por defecto en la aplicación monopuesto, ésta se ejecutará sin archivo de datos y sin licencia.
El escenario básico es:
- En la caja de diálogo del Generador de aplicaciones, seleccione la opción "Generar una estructura compilada" para producir un .4DZ o un .4DC para utilizar la aplicación en modo monopuesto.
- En el archivo buildApp.4DSettings de la aplicación cliente-servidor, utilice la(s) siguiente(s) llave(s) xml para indicar la ruta de la carpeta que contiene la aplicación compilada monopuesto:
DatabaseToEmbedInClientWinFolderDatabaseToEmbedInClientMacFolder
- Genere la aplicación cliente-servidor. Esto tendrá los siguientes efectos:
- la carpeta de la aplicación monopuesto se copia completa dentro de la carpeta "Database" del cliente fusionado
- el archivo EnginedServer.4Dlink de la carpeta "Database" no se genera
- los archivos .4DC, .4DZ, .4DIndy de la copia de la aplicación monopuesto se renombran utilizando el nombre del cliente fusionado
- la llave
PublishNameno se copia en el info.plist del cliente fusionado - si la aplicación monopuesto no tiene una carpeta "Data" por defecto, el cliente fusionado se ejecutará sin datos.
Actualización automática de funciones del servidor 4D número de (versión actual, comando SET UPDATE FOLDER...) trabaja con una aplicación de un solo usuario como con una aplicación remota estándar. Al conectarse, la aplicación monopuesto compara su llave CurrentVers con el rango de versión 4D Server. Si está fuera del rango, la aplicación cliente actualizada se descarga del servidor y el Updater lanza el proceso de actualización local.
Personalizar nombres de carpeta de caché cliente y/o servidor
Las carpetas de caché cliente y servidor se utilizan para almacenar elementos compartidos, como recursos o componentes. Son necesarios para gestionar los intercambios entre el servidor y los clientes remotos. Las aplicaciones cliente/servidor utilizan las rutas de acceso por defecto para las carpetas de caché sistema del cliente y servidor.
En algunos casos específicos, puede ser necesario personalizar los nombres de estas carpetas para implementar arquitecturas específicas (ver abajo). 4D le ofrece las llaves ClientServerSystemFolderName y ServerStructureFolderName a definir en el archivo de parámetros buildApp.
Carpeta de caché cliente
La personalización del nombre de la carpeta de caché del lado del cliente puede ser útil cuando su aplicación cliente se utiliza para conectarse a varios servidores fusionados que son similares pero utilizan diferentes conjuntos de datos. En este caso, para ahorrar múltiples descargas innecesarias de recursos locales idénticos, puede utilizar la misma carpeta de caché local personalizada.
- Configuración por defecto (para cada conexión a un servidor, una carpeta caché específica se descarga/actualiza):

- Utilizando la llave
ClientServerSystemFolderName(se utiliza una única carpeta de caché para todos los servidores):

Carpeta de caché del servidor
La personalización del nombre de la carpeta de caché del lado del servidor es útil cuando se ejecutan varias aplicaciones servidor idénticas creadas con diferentes versiones de 4D en el mismo ordenador. Si quiere que cada servidor utilice su propio conjunto de recursos, debe personalizar la carpeta de caché del servidor.
- Configuración por defecto (las mismas aplicaciones servidor comparten la misma carpeta de caché):

- Utilizando la llave
ServerStructureFolderName(se utiliza una carpeta de caché dedicada para cada aplicación servidor):

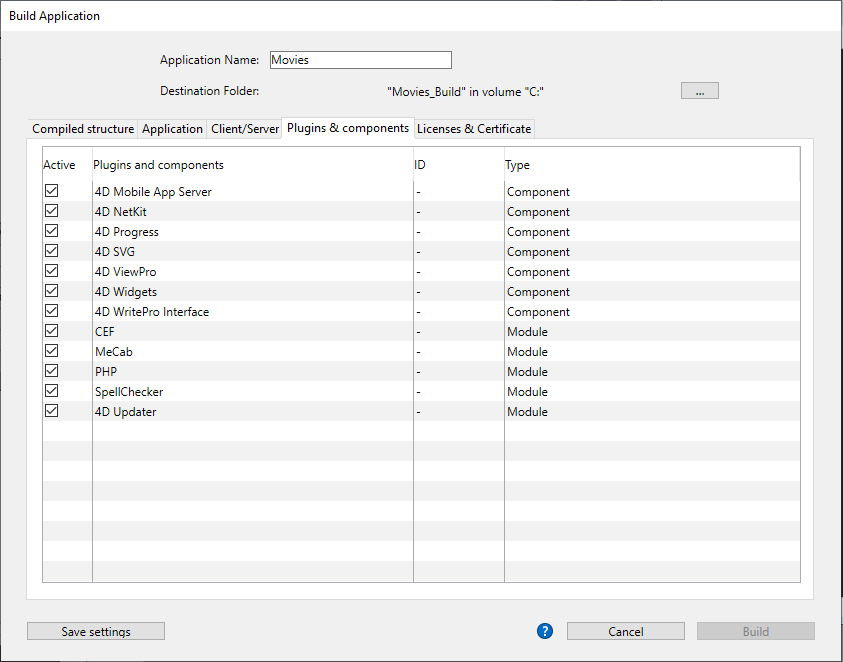
Página Plugins y componentes
En esta pestaña, configurara cada plug-in, componente y módulo que utilizará en su aplicación independiente o cliente/servidor.
La página lista los elementos cargados por la aplicación 4D actual:
-
La columna Activa indica los elementos que se integrarán en la aplicación generada. Todos los elementos están marcados por defecto. Para excluir un plug-in, un componente o un módulo, desmarque la casilla de selección situada junto a él.
-
columna Plugins y componentes - Muestra el nombre del plug-in/componente/módulo.
-
Columna ID - Muestra el número de identificación del elemento (si lo hay).
-
Columna Tipo - Indica el tipo de elemento: Plug-in, Componente o Módulo.
Añadiendo plug-ins o componentes
Si desea integrar otros plug-ins o componentes en la aplicación ejecutable, sólo tiene que colocarlos en una carpeta Plugins o Components junto a la aplicación 4D Volume Desktop o junto a la aplicación 4D Server. El mecanismo para copiar el contenido de la carpeta de la aplicación fuente (ver Personalizar la carpeta 4D Volume Desktop) puede utilizarse para integrar todo tipo de archivo en la aplicación ejecutable.
Si hay un conflicto entre dos versiones diferentes del mismo plug-in (una cargada por 4D y la otra ubicada en la carpeta de la aplicación fuente), la prioridad la tiene el plug-in instalado en la carpeta de 4D Volume Desktop/4D Server. Sin embargo, si hay dos instancias de un mismo componente, la aplicación no se abrirá.
El uso de plug-ins y/o componentes en una versión de despliegue puede requerir números de licencia.
Desmarcar módulos
Un módulo es una librería de código integrada que 4D utiliza para controlar funcionalidades específicas. Si sabe que su aplicación generada no utiliza ninguna de las funcionalidades cubiertas por un módulo, puede desmarcarlo en la lista para reducir el tamaño de los archivos de su aplicación.
Atención: deseleccionar un módulo podría impedir que su aplicación generada funcione como se espera. Si no está 100% seguro de que un módulo nunca será llamado por su aplicación, se recomienda mantenerlo seleccionado.
Los siguientes módulos opcionales pueden ser deseleccionados:
- CEF: Librería integrada Chromium. Es necesario ejecutar áreas Web que utilizan el motor de renderizado integrado y áreas 4D View Pro. La llamada a estas áreas cuando el CEF está deseleccionado mostrará áreas en blanco y/o generará errores.
- SpellChecker: se utiliza para las funciones integradas de corrección ortográfica y los comandos disponibles para las áreas de entrada y las áreas 4D Write Pro.
- 4D Updater: controla la actualización automática de las partes del cliente y es utilizado por el comando
SET UPDATE FOLDERpara actualizaciones automáticas del servidor. - 4D Qodly Pro y Data Explorer: incluye Qodly Studio y sus funciones de renderizado web, así como el Explorador de datos.
- Windows App Runtime: necesario para la renderización Fluent UI en Windows.
Página licencias y certificados
La página Licencias y certificados puede utilizarse para:
- configure las licencias de despliegue que quiere integrar en su aplicación monopuesto o cliente-servidor,
- firmar la aplicación mediante un certificado en macOS.

Licencias
Esta pestaña muestra el menú Tipo de aplicación, que le permite definir cómo desea gestionar las licencias en la aplicación creada. Las siguientes opciones están disponibles:

Aplicación sin licencia integrada
Seleccione esta opción para crear una aplicación sin licencia de despliegue incrustada.
En este caso, el usuario final tendrá que comprar e introducir una licencia 4D Desktop o 4D Server por usuario la primera vez que inicie la aplicación (cuando integra una licencia de despliegue, el usuario no tiene que introducir ni utilizar su propio número de licencia). Para más información, consulte la sección Licencias de despliegue.
Aplicación de evaluación
Seleccione esta opción para crear una versión de evaluación de su aplicación.
Una aplicación de evaluación permite al usuario final ejecutar una versión completa de su aplicación autónoma o de servidor en su máquina durante un periodo de tiempo limitado, a partir del primer lanzamiento. Al final del periodo de evaluación, la aplicación ya no podrá utilizarse durante un determinado periodo de tiempo en la misma máquina.
Se requiere una conexión a Internet en la máquina del usuario en el primer lanzamiento de la aplicación de evaluación.
- El comando
License infopermite conocer el tipo de licencia de la aplicación (colección .attributes) y su fecha de caducidad (objeto .expirationDate). - La llave xml BuildApplication
EvaluationModepermite gestionar las versiones de evaluación. - El comando
CHANGE LICENSESno hace nada cuando se llama desde una versión de evaluación.
Aplicación que incorpora automáticamente las licencias disponibles
Seleccione esta opción para crear una aplicación lista para usar (autónoma o cliente-servidor), incrustando automáticamente las licencias de despliegue disponibles.
Al crear la aplicación, 4D integrará automáticamente la(s) licencia(s) necesaria(s) que se encuentra(n) en la Carpeta de licencias de la máquina. Si hay varias licencias válidas disponibles, 4D utilizará la más apropiada, en el siguiente orden:
- licencias OEM, o
- licencias 4D Desktop Business, o
- otras licencias.
La pestaña de licencias muestra la lista de licencias utilizadas automáticamente para la compilación. La lista no puede modificarse.
Una vez iniciada la compilación, si no se encuentra una licencia válida, se genera un error. De lo contrario, se muestra un cuadro de diálogo para enumerar la(s) aplicación(es) generada(s). La información detallada también se proporciona en el Archivo de registro.
Una vez creada una aplicación licenciada, se incluye automáticamente un nuevo archivo de licencia de despliegue en la carpeta Licencias junto a la aplicación ejecutable (Windows) o en el paquete (macOS).
Aplicación que integra las licencias de la siguiente lista
Seleccione esta opción para crear una aplicación lista para usar (independiente o cliente-servidor), incrustando las licencias de despliegue necesarias que usted designe específicamente.
Al seleccionar esta opción, se muestra una lista de licencias en la pestaña. Debe designar los archivos que contienen sus licencias. Estos archivos se generaron o actualizaron al adquirir la licencia 4D Developer Professional y las licencias de despliegue. Su licencia actual 4D Developer Professional se asocia automáticamente a cada licencia de despliegue que se vaya a utilizar en la aplicación creada. Puede añadir otro número 4D Developer Professional y sus licencias asociadas.
Para eliminar o añadir una licencia, utilice los botones [+] y [-] de la parte inferior de la ventana. Al hacer clic en el botón \N-[+], aparece una caja de diálogo para abrir archivos que muestra por defecto el contenido de la carpeta Licencias de su máquina. Para obtener más información sobre la ubicación de esta carpeta, consulte el comando Get 4D folder.
Una vez seleccionado un archivo, la lista indicará las características de la licencia que contiene.
- Licencia # - número de licencia del producto
- Licencia - Nombre del producto
- Fecha de vencimiento: fecha de vencimiento de la licencia (si la hay)
- Ruta de acceso - Ubicación en el disco
Si una licencia no es válida, un mensaje le avisará.
Puede designar tantos archivos válidos como desee. Al generar una aplicación ejecutable, 4D utilizará la licencia más apropiada disponible.
Se necesitan licencias "R" dedicadas para generar aplicaciones basadas en las versiones "R-release" (los números de licencia de los productos "R" empiezan por "R-4DDP").
Una vez creada una aplicación licenciada, se incluye automáticamente un nuevo archivo de licencia de despliegue en la carpeta Licencias junto a la aplicación ejecutable (Windows) o en el paquete (macOS).
certificado de firma macOS
El generador de aplicaciones puede firmar aplicaciones 4D fusionadas bajo macOS (aplicaciones monopuesto, componentes, 4D Server y partes cliente bajo macOS). La firma de una aplicación autoriza su ejecución por la funcionalidad Gatekeeper de macOS cuando se selecciona la opción "Mac App Store y desarrolladores identificados" (ver "Acerca de Gatekeeper" más adelante).
- Marque la opción Firmar la aplicación para incluir la certificación en el procedimiento de generación de aplicaciones para macOS. 4D comprobará la disponibilidad de los elementos necesarios para la certificación cuando se produzca la generación:

Esta opción aparece tanto en Windows como en macOS, pero sólo se tiene en cuenta en las versiones de macOS.
- Nombre del certificado: introduzca en esta área el nombre de su certificado desarrollador validado por Apple. El nombre del certificado suele ser el nombre del certificado en el utilitario Keychain Access (la parte en rojo en el siguiente ejemplo):
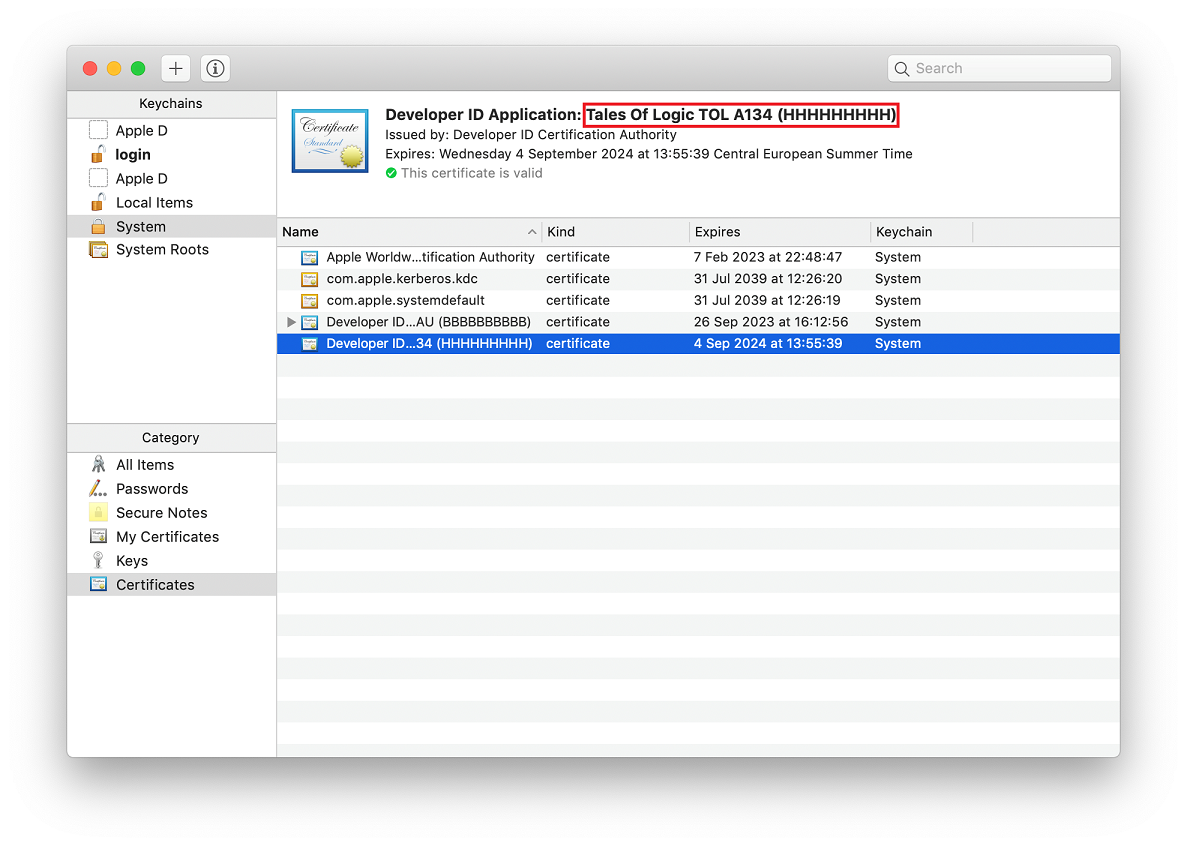
Para obtener un certificado de desarrollador de Apple, Inc., puede utilizar los comandos del menú de acceso al llavero o ir aquí: http://developer.apple.com/library/mac/#documentation/Security/Conceptual/CodeSigningGuide/Procedures/Procedures.html.
Este certificado requiere la presencia del utilitario codesign de Apple, que se ofrece por defecto y suele estar ubicado en la carpeta "/usr/bin/". Si se produce un error, asegúrese de que este utilitario esté presente en su disco.
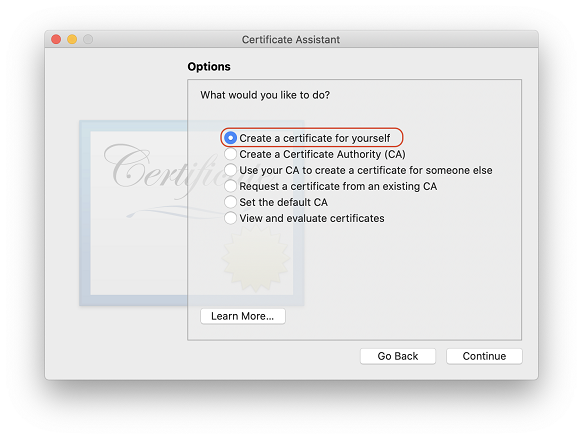
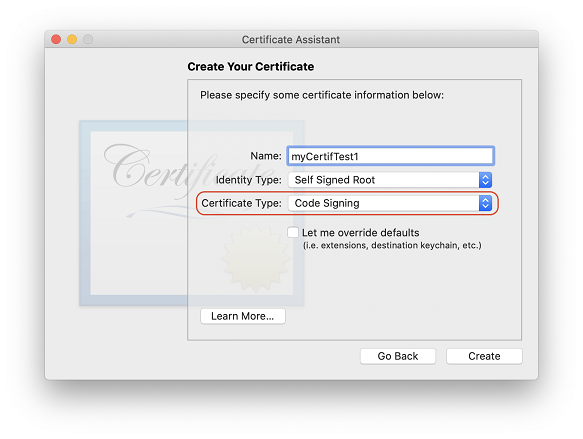
- Generar un certificado autofirmado - ejecuta el "Asistente de Certificados" que permite generar un certificado autofirmado. Si no tiene un certificado de desarrollador Apple, debe suministrar un certificado autofirmado. Con este certificado, no se muestra ningún mensaje de alerta si la aplicación se despliega internamente. Si la aplicación se despliega externamente (es decir, a través de http o correo electrónico), al iniciarse macOS muestra un mensaje de alerta que indica que el desarrollador de la aplicación no está identificado. El usuario puede "forzar" la apertura de la aplicación. En el "Asistente de Certificados", asegúrese de seleccionar las opciones apropiadas:
4D recomienda suscribirse al Programa Apple Developer Program para tener acceso a los Certificados de Desarrollador que son necesarios para notarizar las aplicaciones (ver más abajo).
Sobre Gatekeeper
Gatekeeper es una función de seguridad macOS que controla la ejecución de las aplicaciones descargadas de Internet. Si una aplicación descargada no procede del Apple Store o no está firmada, se rechaza y no se puede ser lanzada.
En las máquinas Apple Silicon, los componentes4D deben ser firmados. Un componente sin firmar generará un error al iniciar la aplicación ("lib4d-arm64.dylib no se puede abrir...").
La opción Firmar la aplicación del Generador de aplicaciones de 4D le permite generar aplicaciones y componentes compatibles con esta opción por defecto.
Sobre la notarización
La notarización de las aplicaciones es muy recomendada por Apple a partir de macOS 10.14.5 (Mojave) y 10.15 (Catalina), ya que las aplicaciones no notarizadas que se despliegan a través de internet se bloquean por defecto.
La notarización en sí debe ser realizada por el desarrollador y es independiente de 4D (tenga en cuenta también que requiere la instalación de Xcode). La notarización en sí debe ser realizada por el desarrollador y es independiente de 4D (tenga en cuenta también que requiere la instalación de Xcode). The 4D built-in signing features have been adapted to meet all of Apple's requirements to allow using the Apple notary service.
Para más información sobre el concepto de notarización, consulte esta página en el sitio web para desarrolladores de Apple.
Para más información sobre el concepto de grapado, lea este mensaje del foro de Apple.
Personalizar los iconos de una aplicación
4D asocia un icono por defecto a las aplicaciones ejecutables (monopuestos y cliente-servidor). Sin embargo puede personalizar el icono para cada aplicación.
- macOs - cuando se crea una aplicación con doble clic, 4D se encarga de la personalización del icono. Para ello, debe crear un archivo de iconos (tipo icns), antes de crear el archivo de la aplicación, y colocarlo junto a la carpeta del proyecto.
Apple, Inc. ofrece una herramienta específica para crear archivos de iconos icns (para obtener más información, consulte la documentación de Apple).
Su archivo de iconos debe tener el mismo nombre que el archivo del proyecto e incluir la extensión .icns. 4D tiene en cuenta automáticamente este archivo cuando genera la aplicación de doble clic (el archivo .icns es renombrado NomApplication.icns y copiado en la carpeta Resources; la entrada CFBundleFileIcon del archivo info.plist es actualizada).
- Windows - Cuando se crea una aplicación con doble clic, 4D se encarga de la personalización de su icono. Para ello, debe crear un archivo de iconos (extensión .ico), antes de crear el archivo de la aplicación, y colocarlo junto a la carpeta del proyecto.
Su archivo de iconos debe tener el mismo nombre que el archivo del proyecto e incluir la extensión .ico. 4D tiene en cuenta automáticamente este archivo cuando genera la aplicación de doble clic.
También puede definir las llaves XML específicas en el archivo buildApp.4DSettings para designar cada icono a utilizar. Están disponibles las siguientes llaves:
- RuntimeVLIconWinPath
- RuntimeVLIconMacPath
- ServerIconWinPath
- ServerIconMacPath
- ClientMacIconForMacPath
- ClientWinIconForMacPath
- ClientMacIconForWinPath
- ClientWinIconForWinPath
Gestión de archivos de datos
Apertura del archivo de datos
Cuando un usuario lanza una aplicación fusionada o una actualización (aplicaciones monopuesto o cliente/servidor), 4D intenta seleccionar un archivo de datos válido. Varias ubicaciones son examinadas sucesivamente por la aplicación.
La secuencia de lanzamiento de una aplicación fusionada es:
- 4D intenta abrir el último archivo de datos abierto, como se describe a continuación (no aplicable durante el lanzamiento inicial).
- Si no se encuentra, 4D intenta abrir el archivo de datos en una carpeta de datos por defecto junto al archivo .4DZ en modo de sólo lectura.
- Si no se encuentra, 4D intenta abrir el archivo de datos estándar por defecto (mismo nombre y misma ubicación que el archivo .4DZ).
- Si no se encuentra, 4D muestra una caja de diálogo estándar "Abrir archivo de datos".
Último archivo de datos abierto
Ruta del último archivo de datos
Toda aplicación autónoma o servidor generada con 4D almacena la ruta de acceso del último archivo de datos abierto en la carpeta de preferencias del usuario de la aplicación.
La ubicación de la carpeta de preferencias del usuario de la aplicación corresponde a la ruta devuelta por la instrucción siguiente:
userPrefs:=Get 4D folder(Carpeta 4D activa)
La ruta del archivo de datos se almacena en un archivo dedicado, llamado lastDataPath.xml.
Gracias a esta arquitectura, cuando usted ofrece una actualización de su aplicación, el archivo de datos del usuario local (último archivo de datos utilizado) se abre automáticamente en el primer lanzamiento.
Este mecanismo suele ser adecuado para los despliegues estándar. Sin embargo, para necesidades específicas, por ejemplo, si duplica sus aplicaciones fusionadas, es posible que desee cambiar la forma en que el archivo de datos está vinculado a la aplicación (se describe a continuación).
Configurar el modo de enlace de los datos
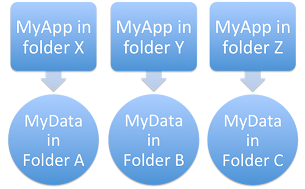
Con sus aplicaciones compiladas, 4D utiliza automáticamente el último archivo de datos abierto. Por defecto, la ruta del archivo de datos se almacena en la carpeta de preferencias del usuario de la aplicación y está vinculada al nombre de la aplicación.
Esto puede ser inadecuado si se quiere duplicar una aplicación fusionada destinada a utilizar diferentes archivos de datos. Las aplicaciones duplicadas en realidad comparten la carpeta de preferencias del usuario de la aplicación y, por lo tanto, siempre utilizan el mismo archivo de datos - incluso si el archivo de datos se cambia de nombre, porque se abre el último archivo utilizado para la aplicación.
Por lo tanto, 4D le permite vincular la ruta del archivo de datos a la ruta de la aplicación. En este caso, el archivo de datos se relacionará con una ruta específica y no será simplemente el último archivo abierto. Por lo tanto, 4D le permite vincular la ruta del archivo de datos a la ruta de la aplicación.
Este modo le permite duplicar sus aplicaciones fusionadas sin romper el vínculo con el archivo de datos. Sin embargo, con esta opción, si el paquete de la aplicación se mueve en el disco, se pedirá al usuario un archivo de datos, ya que la ruta de la aplicación ya no coincidirá con el atributo "executablePath" (después de que el usuario haya seleccionado un archivo de datos, el archivo lastDataPath.xml se actualiza en consecuencia).
Duplicación cuando los datos están vinculados por nombre de la aplicación:
Duplicación cuando los datos están vinculados por ruta de la aplicación:
Puede seleccionar el modo de vinculación de datos durante el proceso de generación de la aplicación. Puede:
- Utilice la página Aplicación o la Página cliente/servidor de la caja de diálogo del Generador de aplicaciones.
- Utilice la llave XML LastDataPathLookup (aplicación monopuesto o aplicación servidor).
Definir una carpeta de datos por defecto
4D le permite definir un archivo de datos por defecto en la fase de construcción de la aplicación. Cuando la aplicación se lanza por primera vez, si no se encuentra ningún archivo de datos local (ver [secuencia de lanzamiento descrita anteriormente](#opening-the-data-file)), el archivo de datos por defecto se abre automáticamente y de forma silenciosa en modo de sólo lectura por 4D. Cuando la aplicación se lanza por primera vez, si no se encuentra ningún archivo de datos local (ver [secuencia de lanzamiento descrita anteriormente](#opening-the-data-file)), el archivo de datos por defecto se abre automáticamente y de forma silenciosa en modo de sólo lectura por 4D.
Más específicamente, se cubren los siguientes casos:
- Evitar la visualización de la caja de diálogo "Abrir archivo de datos" de 4D al lanzar una nueva aplicación fusionada o actualizada. Puede detectar, por ejemplo al inicio, que se ha abierto el archivo de datos por defecto y así ejecutar su propio código y/o diálogos para crear o seleccionar un archivo de datos local.
- Permitir la distribución de aplicaciones fusionadas con datos de sólo lectura (para aplicaciones de demostración, por ejemplo).
Para definir y utilizar un archivo de datos por defecto:
- Debe suministrar un archivo de datos por defecto (llamado "Default.4DD") y almacenarlo en una carpeta específica por defecto (llamada "Default Data") dentro de la carpeta del proyecto de la aplicación. Este archivo debe suministrarse junto con todos los demás archivos necesarios, dependiendo de la configuración del proyecto: índice (.4DIndx), blobs externos, journal, etc. Es su responsabilidad proveer un archivo de datos válido por defecto. Es su responsabilidad proveer un archivo de datos válido por defecto.
- Cuando se genera la aplicación, la carpeta de datos por defecto se integra en la aplicación fusionada. Todos los archivos dentro de esta carpeta por defecto también están anidados.
El siguiente gráfico ilustra esta funcionalidad:

Cuando se detecta el archivo de datos por defecto en el primer lanzamiento, se abre silenciosamente en modo de sólo lectura, lo que le permite ejecutar toda operación personalizada que no modifique el archivo de datos en sí.
Gestión de la conexión(es) de las aplicaciones clientes
La gestión de las conexiones de las aplicaciones clientes abarca los mecanismos por los que una aplicación cliente fusionada se conecta al servidor objetivo, una vez que está en su entorno de producción.
Escenario de conexión
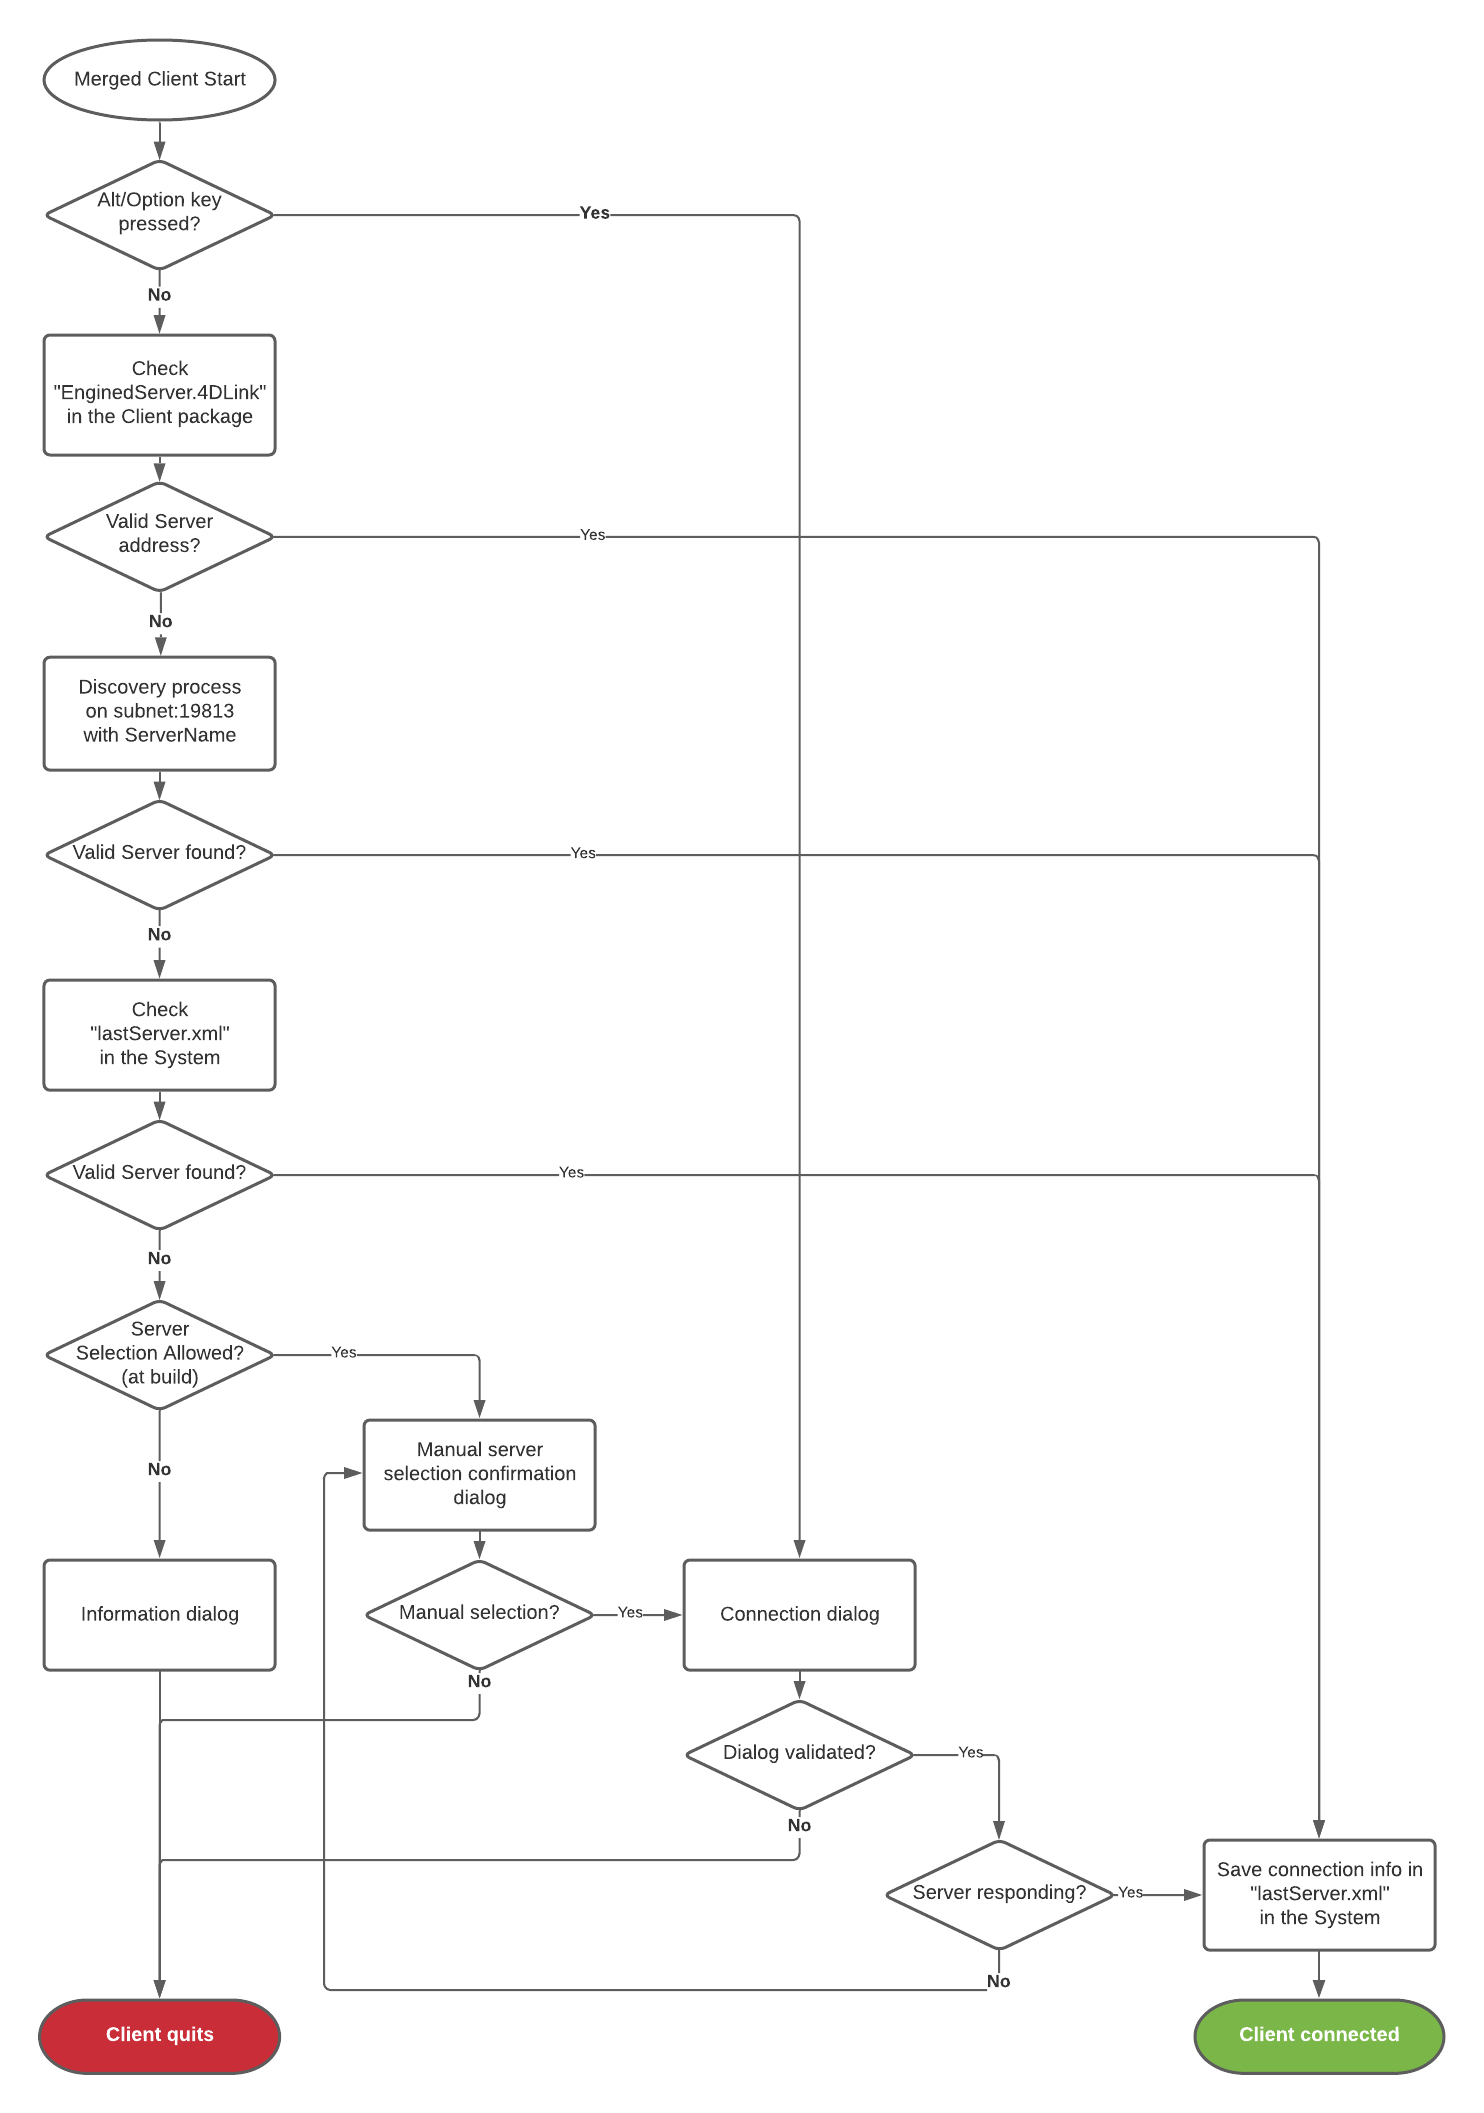
El procedimiento de conexión para las aplicaciones cliente fusionadas admite los casos en los que el servidor dedicado no está disponible. El escenario de inicio de una aplicación cliente 4D es el siguiente:
-
Si la información de conexión válida se encuentra almacenada en el archivo "EnginedServer.4DLink" dentro de la aplicación cliente, la aplicación cliente se conecta a la dirección del servidor especificada.
O
La aplicación cliente intenta conectarse al servidor utilizando el servicio de descubrimiento (basado en el nombre del servidor, transmitido en la misma subred).
O
La aplicación cliente intenta conectarse al servidor utilizando el servicio de descubrimiento (basado en el nombre del servidor, transmitido en la misma subred).
O
La aplicación cliente intenta conectarse al servidor utilizando el servicio de descubrimiento (basado en el nombre del servidor, transmitido en la misma subred). -
Si esto falla, la aplicación cliente intenta conectarse al servidor utilizando la información almacenada en la carpeta de preferencias del usuario de la aplicación (archivo "lastServer.xml", ver último paso).
-
Si esto falla, la aplicación cliente muestra una caja de diálogo de error de conexión.
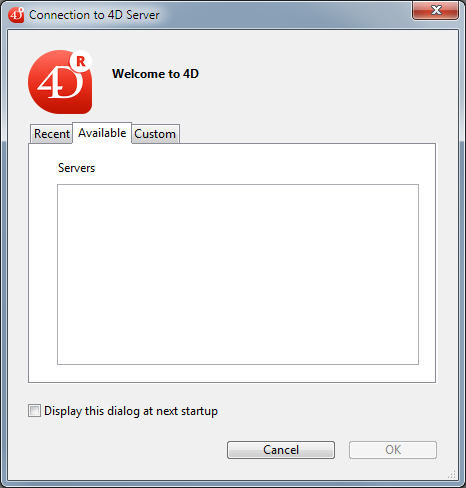
- Si el usuario hace clic en el botón Seleccionar... (cuando lo permite el desarrollador 4D al momento de la generación, ver más abajo), se muestra la caja de diálogo estándar "Conexión al servidor".
- Si el usuario hace clic en el botón Salir, la aplicación cliente se cierra.
- Si la conexión tiene éxito, la aplicación cliente guarda esta información de conexión en la carpeta de preferencias usuario de la aplicación para su uso futuro.
Todo el procedimiento se describe en el siguiente diagrama:
Almacenando la última ruta del servidor
La última ruta servidor utilizada y validada se guarda automáticamente en un archivo llamado "lastServer.xml" en la carpeta de preferencias usuario de la aplicación. Esta carpeta se guarda en la siguiente ubicación:
userPrefs:=Get 4D folder(Carpeta 4D activa)
Este mecanismo aborda el caso en el que el servidor objetivo primario esté disponible temporalmente por alguna razón (modo mantenimiento, por ejemplo). Cuando se produce este caso por primera vez, se muestra la caja de diálogo de selección de servidor (si está permitido, ver más adelante) y el usuario puede seleccionar manualmente un servidor alternativo, cuya ruta se guarda si la conexión tiene éxito. Toda indisponibilidad posterior se gestionaría automáticamente a través de la información de la ruta "lastServer.xml".
- Cuando las aplicaciones cliente no pueden beneficiarse permanentemente del servicio de descubrimiento, por ejemplo debido a la configuración de la red, se recomienda que el desarrollador indique un nombre de host en el momento de la generación utilizando la llave IPAddress en el archivo "BuildApp.4DSettings". El mecanismo aborda los casos de indisponibilidad temporal.
- Presionar la tecla Alt/Opción al inicio para mostrar la caja de diálogo de selección del servidor sigue siendo soportado en todos los casos.
Disponibilidad de la caja de diálogo de selección del servidor en caso de error
Puede elegir si mostrar o no la caja de diálogo estándar de selección de servidor en las aplicaciones cliente fusionadas cuando no se puede acceder al servidor. La configuración depende del valor de la ServerSelectionAllowed La llave XML en la máquina donde se generó la aplicación:
-
Visualización de un mensaje de error sin poder acceder a la caja de diálogo de selección del servidor. Funcionamiento por defecto. La aplicación solo puede cerrarse.
ServerSelectionAllowed: False o llave omitida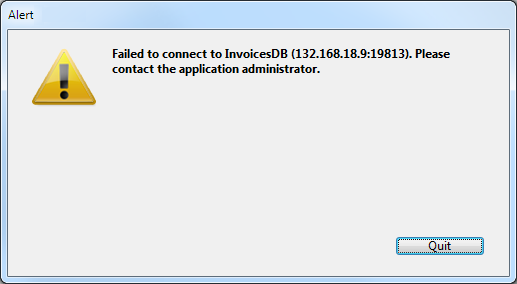
-
Visualización de un mensaje de error con acceso posible a la caja de diálogo de selección del servidor. El usuario puede acceder a la ventana de selección del servidor haciendo clic en el botón Seleccionar....
ServerSelectionAllowed: True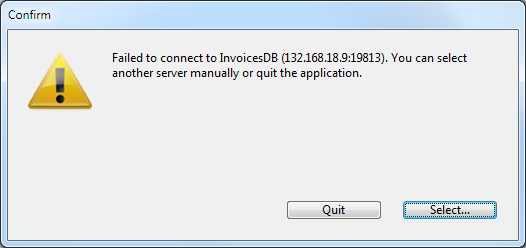
Actualización automática de aplicaciones servidor o monopuesto
En principio, la actualización de las aplicaciones servidor o de las aplicaciones monopuesto fusionadas requiere la intervención del usuario (o la programación de rutinas de sistema personalizadas): cada vez que esté disponible una nueva versión de la aplicación fusionada, hay que salir de la aplicación en producción y sustituir manualmente los archivos antiguos por los nuevos; a continuación, reiniciar la aplicación y seleccionar el archivo de datos actual.
Puede automatizar este procedimiento en gran medida utilizando los siguientes comandos del lenguaje: SET UPDATE FOLDER, RESTART 4D, y también Last update log path para operaciones de monitoreo. La idea es implementar una función en su aplicación 4D que active la secuencia de actualización automática descrita a continuación. Puede ser un comando de menú o un proceso que se ejecuta en segundo plano y comprueba a intervalos regulares la presencia de un archivo en un servidor.
También dispone de llaves XML para elevar los privilegios de instalación y poder utilizar archivos protegidos en Windows (consulte el manual 4D XML Keys BuildApplication).
Este es el escenario para actualizar un servidor o una aplicación unipersonal fusionada:
- Se transfiere, por ejemplo utilizando un servidor HTTP, la nueva versión de la aplicación servidor o la aplicación monopuesto fusionada a la máquina en producción.
- En la aplicación en producción, se llama al comando
SET UPDATE FOLDER: este comando designa la ubicación de la carpeta donde se encuentra la actualización "pendiente" de la aplicación actual. Opcionalmente, puede copiar en esta carpeta los elementos personalizados de la versión en producción (archivos usuario). - En la aplicación en producción, llame al comando
RESTART 4D: este comando desencadena automáticamente la ejecución de un programa utilitario llamado "updater" que sale de la aplicación actual, la reemplaza utilizando la actualización "pendiente" si se especifica una y reinicia la aplicación con el archivo de datos actual. La versión anterior ha sido renombrada.
Esta secuencia es compatible con las aplicaciones servidor de Windows que se ejecutan como servicio.
Historial de actualización
El procedimiento de instalación genera un archivo de registro en el que se detallan las operaciones de actualización de las aplicaciones fusionadas (cliente, servidor o monopuesto) en los equipos de destino. Este archivo es útil para analizar cualquier error que se produzca durante el proceso de instalación.
El historial de actualización se denomina YYYY-MM-DD_HH-MM-SS_log_X.txt, por ejemplo, 2021-08-25_14-23-00_log_1.txt para un archivo creado el 25 de agosto de 2021 a las 14:23.
Este archivo se crea en la carpeta de la aplicación "Updater", dentro de la carpeta de usuario del sistema. Puede encontrar la ubicación de este archivo en cualquier momento utilizando el comando Last update log path.