Qodly Studio for 4D
Qodly Studio est un constructeur d'interface pour des applications web. It provides developers with a graphical page editor to design applications running in web browsers or smartphones. Il prend en charge nativement les objets ORDA.
Vous pouvez utiliser Qodly Studio directement depuis votre environnement 4D pour construire des interfaces modernes et sophistiquées que vous pouvez facilement intégrer à vos projets 4D existants et déployer on premise (sur site).
Qodly Studio peut également être utilisé sur la plateforme Qodly Cloud, dédiée au développement d'applications web métier.
Qodly Studio proposes a full-featured web UI, allowing you to:
- create Qodly pages by placing components on a canvas
- map components to Qodly Sources
- déclencher du code 4D en configurant des événements
- et bien plus encore !
Configuration
Conditions requises
Navigateur
Qodly Studio prend en charge les navigateurs Web suivants :
- Chrome
- Edge
- FireFox
La résolution recommandée est de 1920x1080.
Application 4D
- Développement : 4D 20 R2 ou version ultérieure
- Déploiement : 4D Server 20 R2 ou version ultérieure
- Qodly Studio ne fonctionne qu'avec des projets 4D (les bases de données binaires ne sont pas prises en charge).
- Les sessions web (également appelées sessions évolutives) doivent être activées.
- Le code 4D appelé par les pages Qodly doit être thread-safe.
Activer l'accès à Qodly Studio
Par défaut, l'accès à Qodly Studio n'est pas accordé.
Qodly Studio est alimenté par le serveur WebAdmin et affiche les données des projets 4D gérés par le serveur web 4D.
Pour permettre l'accès à Qodly Studio, vous devez explicitement autoriser deux niveaux :
- au niveau de l'application 4D
- niveau projet
Si l'un des deux niveaux (ou les deux) n'est pas activé, l'accès à Qodly Studio est refusé (une page 403 est renvoyée).
Au niveau 4D
Comme premier niveau de sécurité, vous devez autoriser l'accès à Qodly Studio sur le serveur WebAdmin. Ce paramètre s'applique à l'application 4D (4D ou 4D Server) sur la machine hôte. Tous les projets ouverts avec cette application 4D tiennent compte de ce paramètre.
Laissez cette option désélectionnée si vous voulez vous assurer qu'aucun accès à Qodly Studio n'est autorisé sur l'application. Cochez cette option pour rendre possible l'accès à Qodly Studio. Cependant, vous devez aussi l'activer au niveau de chaque projet.
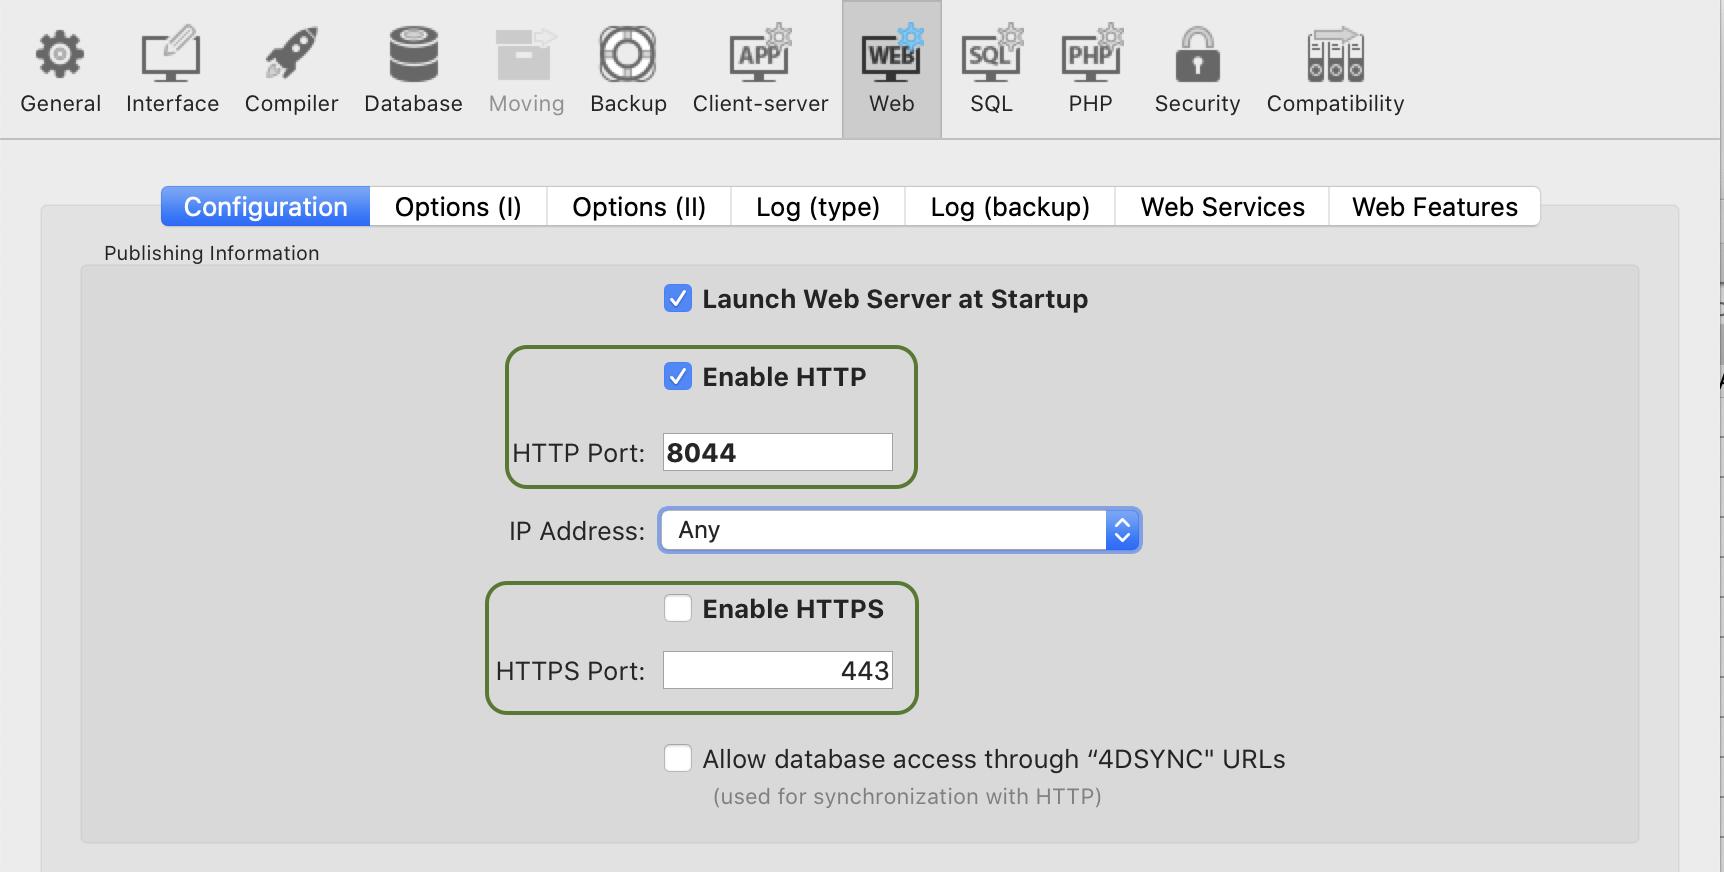
De plus, vous pouvez configurer le port HTTP/HTTPS utilisé par le serveur web WebAdmin.
Après toute modification de ces paramètres, vous devez redémarrer le serveur WebAdmin pour que la nouvelle configuration soit effective.
Au niveau du projet
Après avoir activé l'accès à Qodly Studio au niveau 4D, vous devez désigner explicitement chaque projet qui peut être consulté. L'option Activer l'accès à Qodly Studio doit être activée sur la page Fonctionnalités Web des Propriétés de l'application 4D.
N'oubliez pas que les propriétés utilisateurs peuvent être définies à plusieurs niveaux et que des priorités s'appliquent.
Activation de l'authentification
L'authentification sur le serveur WebAdmin utilise une access key (clé d'accès). Pour plus de détails, voir Access key.
Development and deployment
Conformément à la gestion des projets 4D, seules les utilisations suivantes sont prises en charge :
- le développement avec Qodly Studio s'effectue avec 4D (monoposte).
- deployment of 4D applications powered with Qodly pages must be done using 4D Server.
You can open Qodly Studio, debug and edit Qodly pages directly on a 4D Server machine when a project is running in interpreted mode. This feature is only provided for testing and debugging purposes, for example to evaluate the application flow with actual data, or in multi-user environment. It must NOT be considered as a regular way to develop applications since it does not provide any control over concurrent accesses.
Ouverture de Qodly Studio
La page Qodly Studio est disponible lorsque le serveur WebAdmin est lancé et l'authentification est activée (voir ci-dessus).
Il y a deux façons d'accéder à Qodly Studio :
-
by selecting the Qodly Studio... menu command from the Design menu (4D single-user) or the Window menu (4D Server). Si le serveur WebAdmin est déjà en cours d'exécution, selon sa configuration, votre navigateur par défaut s'ouvre à l'adresse
IPaddress:HTTPPort/studioouIPaddress:HTTPSPort/studio. Sinon, vous serez invité à démarrer d'abord le serveur web WebAdmin. -
on a browser, with the WebAdmin web server running (launched from 4D or 4D Server), enter the following address:
IPaddress:HTTPPort/studioou :
IPaddress:HTTPSPort/studioPar exemple, après avoir lancé un serveur web local sur le port 7080, saisissez cette adresse dans votre navigateur :
localhost:7080/studioVous serez ensuite invité à saisir l'access key pour accéder à Qodly Studio.
Developing with Qodly Studio
Documentation
The Qodly Studio documentation is available on the Qodly documentation website.
You can rely on this documentation and its associated resources for developing web applications powered by Qodly pages. Cependant, en fonction de la phase de mise en œuvre, les développeurs 4D utiliseront soit Qodly Studio, soit 4D IDE (voir Comparaison des fonctionnalités).
Les exemples de code sont fournis en QodlyScript, mais étant donné que QodlyScript hérite du langage 4D, vous ne serez pas perdu. Les exemples de code sont fournis en QodlyScript, mais étant donné que QodlyScript hérite du langage 4D, vous ne serez pas perdu.
Il n'y a pas de compatibilité directe entre les applications implémentées avec 4D et les applications implémentées avec Qodly.
Comparatif des fonctionnalités
| Qodly Studio dans 4D | Qodly Studio dans la plateforme Qodly Cloud | |
|---|---|---|
| Afficher et modifier les tableaux (dataclasses), les attributs et les relations | Éditeur de structure 4D(1) | Éditeur de modèles de Qodly Studio |
| Qodly pages | Qodly Studio Page Editor | Qodly Studio Page Editor |
| Formulaires Desktop | 4D IDE | non supporté |
| Langage de programmation | Langage 4D avec ORDA | QodlyScript avec ORDA |
| IDE code | 4D IDE code editor or VS Code with 4D-Analyzer extension 4D Server only: Qodly Studio code editor (see (2)) | Éditeur de code Qodly Studio |
| Débogueur | 4D IDE debugger 4D Server only: Qodly Studio debugger (see this paragraph) | Débogueur Qodly Studio |
| Rôles et privilèges REST/Web | Edition directe roles.json / Éditeur de rôles et privilèges de Qodly Studio | Éditeur de rôles et privilèges de Qodly Studio |
(1) L'élément Modèle est désactivé dans Qodly Studio.
(2) Dans 4D Server, l'ouverture du code 4D avec l'éditeur de code Qodly Studio est prise en charge à des fins de test et de débogage (voir ce paragraphe). Notez que dans 4D monoposte, si vous ouvrez du code 4D avec l'éditeur de code de Qodly Studio, la coloration syntaxique n'est pas disponible et un avertissement "Lsp not loaded" est affiché.
Langage
The following commands and classes are dedicated to the server-side management of Qodly pages:
Web Formcommand: returns the Qodly page as an object.Web Eventcommand: returns events triggered within Qodly page components.WebFormclass: functions and properties to manage the rendered Qodly page.WebFormItemclass: functions and properties to manage Qodly page components.
Utilisation des méthodes projet
Nous recommandons d'utiliser les fonctions de classe plutôt que les méthodes projet. Seules les fonctions de classe peuvent être appelées à partir des composants. Cependant, vous pouvez toujours utiliser les méthodes projet dans Qodly Studio de deux manières :
- Vous pouvez appeler vos méthodes à partir des fonctions de classe.
- Vous pouvez directement exécuter vos méthodes depuis l'Explorateur Qodly.
Utilisation hors ligne
Vous pouvez développer avec Qodly Studio lorsque votre ordinateur n'est pas connecté à internet. Dans ce cas cependant, les fonctions suivantes ne sont pas accessibles :
- Templates: la bibliothèque de templates (modèles) est vide
- UI tips (infobulles interface utilisateur) : ils ne sont pas affichés lorsque vous cliquez sur les icônes
 .
.
Déploiement
Activation du rendu
Qodly Studio encapsulates Qodly pages, including layout, data connections, and event-driven logic, in a structured JSON file. Ce fichier JSON est traité en temps réel par le moteur de rendu Qodly (renderer) pour servir une page web entièrement fonctionnelle.
See this page for detailed information on how to render Qodly pages in Qodly.
To enable the rendering of Qodly pages, the following options must be set.
- The 4D project's Settings > Web > Web Features > Expose as REST server option must be activated.
- Le serveur Web 4D doit être démarré.
Les boutons de rendu ne sont pas disponibles si les options de configuration ne sont pas activées.
Portée des pages Qodly
Lors du rendu des pages Qodly dans Qodly Studio, le moteur de rendu se connectera au serveur web 4D via HTTP ou HTTPS, en fonction des propriétés, en suivant le même schéma de connexion HTTP/HTTPS que pour le serveur webAdmin 4D. Voir aussi ce paragraphe sur les schémas d'URL et l'utilisation de la licence.
Gardez à l'esprit que Qodly Studio fonctionne à travers le serveur web 4D WebAdmin. When you use Qodly Studio as a developer, even when you preview a Qodly Page in the studio, you're using the 4D WebAdmin web server. Cela vous permet de voir les dataclass, les fonctions et les attributs qui ne sont pas exposés en tant que ressources REST par exemple (ils sont grisés).
However, page rendering happens outside Qodly Studio, and is served by the standard 4D web server. Dans cette situation, votre application web ne peut pas accéder aux ressources qui ne sont pas exposées en tant que ressources REST. Voir Fonctions exposées et non exposées et Exposer des tables pour plus d'informations sur la façon d'exposer des ressources.
Accès aux pages Qodly
Pour le déploiement, le serveur WebAdmin n'est pas nécessaire. L'accès des utilisateurs finaux à votre application web créée avec Qodly Studio est basé sur le protocole REST 4D, et en tant que tel, il fonctionne comme une application distante 4D conventionnelle.
Vos pages Qodly sont disponibles via l'Url suivante :
IP:port/$lib/renderer/?w=QodlyPageName
...where IP:port represents the address of the web server and QodlyPageName is the name of the Qodly page.
Par exemple :
https://www.myWebSite.com/$lib/renderer/?w=welcome
Aperçu de l'application Qodly
You can preview your Qodly application at any moment by selecting the Preview Qodly Application... command in the Windows menu (4D Server) or in the Design menu (4D single-user).
This command launches the Qodly renderer on a local address in your default browser and displays the start page defined in the Application settings of Qodly Studio.
Using Qodly debugger on 4D Server
When using Qodly pages in a deployed 4D Server application (interpreted mode), you might encounter some cases where you need to debug your pages on the server, for example when a specific user configuration is required. In this case, you can attach the Qodly Studio debugger to the 4D Server and then, benefit from its features when executing your Qodly pages.
Note that in this case, the Qodly Studio debugger will display all the code executed on the server, in accordance with the attached debugger rule on 4D Server.
To attach the Qodly Studio debugger to your running 4D Server application:
- Ouvrir Qodly Studio depuis le serveur 4D.
The project must be running in interpreted mode so that Qodly Studio menu item is available.
- Dans la barre d'outils de Qodly Studio, cliquez sur le bouton Debug.

If the debug session starts successfully, a green bullet appears on the button label ![]() and you can use the Qodly Studio debugger.
and you can use the Qodly Studio debugger.
If the debugger is already attached to a another machine or another Qodly Studio page, an error is displayed. You have to detach it beforehand from the other location.
To detach the Qodly Studio debugger from your running 4D Server application:
- Click the Debug button in the Qodly Studio toolbar while a debug session is active. A warning dialog box will prompt you to confirm whether you want to detach the debugger.
- Select Keep in progress to continue evaluating the code until the end of the current method or function before detaching the debugger, or Stop to detach the debugger immediately.
Force login
With Qodly Studio for 4D, the "force login" mode allows you to control the number of opened web sessions that require 4D Client licenses. Vous pouvez également déconnecter l'utilisateur à tout moment pour décrémenter le nombre de licences consommées.
Configuration
Make sure the "force login" mode is enabled for your 4D application in the Roles and Privileges page, using the Force login option:
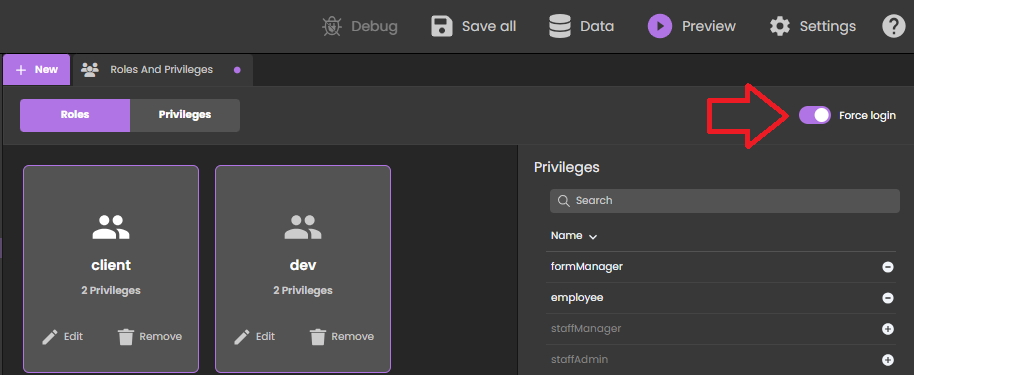
Vous pouvez également définir cette option directement dans le fichier roles.json.
You just need then to implemented the authentify() function in the datastore class and call it from the Qodly page. A licence will be consumed only when the user is actually logged.
When the legacy login mode (deprecated as of 4D 20 R6) is enabled, any REST request, including the rendering of an authentication Qodly page, creates a web session on the server and gets a 4D Client license, whatever the actual result of the authentication. Pour plus d'informations, veuillez vous référer à cet article de blog qui détaille ce principe.
Exemple
In a simple Qodly page with login/password inputs, a "Submit" button calls the following authentify() function we have implemented in the DataStore class:
exposed Function authentify($credentials : Object) : Text

var $salesPersons : cs.SalesPersonsSelection
var $sp : cs.SalesPersonsEntity

$salesPersons:=ds.SalesPersons.query("identifier = :1"; $credentials.identifier)
$sp:=$salesPersons.first()

If ($sp#Null)
	If (Verify password hash($credentials.password; $sp.password))

		Session.clearPrivileges()
		Session.setPrivileges("") //guest session

		return "Authentication successful"
	Else
		return "Wrong password"
	End if
Else
	return "Wrong user"
End if
Cet appel est accepté et tant que l'authentification n'est pas réussie, Session.setPrivileges() n'est pas appelée, donc aucune licence n'est consommée. Une fois que Session.setPrivileges() est appelée, une licence client 4D est utilisée et toute requête REST est alors acceptée.
Logout
Quand le mode "force login" est activé, Qodly Studio for 4D vous permet d'implémenter une fonctionnalité de déconnexion dans votre application.
To logout the user, you just need to execute the Logout standard action from the Qodly page. Dans Qodly Studio, vous pouvez associer cette action standard à un bouton par exemple :

Déclencher l'action de déconnexion d'une session utilisateur Web a les effets suivants :
- la session utilisateur web courante perd ses privilèges, seules les requêtes REST descriptives sont autorisées,
- la licence 4D associée est libérée,
- le
Session.storageest conservé jusqu'à ce que le délai d'inactivité de la session Web soit atteint (au moins une heure). Pendant cette période après une déconnexion, si l'utilisateur se connecte à nouveau, la même session est réutilisée et l'objet partagéSession.storageest disponible avec son contenu actuel.
Utilisation de licences pour le rendu
In default mode when any page is rendered, or in "force login" mode when a page handling data or calling a function is rendered, you must have an available license, as rendering Qodly forms targets the project database's main web server.
Schemas d'URL
La configuration de schéma d'URL de Qodly Studio (HTTP et HTTPS) influe sur le nombre de licences qui sont prises lors du rendu des pages Qodly. Avec une configuration appropriée, vous pouvez éviter la consommation inutile de licences.
Comme expliqué dans la section configuration, le serveur Web WebAdmin fournit un accès sécurisé à Qodly Studio. En tant que tel, il se comporte comme un client 4D conventionnel. D'autre part, le moteur de rendu communique avec le serveur web 4D de la base de données en utilisant des requêtes REST.
Si vous exécutez le moteur de rendu depuis Qodly Studio et que ces deux serveurs Web ne sont pas accessibles via le même schéma d'URL (HTTP ou HTTPS), cela peut entraîner un décompte de licence incorrect.
Using different schemes might also lead to session issues, such as losing privileges after a page refresh.
Exemple
-
Vous exécutez Qodly Studio sur un schéma d'URL HTTPS (par exemple,
https://127.0.0.1:7443/studio/) -
Le serveur web de votre base de données est démarré uniquement sur un port HTTP.
- Dans Qodly Studio, vous cliquez sur l'icône Preview. Vous êtes averti que les deux serveurs Web sont lancés sur des schémas différents, mais malgré cela, vous cliquez sur le bouton Confirmer.
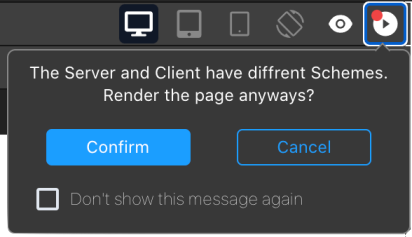
En conséquence, deux licences sont consommées.
Vous pouvez activer/désactiver l'affichage de la fenêtre "pop over" de rendu en utilisant un paramètre utilisateur de Qodly Studio.
Attribut SameSite
Le comportement précédemment décrit est dû au cookie de session du serveur web 4D. Ce cookie de session a un attribut SameSite qui détermine si le cookie de session est envoyé au serveur web.
Si la valeur de l'attribut SameSite est Strict (par défaut), le cookie de session n'est pas envoyé au serveur web, donc une nouvelle session est ouverte à chaque fois qu'une page est affichée ou rafraîchie.
Pour plus d'informations sur l'attribut SameSite, consultez cet article de blog.
Recommandations
Pour éviter d'utiliser plus de licences que nécessaire, nous vous recommandons d'effectuer l'une des actions suivantes :
- Run the renderer on another browser tab (by entering the rendered URL of your Qodly page:
IP:port/$lib/renderer/?w=QodlyPageName). - Assurez-vous que Qodly Studio et votre base de données sont accessibles sur le même schéma d'URL.
- Utilisez la valeur
Laxpour le cookie de session du serveur web de la base de données de votre projet.