Editor de método
4D tem um poderoso editor de código embutido que oferece um amplo conjunto de funcionalidades para edição de código altamente produtiva, como preenchimento inteligente de código, navegação de código, depuração, busca, e mais.
O editor de código funciona de forma semelhante a um editor de texto. Escrever um método ou uma classe é geralmente uma combinação de digitar texto, selecionar componentes e arrastar itens do Explorador ou de outras janelas. Você também pode usar várias funções de preenchimento automático para criar métodos mais rapidamente.
Você pode rolar através do conteúdo de métodos, classes e funções, que podem incluir até 32.000 linhas de código ou 2 GB de texto.
O Editor de código 4D fornece verificação básica de erros de sintaxe. É efetuada uma verificação de erros adicional quando o código é executado. Para obter mais informações sobre como lidar com erros, consulte Depuração.
Interface
Barra de ferramentas
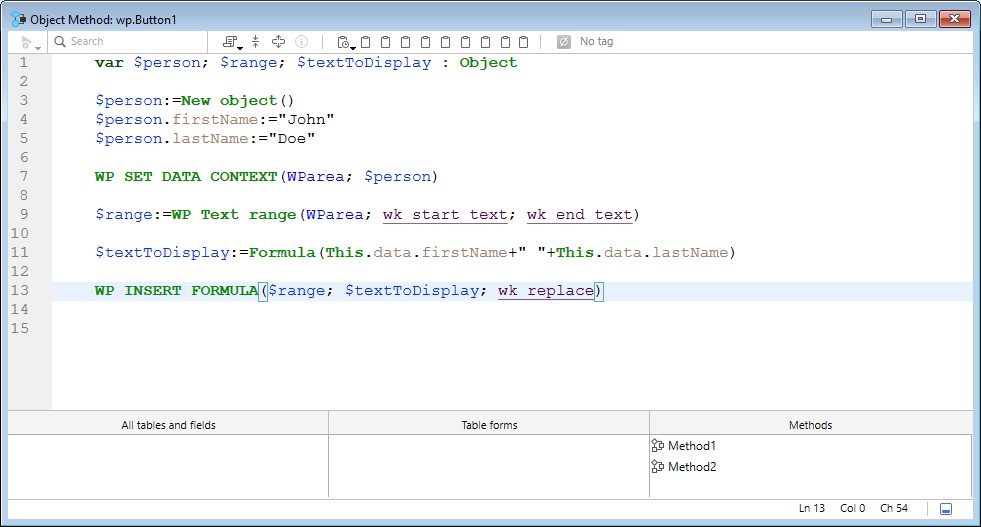
Cada janela do Editor de Código possui uma barra de ferramentas que fornece acesso instantâneo a funções básicas relacionadas à execução e edição de código.
| Elemento | Ícone | Descrição |
|---|---|---|
| Execução do método | 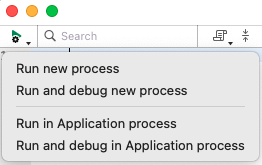 | Ao trabalhar com métodos, cada janela do Code Editor tem um botão que pode ser usado para executar o método atual. Usar o menu associado com o botão, pode escolher o tipo de execução:
|
| Procurar no método | Exibe a área Pesquisa. | |
| Macros | Insere uma macro na seleção. Clique na seta pendente para visualizar uma lista de macros disponíveis. Para obter mais informações sobre como criar e instanciar macros, consulte Macros. | |
| Expandir tudo / Recolher tudo | Estes botões permitem expandir ou recolher todas as estruturas de fluxo de controle do código. | |
| Informações sobre o método | Exibe a caixa de diálogo Propriedades do método (somente métodos projeto). | |
| Últimos valores da área de transferência | Exibe os últimos valores armazenados na área de transferência. | |
| Pranchetas | Nove pranchetas disponíveis no editor de código. Você pode usar uma opção Preferências para ocultá-las. Você pode usar essas pranchetas clicando nelas diretamente ou usando atalhos de teclado. | |
| Menu de navegação suspenso | Permite navegar dentro de métodos e classes com conteúdo marcado automaticamente ou marcadores declarados manualmente. Ver abaixo |
Área de edição
É aqui que escreve e edita o seu código. O editor recua automaticamente o texto do código e colore os diferentes elementos de sintaxe para uma estrutura de código clara.
É possível personalizar a apresentação da área de edição. Qualquer personalização é automaticamente passada para todas as janelas do editor de código:
| Opção | Descrição | Definido em... |
|---|---|---|
| tipo de letra e tamanho de letra | Define o tipo de letra e o tamanho dos caracteres a utilizar na área de edição | Preferências > Métodos ou Método > Ver > Tipo de letra maior ou Tipo de letra menor |
| estilo e cor dos elementos de sintaxe | atribui uma cor e/ou estilo específicos a cada tipo de elemento da linguagem 4D. Você também pode alterar as diferentes cores usadas na interface da área de edição (destaque, fundo, etc.). | Clique com o botão direito do mouse em um elemento de linguagem (variável, palavra-chave, etc.) Clique com o botão direito do mouse em um elemento de linguagem (variável, palavra-chave, etc.) Submenu > Estilo. Ou Preferências > Métodos |
| espaços | Você pode exibir os espaços entre as palavras usando pontos (.) em vez de espaços em branco. Esta opção se aplica a todos os elementos de código (nomes de comandos, variáveis, comentários, etc.). | Método > Ver > Espaços em branco |
| temas | Pode selecionar o tema Escuro ou Claro, ou definir um tema personalizado | Preferências > Métodos |
| largura das indentações de código | Definir a largura das indentações do código | Preferências > Métodos |
Mudar barras
Barras coloridas mostram instantaneamente onde as linhas de código foram modificadas desde que o método foi aberto:

As barras de alteração mudam de cor para indicar se as modificações foram salvas ou não:
- amarelo: a linha foi modificada e o método ainda não foi guardado.
- verde: A linha foi modificada e o método foi guardado.
Área listas
A área de lista permite exibir uma ou mais listas de elementos necessários para escrever métodos e classes (comandos, constantes, formulários, etc.). Você pode escolher o número e o conteúdo das listas exibidas na janela.
Por padrão, o editor de código apresenta quatro listas. Você pode ocultar ou mostrar todas as listas clicando no ícone no canto inferior direito da janela. ![]()
Você pode aumentar ou reduzir a largura relativa de cada área da lista arrastando uma de suas divisões. Também é possível ajustar o tamanho da área de lista em relação à área de edição arrastando a linha divisória entre elas.
- Ao clicar duas vezes em um item em uma lista, ele será inserido na área de edição, na posição do cursor.
- Para modificar o conteúdo de uma lista, clique na área do título da lista em questão: um menu pop-up será exibido, permitindo que você escolha o tipo de item a ser exibido.

-
Para adicionar ou remover uma lista, clique na área do título de uma das listas e escolha o comando correspondente no menu suspenso. O comando Remover esta lista está desativado quando você clica na última lista. Se você deseja ocultar todas as listas, você deve clicar no botão mostrar ou ocultar listas no canto inferior direito da janela ou ocultá-las por padrão nas Preferências.
-
Pode ocultar as listas em todas as janelas das seguintes formas:
- Selecione a opção Ver > Listas no menu Método (uma marca de seleção indica se as listas são exibidas)
- Desmarque a opção Preferências > Métodos > Opções > Mostrar Listas. Para que as modificações feitas na caixa de diálogo Preferências sejam consideradas, todos os métodos, classes ou funções abertos devem ser fechados e reabertos.
Listas de itens disponíveis
Você pode exibir as seguintes listas de itens na área de listas da janela do Code Editor:
- Todas as tabelas e campos: nomes de tabelas e campos do banco de dados em forma de lista hierárquica. Quando você inserir um nome de campo no método, clicando duas vezes no seu nome, A 4D inseriu-a respeitando a sintaxe e adiciona o nome da tabela ou subtabela, como o caso pode ser.
- Tabela (submenu): nomes dos campos da tabela selecionada usando o submenu.
- Tabela atual: nomes dos campos da tabela atual (disponível em triggers, métodos formulário e métodos objeto).
- Formulários projeto: nomes de formulários projeto de banco de dados. Quando você clica duas vezes no nome de um projeto de formulário, 4D insere o mesmo respeitando a sintaxe: o nome do formulário é inserido entre as cotações.
- Formulários de tabela: nomes de tabelas do banco de dados e nomes de formulários em forma de lista hierárquica. Quando você inserir o nome de um formulário em um método, clicando duas vezes em seu nome, 4D insere ele respeitando a sintaxe: o nome do formulário é inserido entre aspas e é precedido pelo nome da tabela e um ponto e vírgula. Por exemplo: [Table]; "Form".
- Métodos: nomes de métodos projeto do banco de dados.
- Todas as pastas: nomes das pastas de objetos e subpastas definidas no banco de dados exibidas na forma de uma lista hierárquica. As pastas podem ser utilizadas para organizar objetos de uma forma personalizada. São geridos a partir da página inicial do explorador.
- Pastas (submenu): conteúdo da pasta selecionada usando o submenu.
- Macros: nomes de macros definidos para o banco de dados (consulte Criação e uso de macros).
- Comandos: comandos da linguagem 4D em ordem alfabética.
- Comandos por temas: comandos da linguagem 4D classificados por tema em forma de lista hierárquica.
- Barras de menu: nomes e números das barras de menu criadas com o editor de barras de menu 4D.
- Constantes: constantes 4D e de quaisquer plug-ins, classificadas por tema em forma de lista hierárquica.
- Listas: Nomes de listas.
- Todos os comandos de plug-in: comandos para todos os plug-ins instalados no banco de dados (se houver), classificados por tema em forma de lista hierárquica.
- Palavras SQL: conjunto de palavras-chave reconhecidas pelo analisador de sintaxe SQL de 4D. Essa lista inclui comandos (por exemplo, SELECT), cláusulas (por exemplo, WHERE), bem como funções (ABS).
- Funções SQL: funções SQL 4D.
Nota: com exceção do elemento Macros, todas as listas estão por ordem alfabética.
Guardar como modelo
Você pode salvar as listas definidas na janela do Editor de Código na forma de um modelo. Depois que o modelo é salvo, os parâmetros definidos nele serão usados para cada nova janela do Editor de Código que é aberta.
Os seguintes parâmetros são armazenados no modelo:
- Tamanho relativo das áreas de edição e de lista
- Número de listas
- Localização e conteúdo de cada lista
- Largura relativa de cada lista
Para salvar uma janela do editor de código como um modelo, selecione Método > Salvar como modelo. O modelo é guardado imediatamente (não aparece nenhuma caixa de diálogo). Está armazenado nas Preferências do aplicativo 4D. Se já existir um modelo anterior, ele será substituído.
Área de pontos de paragem
Esta área, localizada à esquerda da área de edição, permite que você exiba os números de linha e insira pontos de interrupção diretamente ao lado de instruções específicas. Os pontos de interrupção são úteis durante a fase de depuração de sua programação. Eles interrompem a execução do seu código em locais específicos e exibem o depurador.
Para obter mais informações sobre pontos de interrupção, consulte a seção Depuração.
Você pode exibir ou ocultar os números de linhas na área de pontos de quebra para cada janela do Editor de Código.
- Para ativar ou desativar a exibição de números de linha por padrão, escolha Preferências > Métodos > Mostrar números de linha.
- Para modificar essa exibição separadamente para cada janela do editor de código, selecione Método > Visualizar > Números de linha.
Exibir as linhas de números torna mais fácil encontrar o seu caminho na janela. O comando Método > Ir al número de linha... no também permite aproveitar essa exibição.
Esse tipo de pesquisa é útil quando usado em conjunto com o compilador, que sinaliza os erros de tempo de execução pelo número da linha em que eles ocorrem.
Barra de estado
A barra de status localizada na parte inferior direita do editor da janela exibe a posição do cursor em todos os momentos:
![]()
- Ln: Número da linha
- C: número de coluna, ou seja, o nível na hierarquia das estruturas de programação. O primeiro nível é 0. O número da coluna é útil para debugar, pois essa informação pode ser fornecida pelo interpretador em caso de erro no código.
- Ch: localização do carácter na linha.
 : ocultar/apresentar listas.
Quando você define o cursor em um comando, função ou parâmetros, a barra de status exibe a sintaxe do comando. Se você escrever ou selecionar um parâmetro, a área mostrará o parâmetro atual em negrito: 
Menu de navegação suspenso
O menu suspenso de navegação ajuda você a organizar seu código e navegar com mais facilidade dentro de suas classes e métodos:

Algumas tags são adicionadas automaticamente, e você pode complementar a lista suspensa usando marcadores.
Navegação de código
Clique em um item da lista suspensa para acessar sua primeira linha no código. Você também pode navegar com as teclas de seta e pressionar Enter.
Marcação automática
Construtores, declarações de métodos, funções e atributos computados são automaticamente marcados e adicionados à lista suspensa.
Quando não existe uma etiqueta na classe/método, a ferramenta apresenta "Sem etiqueta".
Os seguintes itens são adicionados automaticamente:
| Ícone | Elemento |
|---|---|
| Sem etiqueta | |
| Class constructor ou declaração de método | |
| Atributo calculado (get, set, orderBy e query) | |
| Nome da função de classe |
Marcação manual
Ao adicionar marcadores no seu código, pode adicionar as seguintes etiquetas ao menu pendente:
| Ícone | Elemento |
|---|---|
| MARK: etiqueta | |
| TODO: etiqueta | |
| FIXME: etiqueta |
Declara-os acrescentando comentários como:
// FIXME: Correção dos seguintes itens
As declarações não diferenciam maiúsculas de minúsculas; escrever fixme: tem o mesmo efeito.
A adição de um hífen após a tag MARK: desenha uma linha de separação no editor de código e no menu suspenso. Por isso, estou a escrever isto:

Os resultados são os seguintes:

Todos os marcadores localizados dentro de funções são recuados na lista suspensa, exceto as tags MARK: localizadas no final das funções e não seguidas de instruções. Estes aparecerão no primeiro nível.
Ordem de visualização
As etiquetas são exibidas em sua ordem de aparecimento dentro do método/classe.
Para exibir as tags de um método ou classe em ordem alfabética, faça uma das seguintes:
- Clique direito na ferramenta suspensa
- mantenha pressionado Cmd no macOS ou Alt no Windows e clique na ferramenta suspensa
As etiquetas em funções movem-se com os seus itens pais.
Atalhos
Várias funcionalidades do editor de código do 4D estão disponíveis através de atalhos de teclado padrão.
No macOS, use a tecla Command em vez da tecla Ctrl mencionada (Windows).
| Atalho | Ação |
|---|---|
| Selecção e navegação | |
| Duplo clique | Selecionar o nome de um elemento da linguagem |
| [Alt]+Clique duas vezes | Selecionar um nome de elemento de língua contendo espaços (constante, método, etc.) |
| [Shift]+[seta para a direita] | Criar e ampliar a seleção, personagem por caractere, para a direita ou Reduzir a seleção, personagem por caracter a partir da esquerda |
| [Shift]+[seta para a esquerda] | Reduzir a seleção, caractere por caractere, da direita ou Criar e ampliar a seleção, caractere por caractere, para a esquerda |
| [Shift]+[seta para baixo] | Criar e ampliar uma seleção, linha por linha, da parte superior à parte inferior |
| [Shift]+[seta para cima] | Criar e ampliar uma seleção, linha por linha, de baixo para cima |
| [Ctrl]+[Shift]+[seta para a direita] | Criar e ampliar a seleção, palavra a palavra, a partir da direita |
| [Ctrl]+[Shift]+[seta para a esquerda] | Reduza a seleção, palavra por palavra, à direita, ou crie e amplie a seleção, palavra por palavra, à esquerda |
| [Ctrl]+[seta para a direita] | Mover o ponto de inserção, palavra a palavra, da esquerda para a direita |
| [Ctrl]+[left arrow] | Mover o ponto de inserção, palavra a palavra, da direita para a esquerda |
| [Alt]+[seta para baixo] | Mover a(s) linha(s) onde se encontra o cursor para a parte inferior |
| [Alt]+[seta para cima] | Mover a(s) linha(s) onde se encontra o cursor para o topo |
| [Home] | Posicione o ponto de inserção no início da linha |
| [End] | Colocar o ponto de inserção no fim da linha |
| [Ctrl]+[Home] | Colocar o ponto de inserção no início do método |
| [Ctrl]+[End] | Colocar o ponto de inserção no final do método |
| [Shift]+[Home] | Selecione todos os caracteres da linha que estão à esquerda do cursor |
| [Shift]+[End] | Selecione todos os caracteres da linha que estão à direita do cursor |
| [PgUp] | Rolar o conteúdo do método, página por página, da parte inferior até a parte superior (não modificar o ponto de inserção) |
| [PgDn] | Rolar o conteúdo do método, página por página, de cima para baixo (não modifica o ponto de inserção) |
| Introspecção | |
| [Ctrl]+K ou [Alt]+clique duas vezes | Mesmo que o comando Goto definition |
| [Ctrl] (Windows) ou [Alt] (macOS)+pairing sobre um token | Sublinhar o token (elemento linguístico identificado). Clique no token sublinhado = igual ao comando Goto definition |
| Procurar e substituir | |
| [Ctrl]+F | Find |
| [Ctrl]+G | Encontrar o próximo |
| [Ctrl]+[Shift]+G | Procurar Anterior |
| [Ctrl]+E | Encontrar o mesmo próximo |
| [Ctrl]+[Shift]+E | Encontrar o mesmo anterior |
| [Ctrl]+[Alt]+F | Substituir |
| [Ctrl]+[Alt]+G | Substituir próximo |
| [Ctrl]+[Alt]+[Shift]+G | Reemplazar anterior |
| Pranchetas | |
| [Shift]+clique ou [Alt]+clique no ícone da área de transferência | Copiar texto selecionado para uma área de transferência |
| [Ctrl]+[Shift]+tecla numérica | Copiar texto selecionado numa área de transferência numérica |
| [Ctrl]+clique no ícone da área de transferência | Colar o conteúdo de uma área de transferência na localização do cursor |
| [Ctrl]+chave numérica | Colar o conteúdo da área de transferência numérica na localização do cursor |
A maioria desses atalhos pode ser personalizada na caixa de diálogo Preferencias4D.
Editar código
O 4D utiliza técnicas padrão de edição de texto para digitar e editar no Editor de código.
O Editor de código usa convenções de exibição (estilo, cor) para os elementos de sintaxe. Você pode personalizar essas convenções. Conforme você digita, ao validar sua entrada, o 4D avalia o texto da linha e aplica o formato de exibição apropriado. 4D também recua cada linha para seu nível adequado em relação à linha anterior quando você usa estruturas de programação (If, End if...).
Pode utilizar as teclas de setas para se deslocar rapidamente de uma linha para outra. Usar as teclas de seta para mover-se por várias linhas é mais rápido do que clicar, pois o editor atrasa a avaliação da linha em busca de erros.
No Windows, o editor de código inclui um Editor de Código de Entrada (IME) para facilitar a edição de código em sistemas japoneses ou chineses.
O Editor de código inclui numerosos atalhos de navegação.
Uso de la barra invertida
O caractere de barra invertida (\) tem um suporte específico na linguagem 4D:
- inserido no final das linhas, permite escrever uma única declaração em várias linhas.
- permite definir sequências de escape.
O caractere de barra invertida (\) é usado como separador em nomes de caminho no Windows. Em geral, o 4D interpretará corretamente os nomes de caminho do Windows inseridos no Editor de código substituindo a barra invertida única \ por uma barra invertida dupla \\`. Por exemplo,<code>C:\MyDocuments se tornará C:\\MyDocuments<code>. No entanto, se escrever <code>"C:\MyDocuments\New", 4D mostrará "C:\\MyDocuments\New". Nesse caso, a segunda barra invertida é interpretada incorretamente como \N (uma [sequência de escape](../Concepts/quick-tour.md#escape-sequences) existente). Você deve então digitar um duplo \ quando quiser inserir uma barra invertida antes de um caractere usado em uma das sequências de escape reconhecidas por 4D.
Arrastar e largar
Do explorer, você pode arrastar e soltar tabelas, campos, formulários, métodos de projeto, constantes ou comandos 4D. Quando você arrasta e solta um elemento, 4D sempre usa a sintaxe correta. Por exemplo, se você arrastar o nome de campo First Name da tabela [People], ele aparecerá no Editor editor de código como [People]First Name. Da mesma forma, se você arrastar o nome do formulário Input da tabela People, ele aparecerá no Code Editor como [People]; "Input".
Quando você insere um comando arrastando-o da página Comandos do Explorer, ele aparece com sua sintaxe (que consiste em todos os seus parâmetros) no Editor de código. Essa funcionalidade simplesmente lembra você dos parâmetros que o comando espera. Assim, você pode usar uma sintaxe mais adequada ao seu uso.
Você também pode arrastar e soltar dentro de um método, classe, função ou entre dois métodos diferentes. You can also drag-and-drop within a method, class, function or between two different ones. Por padrão, o mecanismo de arrastar e soltar move o texto selecionado. Para copiá-lo, mantenha pressionada a tecla Ctrl (Windows) ou a tecla Option (macOS) durante a operação.
Alternância entre letras maiúsculas e minúsculas
Você pode modificar automaticamente o caso dos caracteres selecionados usando os comandos em Métodos > Case ou o menu de contexto do editor:
- Maiúsculas / Minúsculas: muda os caracteres selecionados para maiúsculas ou minúsculas.
- camelCase / CamelCase: muda os caracteres selecionados para "camel case". Isso consiste em alterar a primeira letra de cada palavra do grupo para maiúscula. Este tipo de notação é frequentemente utilizado para as nomenclaturas de variáveis. hireDate e PurchaseDate são exemplos de duas variantes da notação camel case.
Quando você aplica um desses comandos a uma seleção de texto, os espaços e os caracteres "_" são removidos e a primeira letra de cada palavra se torna maiúscula.
Trocar expressão
A função Swap Expression pode ser usada para inverter os argumentos de uma expressão que atribui um valor. Por exemplo,
variable1:=variable2
torna-se
variable2:=variable1
Essa função é extremamente útil para reverter um conjunto de atribuições usadas para obter ou definir propriedades ou para corrigir erros de entrada. Para usar essa função, selecione a(s) linha(s) a ser(em) modificada(s) e, em seguida, escolha Method > Swap Expression ou use o menu de contexto da área. Dentro da seleção, apenas as linhas que atribuem um valor serão modificadas.
Pranchetas
Além da operação padrão de copiar e colar, o 4D oferece duas funções adicionais que permitem trabalhar com o conteúdo de diferentes áreas de transferência:
-
O programa armazena em memória as últimas 10 ações de "copiar" ou "recortar" que foram executadas no Editor de Código durante a sessão atual. Cada um dos diferentes conteúdos salvos desta forma pode ser reutilizado a qualquer momento. Para isso, use o comando Clipboard History do menu de contexto do Editor de código ou o botão "Last Clipboard values" da barra de ferramentas:

São apresentadas as primeiras palavras dos itens copiados ou cortados. Selecione um item para inseri-lo no local atual do cursor.
-
Nove áreas de transferência numeradas adicionais estão disponíveis e podem ser empregadas diretamente usando os botões da barra de ferramentas do Editor de Código ou usando atalhos de teclado:

Linhas em movimento
Você pode mover a linha onde o cursor está diretamente, sem selecioná-la primeiro, usando os comandos Mover Linhas para Cima e Mover Linhas para Baixo no menu Método. Você também pode fazer isso usando as teclas Alt/Option + Seta para cima ou Seta para baixo atalho do teclado.
Funções de preenchimento automático
O editor de código fornece funções de preenchimento automático. 4D exibe automaticamente sugestões baseadas nos primeiros caracteres digitados.
No exemplo abaixo, digitar a string "cop" faz com que seja exibido um triângulo azul indicando que há várias sugestões disponíveis:
![]()
When the characters you enter correspond to a single possibility, this suggested value appears greyed out (and is inserted if you hit the Tab key): ![]() --->
---> ![]()
If you checked the Insert () and closing } ) ] " option in the Methods page of the Preferences, 4D will also automatically add () after a 4D command, keyword or project method that requires one or more mandatory arguments (after accepting a suggestion or completion):
->
Autocompletion also works with code structures (e.g. If.. End if, For each... End for each): when you enter the first part of the structure, the Code Editor will automatically suggest the closing part:
Se houver várias sugestões disponíveis, 4D as exibe em uma lista pop-up quando você pressiona a tecla Tab:

A lista está por ordem alfabética. Escolha o valor clicando duas vezes nele ou role a lista usando as teclas de seta do teclado e, em seguida, pressione Enter, Carriage Return ou Tab para inserir o valor selecionado.
Por padrão, você também pode inserir um valor sugerido pressionando uma das seguintes teclas delimitadoras ( ; : = < [ { após selecionar um valor: o valor inserido é seguido pelo delimitador, pronto para a entrada de dados.
 + ( key -->
 ![]()
Você pode desativar o uso de delimitadores para inserir valores sugeridos em Preferências > Métodos > Opções.
Você pode pressionar a tecla Esc para fechar a lista pop-up ou pode continuar digitando enquanto ela estiver aberta. Os valores sugeridos na lista pop-up são atualizados como caracteres adicionais são digitados.
Se os caracteres digitados correspondem a diferentes tipos de objetos, a lista os exibe em seu estilo atual. Podem ser visualizados os seguintes tipos de objetos:
- Comandos 4D
- Comandos SQL
- Métodos utilizador
- Nomes de tabelas
- Nomes de campos
- Constantes
- Variável local, processo ou inter-processo, declarada no método
- Nomes de propriedade de objeto
- Comandos Plug-in
- Palavras-chave 4D
- Palavras-chave SQL
- Macros (apresentadas entre < >)
Por motivos práticos, você pode desativar a exibição automática da lista de sugestões para constantes, variáveis (locais ou entre processos) e atributos de objetos, e/ou tabelas. Essas opções podem ser encontradas em Preferências > Métodos > Opções
Nomes de propriedade de objeto
O 4D exibe automaticamente sugestões sensíveis a maiúsculas e minúsculas de todos os nomes de propriedades de objetos válidos no código 4D quando você:
- digite um ponto "." depois de um objeto ou
- utilizar a tecla Tab após um ponteiro objeto desreferenciado "->".
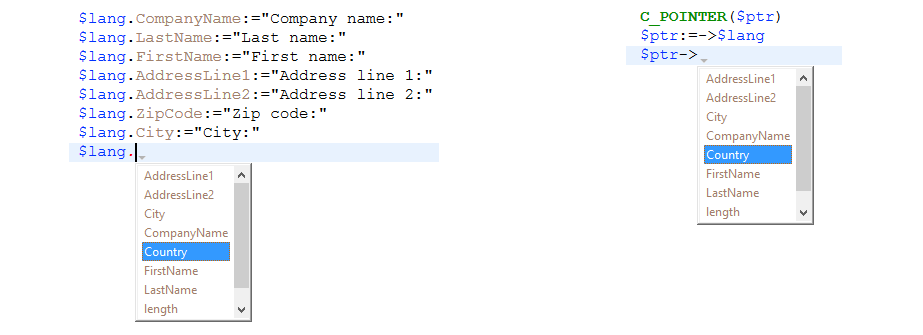
A propriedade
lengthé sempre incluída para uso com coleções.
Uma vez criados, os nomes das propriedades são armazenados em uma lista global interna e ficam disponíveis sempre que um método/classe/função é aberto, fechado ou muda de foco.

A lista de sugestões é atualizada dinamicamente enquanto você edita o código. Ao alternar entre janelas, os nomes de propriedades novos/editados são sempre adicionados à lista global. A lista também é atualizada quando você visualiza um método, uma classe ou uma função no Explorer.
Quando o banco de dados é reiniciado, a lista é reinicializada.
Você pode desativar a exibição automática das propriedades do objeto em Preferências > Métodos > sugestões.
Procurar e substituir
O editor de código possui poderosas funcionalidades de buscar e substituir que se aplicam à janela atual.
Uma área de busca e substituição pode ser exibida na barra de ferramentas de qualquer janela de método:
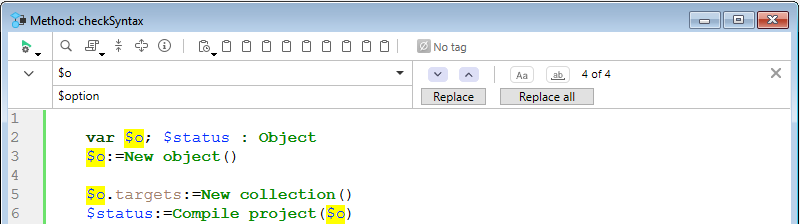
Para exibir essa área, clique no ícone Localizar no método da barra de ferramentas ou selecione uma função de localização ou substituição por meio de um atalho ou um comando no submenu Editar > Localizar. Você pode fechar essa área a qualquer momento clicando no botão x no lado direito da barra de ferramentas.
A funcionalidade Localizar no Design na barra de ferramentas do 4D ou no menu Editar não é específica do editor de código, mas pode ser usada para pesquisar um valor entre todos os métodos e classes.
Find
Selecione Localizar > Localizar... no menu Editar ou digite Ctrl+F (Windows)/Cmd+F (macOS) para exibir/ativar a área de Pesquisa.
A pesquisa definida nessa área será executada no código localizado na janela.
A área de entrada find permite que você insira a string a ser pesquisada. Esta área é uma caixa de combinação que armazena as últimas 10 sequências de caracteres que foram pesquisadas ou substituídas durante a sessão. Se você destacar o texto antes de escolher o comando Localizar..., ele aparecerá nessa área. Pode então utilizar este texto ou substituí-lo por outro.
Depois que uma cadeia é inserida ou selecionada, todas as ocorrências encontradas na janela aberta são destacadas e o lado direito da área exibe o número total de ocorrências encontradas. Também indica a posição atual do cursor entre todos os resultados.
Pressione a tecla Enter para selecionar a ocorrência mais próxima ao cursor. Também pode clicar nos botões Próximo / Anterior ![]() para selecionar todas as ocorrências sequencialmente no início ou no fim do método atual, a partir da localização inicial do cursor, ou utilizar os comandos Procurar seguinte e Procurar anterior do menu Editar.
para selecionar todas as ocorrências sequencialmente no início ou no fim do método atual, a partir da localização inicial do cursor, ou utilizar os comandos Procurar seguinte e Procurar anterior do menu Editar.
Opções
- Sensível a maiúsculas e minúsculas
 : tem em conta as maiúsculas e minúsculas dos caracteres tal como foram introduzidos na área de pesquisa. Essa opção também considera os caracteres diacríticos. Por exemplo, uma busca por "MyVar" não encontrará "myVar"; uma busca por "dej" não encontrará "déjà".
 - Palavra inteira
 : limita a pesquisa a ocorrências exatas da palavra pesquisada. Quando esta opção for marcada, por exemplo, uma busca por "cliente" não irá encontrar nem "clientes" nem "meucliente." Por padrão, essa opção não está marcada; portanto, uma pesquisa por "var" encontrará "Myvar", "variation" etc.
Substituir
Clique no botão de alternância v no lado esquerdo da área Pesquisa para mostrar/ocultar a área Substituir. Você também pode selecionar Find > Replace... no menu Edit ou digitar Ctrl+Alt+F (Windows)/Cmd+Alt+F (macOS).
A área de entrada Replace é usada para definir a cadeia de caracteres que substituirá a definida acima.
Clique no botão Substituir para iniciar a pesquisa com todas as opções definidas e substituir a primeira ocorrência encontrada. 4D começa a pesquisar a partir do ponto de inserção de texto atual e continua até o final do método. É possível então continuar encontrando/substituindo usando os comandos Substituir Próximo e Substituir anterior do menu Editar.
Clique no botão Replace all para substituir todas as ocorrências correspondentes aos critérios de pesquisa diretamente no método aberto.
Encontrar o mesmo
O comando Find Same é usado para localizar cadeias de caracteres idênticas à selecionada. Esse comando só estará ativo se você tiver selecionado pelo menos um caractere no Code Editor.
A pesquisa realizada é do tipo "Localizar próximo" na janela atual do editor de código.
Os comandos Find Same Next e Find Same Previous são usados para localizar cadeias de caracteres estritamente idênticas às selecionadas. Por exemplo, as maiúsculas e minúsculas devem corresponder.
Marcar tudo
O comando Editar > Marcar tudo é ativado quando uma pesquisa já tiver sido especificada na caixa de diálogo localizar ou substituir. Quando você seleciona esse comando, 4D coloca um marcador em cada linha que contém um item correspondente aos critérios de pesquisa "atuais". Deste modo, é fácil identificar todos os resultados da pesquisa. Para obter mais informações sobre marcadores, consulte Marcadores.
Erros de sintaxe
4D verifica automaticamente a sintaxe do método para ver se está correta. Se introduzir texto ou selecionar um componente que não esteja sintaticamente correto, 4D apresenta um símbolo para indicar a expressão incorrecta ![]() . Quando você passa o mouse sobre o símbolo, uma dica de ajuda exibe a causa do erro:
. Quando você passa o mouse sobre o símbolo, uma dica de ajuda exibe a causa do erro:
![]()
Ao inserir o código, você pode verificar imediatamente a sintaxe da linha atual (sem avançar para a próxima linha) pressionando a tecla Enter no teclado numérico. 4D avalia a linha, formata, marca qualquer erro e coloca o ponto de inserção no final da linha. Quando uma linha de um método, classe ou função for marcada como tendo sintaxe inadequada, verifique e corrija a entrada. Se a linha estiver correta, 4D removerá o símbolo de erro. Quando salvar ou fechar a janela, todo o método é validado. Você também pode forçar a validação pressionando a tecla Enter.
Quando o método, classe ou função é validado, 4D verifica:
- erros básicos de sintaxe
- a estrutura das instruções (
If,End ife assim por diante) - correspondência de caracteres de fechamento no código, como parênteses ou aspas. Quando você digita um caractere de fechamento, 4D indica a correspondência enquadrando os caracteres de início/fim com retângulos cinzas:
![]()
Se você clicar em um caractere no código, 4D indica sua correspondência com retângulos cinza por padrão. Você pode modificar a maneira como 4D indica os caracteres correspondentes ou desativar esse recurso em Preferências > Métodos > Opções > Parenteses correspondentes.
O Code Editor só pode verificar erros óbvios de sintaxe (erros de ortografia e similares). Não verifica os erros que só ocorrem durante a execução. Erros de execução são capturados por 4D quando o código é executado.
4D tem um depurador integrado (consulte Depuração) para lidar com esses erros e corrigi-los. O compilador também oferece uma ajuda indispensável para a detecção de erros. Para obter mais informações sobre o compilador, consulte o capítulo Compilação.
Dicas de ajuda
O Editor de código fornece várias informações contextuais utilizando dicas de ajuda. Aparecem quando se passa o rato por cima de um objeto.
A barra de estado também fornece informações contextuais.
-
Erros: quando você passa o mouse sobre o símbolo que indica um erro à esquerda da área de edição, uma dica de ajuda exibe a causa do erro (consulte Erros de sintaxe).
-
Documentação do comando 4D: quando você passa o mouse sobre um comando ou função 4D, uma dica de ajuda fornece sua sintaxe juntamente com uma breve descrição de como funciona.

-
Tipo de variável e descrição: quando você passa o mouse sobre uma variável, uma dica de ajuda mostra seu tipo (se tiver sido explicitamente definido no método) e o comentário associado, se houver.

-
Métodos ou funções do projeto: quando você passa o mouse sobre um método projeto ou função de classe, uma dica de ajuda é exibida:
- ou os comentários especificados no Explorador.
- ou as primeiras linhas da função do método ou da classe, se ela incluir comentários (linhas que começam com // ou /.../ bloco de comentários). É prática comum inserir documentação para o método, assim como seus parâmetros, na forma de comentários no início do método. Você pode obter essa informação diretamente na gorjeta de ajuda, apenas certifique-se de remover primeiro quaisquer comentários encontrados no Explorer. Comentários no início de um método:
 Dica de ajuda em outro método:
-
Você também pode criar um arquivo de documentação dedicado chamado
<MethodName>.mdna pasta<package>/documentation. Veja Visualizando a documentação no editor de código
Comentar / Não comentar
A linguagem 4D suporta comentários, linhas inativas de código. O editor de código não aplica nenhum estilo específico nos comentários. O comprimento dos comentários é limitado ao tamanho máximo de 32.000 caracteres por linha.
Há dois tipos de comentários: //comment(comentário de linha única) e /comment/ (comentários em linha ou blocos de comentários de várias linhas).
Comentários podem ser criados digitando os caracteres /. Ou, o comando Comentário/Descomente encontrado no menu Método bem como no menu de contexto do Editor de Código é usado para marcar um grupo de linhas de código selecionadas como comentários de linha única, ou, pelo contrário, remover os caracteres de comentário de uma única linha de uma seleção. Para usar este comando, selecione o código a ser marcado como comentado, em seguida, selecione o comando Comentário/Descomentar:
 -->
--> 
Quando a seleção contém apenas código ativo, o comando Comentário é aplicado. Quando a seleção inclui tanto código ativo quanto linhas comentadas, é adicionado um par adicional de caracteres de comentário ( // ) a estas últimas; dessa forma, elas manterão seu estado inicial de comentário se a linha for posteriormente "descomentada." Quando a seleção contém apenas linhas comentadas, o comando Sem comentários é aplicado.
O comando Comentar/Descomentar opera apenas com linhas completas --- não pode ser usado para comentar apenas parte de uma linha.
Expandir / Recolher
O código 4D localizado dentro de loops e condições agora pode ser recolhido ou expandido, para facilitar a leitura dos métodos:
-
Código expandido:

-
Código recolhido:

Se você posicionar o mouse sobre o botão de expansão [...], uma dica de ajuda aparece, exibindo as primeiras linhas do código oculto.
Uma porção colapsada de código pode ser selecionada, copiada, colada ou excluída. Todas as linhas incluídas nesse documento serão copiadas, coladas ou excluídas, respectivamente. Quando uma parte do código é colada, é automaticamente expandida.
Existem várias formas de expandir e recolher código:
-
Clique nos ícones de expansão/colapso ([+] e [-] no Windows) ou no botão de abertura [...]
-
Use os comandos do submenu Método > Recolher/Expandir:
- Recolher Seleção / Expandir Seleção: recolhe ou expande todas as estruturas de código encontradas na seleção de texto.
- Recolher Nível Atual / Expandir Nível Atual: recolhe ou expande a estrutura do código no nível em que o cursor está localizado. Esses comandos também estão disponíveis no menu de contexto do editor.
- Recolher tudo / Expandir tudo: colapsa ou expande todos os laços e condições de um método. Estes comandos também estão disponíveis na barra de ferramentas do editor.
Blocos
Os blocos podem ser definidos por:
- Aspas
- Parênteses
- Uma estrutura lógica (If/Else/End if, While/End while, Repeat/Until Case of/End case)
- Parêntesis
Selecionar bloco envolvente
A função Select Enclosing Block é usada para selecionar o "bloco envolvente" do código que contém o ponto de inserção.
Se um bloco de texto já estiver selecionado, a função seleciona o bloco que o envolve com o nível superior seguinte e assim por diante, até que o método inteiro seja selecionado.
Pressionar Ctrl+Shift+B (Windows) ou Command+Shift+B (macOS) permite reverter essa operação e desmarcar o último bloco selecionado.
Nota: se o ponto de inserção for colocado em uma estrutura do tipo If ou Else, o bloco anexo será aquele que contém, respectivamente, a instrução If ou Else.
Início do bloco ou fim do bloco
Two commands make it easier to move around within code structures (e.g. If... Else... End if):
- Início do bloco: coloca o cursor no início da estrutura atual, logo antes da palavra-chave inicial.
- Fim do bloco: coloca o cursor no final da estrutura atual, logo após a palavra-chave final.
Esses comandos são encontrados no menu Método e no menu de contexto do editor. Também pode utilizar os seguintes atalhos:
- Windows: Ctrl + seta para cima ou Ctrl + seta para baixo'
- macOS: Comando + seta para cima ou Comando +seta para baixo.
Marcadores
4D permite que você associe marcadores a certas linhas em seus métodos. Você pode navegar rapidamente dentro do código passando de um favorito para outro usando comandos específicos.

Um favorito se move junto com sua linha original se linhas adicionais forem inseridas no método. Os marcadores são guardados com os métodos.
Os marcadores são gerenciados usando o submenu Marcadores do menu Método:
- Alternar: associa um favorito com a linha atual (onde o cursor está localizado) se ele ainda não tiver um ou remover o favorito existente se o fizer. Essa função também está disponível usando o comando Alternar marcador do menu de contexto do editor ou usando o atalho de teclado Ctrl+F3 (Windows) ou Command+F3 (macOS).
- Remover tudo: remove todos os favoritos da janela em primeiro plano.
- Ir para próximo / Ir para anterior: permite a navegação entre os marcadores na janela. Selecionar um desses comandos coloca o cursor sobre o primeiro caractere da linha associada ao marcador em questão. Você também pode usar os atalhos de teclado F3 (ir para o próximo) ou Shift+F3 (ir para o anterior).
Você pode usar marcadores como marcadores de linhas que contêm um item encontrado por uma pesquisa. Neste caso, 4D adiciona automaticamente os marcadores. Para mais informações, consulte Marcar tudo.
Revelar no Explorador
O comando Revelar no Explorer... abre uma janela do Explorer com o elemento de destino selecionado. Para fazer isso, coloque o cursor dentro do nome do elemento ou selecione-o, então escolha Método > Revelar no Explorer... .
Pesquisar chamadores
O comando Pesquisar chamadores no menu Método só está ativado para métodos de projeto. Ele procura todos os objetos (outros métodos ou menus) que fazem referência ao método do projeto.
Nota: o comando Pesquisar chamadores... também está disponível em Explorador > Métodos
Este comando apresenta os seus resultados numa nova janela.
Ir para Definição
O comando Goto Definition abre a definição de um elemento referenciado no Editor de código. Para fazer isso, coloque o cursor dentro do nome do objeto ou selecione-o e escolha Method > Goto Definition... ou use o menu de contexto do editor.
Essa funcionalidade também está disponível através do atalho de teclado Ctrl+K (Windows) / Command+K (macOS) ou Alt+double-click.
O efeito do comando Ir a Definição... varia dependendo do elemento de destino:
- com um método de projeto, ele exibe o conteúdo do método em uma nova janela do Editor de Código
- com um nome de classe ou função classe, ele abre a classe no Editor de código
- com um comando ou função 4D integrado, ele tem o mesmo efeito que o comando Mostrar documentação.
Mostrar documentação
O comando Mostrar documentação... abre a documentação do elemento de destino. Para fazer isso, coloque o cursor no nome do elemento ou selecione-o e, em seguida, escolha Método > Mostrar documentação... ou use o menu contextual. O efeito varia consoante o elemento alvo. Por exemplo:
- Selecionar um método de projeto ou uma classe de usuário e escolher Mostrar documentação... seleciona o método no Explorador e muda para a guia de documentação
- Ao selecionar um comando, função ou nome de classe 4D e escolher Mostrar documentação... será exibida a documentação online.
- Se nenhum elemento for selecionado, o comando abrirá a documentação do método aberto no momento no Editor de código, se houver.
Para exibir a documentação de um comando da linguagem "clássica" do 4D, selecione o nome do comando ou simplesmente coloque o cursor no nome e pressione F1. A documentação do comando é exibida em uma nova janela do seu navegador padrão. O 4D procura a documentação de acordo com as configurações feitas nas Preferências (consulte Localização da documentação).
Pesquisar referências
O comando Search References... encontrado no menu Method ou no menu de contexto do Editor de código localiza todos os objetos (métodos e formulários) no projeto em que o item atual do método é referenciado (usado).
O item atual é aquele selecionado ou aquele em que o cursor está localizado. Pode ser um nome de campo, nome de variável, comando, cadeia de caracteres e assim por diante. Por exemplo, a ação a seguir procura todas as ocorrências da variável vlNbCmd no banco de dados:

Este comando apresenta os seus resultados numa nova janela.