Form Editor
4D provides a full-featured Form editor that allows you to modify your form until you achieve the effect that you want. With the Form editor, you can create and delete form objects, manipulate them directly, and set form and object properties.
Interface
The Form editor interface displays each JSON form in its own window, which has both an object and tool bar. You can have several forms open at the same time.
Display options
You can show or hide several interface elements on the current page of the form:
- Inherited Form: Inherited form objects (if there is an inherited form).
- Page 0: Objects from page 0. This option allows you to distinguish between the objects on the form’s current page and those on page 0.
- Paper: Borders of the printing page, which are shown as gray lines. This element can only be displayed by default in "for printing" type forms.
- Rulers: Rulers of the Form editor’s window.
- Markers: Output control lines and associated markers that show the limits of the form’s different areas. This element can only be displayed by default in list forms.
- Marker Labels: Marker labels, available only when the output control lines are displayed. This element can only be displayed by default in list forms.
- Limits: Form’s limits. When this option is selected, the form is displayed in the Form editor as it appears in Application mode. This way you can adjust your form without having to switch to the Application mode in order to see the result.
The Size Based on, Hor margin and Vert margin settings of the form properties affect the form’s limits. When using these settings, the limits are based on the objects in the form. When you modify the size of an object that is located next to the form’s border, it is modified to reflect that change.
Default display
When a form is opened in the editor, interface elements are displayed or hidden by default, depending on:
- the New form default display options set in the Preferences - unchecked options cannot be displayed by default.
- the current form type:
- Markers and marker labels are always displayed by default on list forms
- Paper is displayed by default on "for printing" forms.
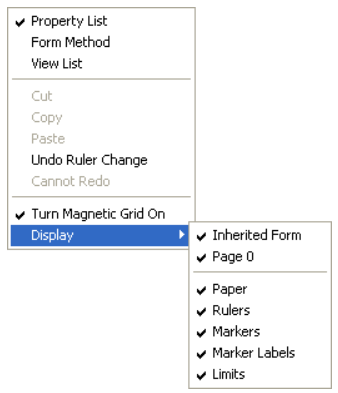
Display/Hide elements
You can display or hide elements at any moment in the Form editor’s current window by selecting Display from the Form menu or the Form editor's context menu:
Rulers
The rulers on the side and bottom help you position objects in the form. They can be displayed or hidden.
Select Ruler definition... from the Form menu to change measurement units so that the form displays inches, centimeters, or pixels.
Toolbar
The toolbar of the Form editor offers a set of tools to manipulate and modify the form. Each window has its own toolbar.

The toolbar contains the following elements:
| Icon | Name | Description |
|---|---|---|
| Execute the form | Used to test the execution of the form. When you click on this button, 4D opens a new window and displays the form in its context (list of records for a list form and current record page for a detail form). The form is executed in the main process. | |
| Selection tool | Allows selecting, moving and resizing form objects. Note: When an object of the Text or Group Box type is selected, pressing the Enter key lets you switch to editing mode. | |
| Entry order | Switches to “Entry order” mode, where it is possible to view and change the current entry order of the form. Note that shields allow viewing the current entry order, while still working in the form. | |
| Moving | Switches to “Move” mode, where it is possible to reach any part of the form quickly by using drag and drop in the window. The cursor takes the shape of a hand. This navigation mode is particularly useful when zooming in the form. | |
| Zoom | Allows modifying the form display percentage (100% by default). You can switch to “Zoom” mode by clicking on the magnifying glass or by clicking directly on the desired bar. This feature is detailed in previous section. | |
| Alignment | This button is linked to a menu that allows aligning objects in the form. It is enabled (or not) depending on the objects selected. Disabled if one selected object position is locked by a CSS property | |
| Distribution | This button is linked to a menu that allows distributing objects in the form. It is enabled (or not) depending on the objects selected. Disabled if one selected object position is locked by a CSS property | |
| Level | This button is linked to a menu that allows changing the level of objects in the form. It is enabled (or not) depending on the objects selected. | |
| Group/Ungroup | This button is linked to a menu that allows grouping and ungrouping selections of objects in the form. It is enabled (or not) depending on the objects selected. | |
| Display and page management | This area allows passing from one form page to another and adding pages. To navigate among form pages, click the arrow buttons, or click the central area and choose the page to display from the menu that appears. If you click the right arrow button while the last form page is displayed, 4D allows you to add a page. | |
| CSS Preview | This button is used to select the CSS Mode to use. | |
| Managing views | This button displays or hides the views palette. This function is detailed in Using object views . | |
| Displaying shields | Each click on this button causes the successive display of each type of form shield. The button is also linked to a menu that allows directly selecting the type of shield to display. | |
| Preconfigured object library | This button displays the preconfigured object library that provides numerous objects with certain properties that have been predefined. | |
| List Box Builder | This button creates new entity selection list boxes. | |
| Insert fields | This button inserts all fields (except object and blob type fields) of the form table in the form, along with their labels and with respect to interface standards. |
Object bar
The object bar contains all the active and inactive objects that can be used in 4D forms. Some objects are grouped together by themes. Each theme includes several alternatives that you can choose between. When the object bar has the focus, you can select the buttons using the keys of the keyboard. The following table describes the object groups available and their associated shortcut key.
| Button | Group | Key |
|---|---|---|
| Text / Group Box | T | |
| Input | F | |
| Hierarchical List / List Box | L | |
| Combo Box / Drop-down List / Picture Pop-up Menu | P | |
| Button / Picture Button / Button Grid | B | |
| Radio Button | R | |
| Check Box | C | |
| Progress Indicator / Ruler / Stepper / Spinner | I | |
| Rectangle / Line / Oval | S | |
| Splitter / Tab Control | D | |
| Plug-in Area / Subform / Web Area / 4D Write Pro / 4D View Pro | X |
To draw an object type, select the corresponding button and then trace the object in the form. After creating an object, you can modify its type using the Property List. Hold down the Shift key as you draw to constrain the object to a regular shape. Lines are constrained to horizontal, 45°, or vertical, rectangles are constrained to squares, and ovals are constrained to circles.
The current variant of the theme is the object that will be inserted in the form. When you click the right side of a button, you access the variant menu:

You can click twice on the button so that it remains selected even after you have traced an object in the form (continual selection). This function makes creating several successive objects of the same type easier. To cancel a continual selection, click on another object or tool.
Property List
Both forms and form objects have properties that control access to the form, the appearance of the form, and the behavior of the form when it is used. Form properties include, for example, the form’s name, its menu bar, and its size. Object Properties include, for example, an object’s name, its dimensions, its background color, and its font.
You can display and modify form and object properties using the Property List. It displays either form or objects properties depending on what you select in the editor window.
To display/hide the Property List, choose Property List from the Form menu or from the context menu of the Form editor. You can also display it by double-clicking in an empty area of the form.
Shortcuts
You can use the following shortcuts in the Property List:
- Arrow keys ↑ ↓: Used to go from one cell to another.
- Arrow keys ← →: Used to expand/collapse themes or enter edit mode.
- PgUp and PgDn: Used to scroll the Property List contents.
- Home and End: Used to scroll the Property List so that the first or last cell is displayed.
- Ctrl+click (Windows) or Command+click (macOS) on an event: Used to select/deselect every event in the list, according to the initial state of the event on which you clicked.
- Ctrl+click (Windows) or Command+click (macOS) on a theme label: Used to Collapse/Expand every theme in the list.
- Ctrl+click (Windows) or Command+click (macOS) on a property value displayed in bold: Resets the property to its default.
Manipulating Form Objects
Adding objects
You can add objects to forms in several ways:
- By drawing the object directly in the form after selecting its type in the object bar (see Using the object bar)
- By dragging and dropping the object from the object bar
- By drag-and-drop or copy-paste operations on an object selected from the preconfigured object library,
- By dragging and dropping an object from another form,
- By dragging and dropping an object from the Explorer (fields) or from other editors in the Design environment (lists, pictures, etc.)
Once the object is placed in the form, you can modify its characteristics using the Form editor.
You can work with two types of objects in your forms:
-
Static objects (lines, frames, background pictures, etc.): These objects are generally used for setting the appearance of the form and its labels as well as for the graphic interface. They are available in the object bar of the Form editor. You can also set their graphic attributes (size, color, font, etc.) and their resizing properties using the Property List. Static objects do not have associated variables like active objects. However, you can insert dynamic objects into static objects.
-
Active objects: These objects perform tasks or functions in the interface and can take many forms: fields, buttons, scrollable lists, etc. Each active object is associated with either a field or a variable.
Selecting objects
Before you can perform any operation on an object (such as changing a line width or font), you need to select the object that you want to modify.
To select an object using the toolbar:
- Click the Arrow tool in the toolbar.

When you move the pointer into the form area, it becomes a standard arrow-shaped pointer.
- Click the object you want to select. Resizing handles identify the selected object.

To select an object using the Property List:
- Choose the object’s name from the Object List drop-down list located at the top of the Property List. Using these two methods, you can select an object that is hidden by other objects or located outside the visible area of the current window. To deselect an object, click outside the object’s boundary or Shift+click the object.
It is also possible to select objects by double-clicking them in the result window of ""Find in design" operation.
Selecting multiple objects
You may want to perform the same operation on more than one form object — for example, to move the objects, align them, or change their appearance. 4D lets you select several objects at the same time. There are several ways to select multiple objects:
- Choose Select All from the Edit menu to select all the objects.
- Right-click on the object and choose the Select Similar Objects command in the context menu.
- Hold down the Shift key and click the objects you want to select.
- Start at a location outside the group of objects you want to select and drag a marquee (sometimes called a selection rectangle) around the objects. When you release the mouse button, if any part of an object lies within or touches the boundaries of the selection rectangle, that object is selected.
- Hold down the Alt key (Windows) or the Option key (macOS) and draw a marquee. Any object that is completely enclosed by the marquee is selected.
The figure below shows a marquee being drawn to select two objects:

To deselect an object that is part of a set of selected objects, hold down the Shift key and click the object. The other objects remain selected. To deselect all the selected objects, click outside the boundaries of all the objects.
Duplicating objects
You can duplicate any object in the form, including active objects. Copies of active objects retain all the properties of the original, including name, type, standard action, display format, and object method.
You can duplicate an object directly using the Duplicate tool in the Tools palette or use the Duplicate Many dialog box to duplicate an object more than once. Also, using this dialog box, you can set the distance between two copies.
To duplicate one or more objects:
- Select the object or objects that you want to duplicate.
- Choose Duplicate from the Edit menu. 4D creates a copy of each selected object and places the copy in front and slightly to the side of the original.
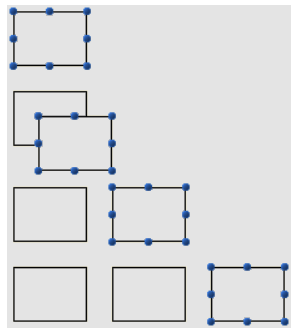
- Move the copy (or copies) to the desired location. If you choose the Duplicate menu item again, 4D creates another copy of each object and moves it the exact same distance and direction from the first copy. If you need to distribute copies of the object along a line, you should use the following procedure. Duplicate the original object, move the copy to another location in the form, and then duplicate the copy. The second copy is automatically placed in the same relation to the first copy as the first copy was in relation to the original object. Subsequent copies are also placed in the same relation to their originals. The figure below shows how this relative placement of copies works:
Duplicate Many
The "Duplicate Many" dialog box appears when you select one or more object(s) and choose the Duplicate Many... command from the Object menu.

-
In the upper area, enter the number of columns and lines (rows) of objects you want to get. For example, if you want three columns and two lines of objects, enter 3 in the Column(s) area and 2 in the Line(s) area. If you want three horizontal new copies of an object, enter 4 in the Column(s) area and leave the default value, 1, in the Line(s) area.
-
For lines and columns, define the offset that you wish to leave between each copy. The value must be expressed in points. It will be applied to each copy, or copies, in relation to the original object.For example, if you want to leave a vertical offset of 20 points between each object and the height of the source object is 50 points, enter 70 in the column’s “Offset” area.
-
If you wish to create a matrix of variables, select the Number Variables option and select the direction in which the variables are to be numbered, either by line(s) or by column(s). This option is active only when the selected object is a variable. For more information on this option, refer to Duplicating on a matrix in the Design Reference.
Moving objects
You can move any graphic or active object in the form including fields and objects created with a template. When moving an object, you have the following options:
- Move the object by dragging it,
- Move the object one pixel at a time using the arrow keys,
- Move the object by steps using the arrow keys (20-pixel steps by default),
As you begin dragging the selected object, its handles disappear. 4D displays markers that show the location of the object’s boundaries in the rulers so that you can place the object exactly where you want it. Be careful not to drag a handle. Dragging a handle resizes the object. You can press the Shift key to carry out the move with a constraint.
When the Magnetic Grid is on, objects are moved in stages indicating noticeable locations.
To move an object one pixel at a time:
- Select the object or objects and use the arrow keys on the keyboard to move the object. Each time you press an arrow key, the object moves one pixel in the direction of the arrow.
To move an object by steps:
- Select the object or objects you want to move and hold down the Shift key and use the arrow keys to move the object by steps. By default, steps are 20 pixels at a time. You can change this value on the Forms Page of the Preferences.
Grouping objects
4D lets you group objects so that you can select, move, and modify the group as a single object. Objects that are grouped retain their position in relation to each other. You would typically group a field and its label, an invisible button and its icon, and so forth.
When you resize a group, all the objects in the group are resized proportionally (except text areas, which are resized in steps according to their font sizes.
You can ungroup a group of objects to treat them as individual objects again.
An active object that has been grouped must be ungrouped before you can access its properties or method. However, it is possible to select an object belonging to a group without degrouping the set: to do this, Ctrl+click (Windows) or Command+click (macOS) on the object (the group must be selected beforehand).
Grouping only affects objects in the Form editor. When the form is executed, all grouped objects act as if they were ungrouped.
It is not possible to group objects belonging to different views and only those objects belonging to the current view can be grouped (see Views ).
To group objects:
- Select the objects that you want to group.
- Choose Group from the Object menu. OR
Click the Group button in the toolbar of the Form editor:
 4D marks the boundary of the newly grouped objects with handles. No handles mark the boundary of any of the individual objects within the group. Now, when you modify the grouped object, you change all the objects that make up the group.
To ungroup an object:
- Select the grouped object that you want to ungroup.
- Choose Ungroup from the Object menu.
OR
Click the Ungroup button (variant of the Group button) in the toolbar of the Form editor.
If Ungroup is dimmed, this means that the selected object is already separated into its simplest form. 4D marks the boundaries of the individual objects with handles.
Aligning objects
You can align objects with each other or using an invisible grid on the form.
- When you align one object to another, you can align it to the top, bottom, side, or horizontal or vertical center of the other object. You can directly align a selection of objects using the alignment tools or apply more advanced alignment settings using the Alignment Assistant. The latter option allows you, for example, to set the object that will be used as the position reference and to preview the alignment in the form before applying it.
- When you use the invisible grid, each object can be aligned manually with others based on “noticeable” positions which are depicted with dotted lines that appear when the object being moved approaches other objects.
Using the instantaneous alignment tools
The alignment tools in the toolbar and in the Align submenu of the Object menu allow you to quickly align selected objects.

When 4D aligns objects, it leaves one selected object in place and aligns the remaining objects to that one. This object is the “anchor.” It uses the object that is the furthest in the alignment’s direction as the anchor and aligns the other objects to that object. For instance, if you want to perform a right alignment on a set of objects, the rightmost object will be used as the anchor. The figure below shows objects with no alignment, "aligned left", "aligned horizontally by centers", and "aligned right":

Using the alignment assistant
The Alignment Assistant allows you to perform any type of alignment and/or distribution of objects.

To display this dialog box, select the objects you want to align then choose the Alignment command from the Align submenu in the Object menu or from the context menu of the editor.
-
In the “Left/Right Alignment” and/or “Top/Bottom Alignment” areas, click the icon that corresponds to the alignment you want to perform.
The example area displays the results of your selection. -
To perform an alignment that uses the standard anchor scheme, click Preview or Apply. In this case 4D uses the object that is the furthest in the alignment’s direction as the anchor and aligns the other objects to that object. For instance, if you want to perform a right alignment on a set of objects, the rightmost object will be used as the anchor. OR:
To align objects to a specific object, select the Align on option and select the object to which you want the other objects to be aligned from the object list. In this case, the position of the reference object will not be altered.
You can preview the results of the alignment by clicking the Preview button. The objects are then aligned in the Form editor but since the dialog box does not go away, you can still cancel or apply the alignment.
This dialog box allows you to align and distribute objects in one operation. For more information on how to distribute objects, refer to Distributing objects.
Using the Magnetic Grid
The Form editor provides a virtual magnetic grid that can help you place and align objects in a form. Magnetic alignment of objects is based on their position in relation to each other. The magnetic grid can only be used when at least two objects are present in the form.
This works as follows: When you move an object in the form, 4D indicates possible locations for this object based on noticeable alignments with other form objects. A noticeable alignment is established each time that:
- Horizontally, the edges or centers of two objects coincide,
- Vertically, the edges of two objects coincide.
When this happens, 4D places the object at the location and displays a red line indicating the noticeable alignment taken into account:

Concerning the distribution of objects, 4D proposes a distance based on interface standards. Like with magnetic alignment, red lines indicate the noticeable differences once they are reached.

This operation applies to all types of form objects. The Magnetic Grid can be enabled or disabled at any time using the Magnetic Grid command in the Form menu or in the editor context menu. It is also possible to set the activation of this feature by default on the Preferences > Forms page (Activate auto alignment by default option). You can manually activate or deactivate the magnetic grid when an object is selected by pressing the Ctrl (Windows) or Control (macOS) key .
The Magnetic Grid also influences the manual resizing of objects.
Distributing objects
You can distribute objects so that they are set out with an equal amount of space between them. To do this, you can distribute objects using either the Distribute tools in the Tools palette or the Alignment Assistant. The latter allows you to align and distribute objects in one operation.
When the Magnetic Grid is on, a visual guide is also provided for distribution when an object is moved manually.
To distribute objects with equal spacing:
-
Select three or more objects and click the desired Distribute tool.
-
In the toolbar, click on the distribution tool that corresponds to the distribution you want to apply.

OR
Select a distribution menu command from the Align submenu in the Object menu or from the context menu of the editor. 4D distributes the objects accordingly. Objects are distributed using the distance to their centers and the largest distance between two consecutive objects is used as a reference.
To distribute objects using the Align and Distribute dialog box:
-
Select the objects you want to distribute.
-
Choose the Alignment command from the Align submenu in the Object menu or from the context menu of the editor. The following dialog box appears:
-
In the Left/Right Alignment and/or Top/Bottom Alignment areas, click the standard distribution icon:

(Standard horizontal distribution icon)
The example area displays the results of your selection. -
To perform a distribution that uses the standard scheme, click Preview or Apply.
In this case 4D will perform a standard distribution, so that the objects are set out with an equal amount of space between them.
OR:
To execute a specific distribution, select the Distribute option (for example if you want to distribute the objects based on the distance to their right side). This option acts like a switch. If the Distribute check box is selected, the icons located below it perform a different function:
- Horizontally, the icons correspond to the following distributions: evenly with respect to left sides, centers (hor.) and right sides of the selected objects.
- Vertically, the icons correspond to the following distributions: evenly with respect to top edges, centers (vert.) and bottom edges of the selected objects.
You can preview the actual result of your settings by clicking on the Preview button: the operation is carried out in the Form editor but the dialog box stays in the foreground. You can then Cancel or Apply the modifications.
This dialog box lets you combine object alignment and distribution. For more information about alignment, refer to Aligning objects.
Layering objects
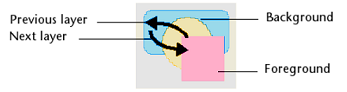
You will sometimes have to rearrange objects that are obstructing your view of other objects in the form. For example, you may have a graphic that you want to appear behind the fields in a form. 4D provides four menu items, Move to Back, Move to Front, Up One Level and Down One Level that let you “layer” objects on the form. These layers also determine the default entry order (see Modifying data entry order). The figure below shows objects in front of and behind other objects:
To move an object to another level, select it and choose:
- One of the Move to Back, Move to Front, Up One Level and Down One Level commands of the Object menu,
- One of the commands in the Level> submenu in the context menu of the editor,
- One of the commands associated with the level management button of the toolbar.

When several objects are superimposed, the Ctrl+Shift+click / Command+Shift+click shortcut can be used to select each object successively by going down a layer with each click.
In binary databases, use Ctrl+Click / Command+Click to perform the same action.
When ordering different levels, 4D always goes from the background to the foreground. As a result, the previous level moves the selection of objects one level towards the background. The next level moves the selection one level towards the foreground of the form.
Data entry order
The data entry order is the order in which fields, subforms, and other active objects are selected as you hit the Tab or the Carriage return key in an input form. It is possible to move through the form in the opposite direction (reverse data entry order) by pressing the Shift+Tab or Shift+Carriage return keys.
You can change the entry order at runtime using the
FORM SET ENTRY ORDERandFORM GET ENTRY ORDERcommands.
Every object that supports the focusable property is included in the data entry order by default.
Setting the entry order for a JSON form is done with the entryOrder property.
If you don’t specify a custom entry order, by default 4D uses the layering of the objects to determine the entry order in the direction “background towards foreground.” The standard entry order thus corresponds to the order in which the objects were created in the form.
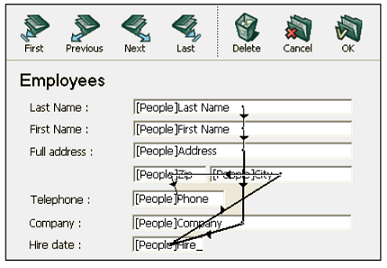
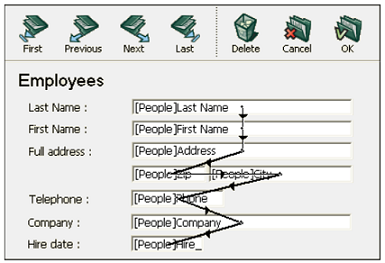
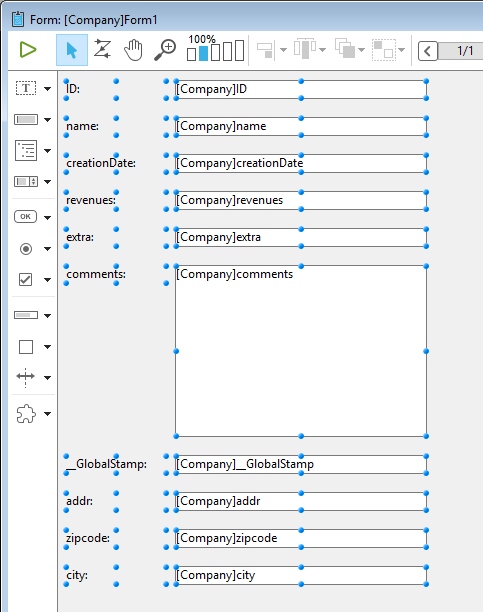
In some forms, a custom data entry order is needed. Below, for example, additional fields related to the address have been added after the creation of the form. The resulting standard entry order thus becomes illogical and forces the user to enter the information in an awkward manner:
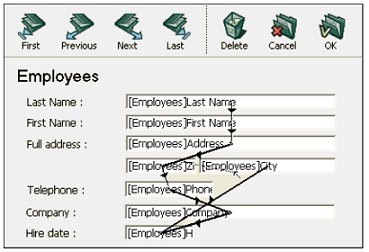
In cases such as this, a custom data entry order allows you to enter the information in a more logical order:
Viewing and changing the data entry order
You can view the current entry order either using the “Entry order” shields, or by using the “Entry order” mode. However, you can only modify the entry order using the “Entry order” mode.
This paragraph describes viewing and modifying the entry order using the “Entry order” mode. For more information about viewing the entry order using shields, refer to Using shields.
To view or change the entry order:
-
Choose Entry Order from the Form menu or click on the Entry Order button in the toolbar of the window:

The pointer turns into an entry order pointer and 4D draws a line in the form showing the order in which it selects objects during data entry. Viewing and changing the data entry order are the only actions you can perform until you click any tool in the Tools palette.
-
To change the data entry order, position the pointer on an object in the form and, while holding down the mouse button, drag the pointer to the object you want next in the data entry order.
4D will adjust the entry order accordingly. -
Repeat step 2 as many times as necessary to set the data entry order you want.
-
When you are satisfied with the data entry order, click any unselected tool in the toolbar or choose Entry Order from the Form menu. 4D returns to normal operation of the Form editor.
Only the entry order of the current page of the form is displayed. If the form contains enterable objects on page 0 or coming from an inherited form, the default entry order is as follows: Objects from page 0 of the inherited form > Objects from page 1 of the inherited form > Objects from page 0 of the open form > Objects from the current page of the open form.
Using a data entry group
While you are changing the data entry order, you can select a group of objects in a form so that the standard data entry order applies to the objects within the group. This allows you to easily set the data entry order on forms in which fields are separated into groups or columns.
To create a data entry group:
- Choose Entry Order from the Form menu or click the button in the toolbar.
- Draw a marquee around the objects you want to group for data entry.
When you release the mouse button, the objects enclosed or touched by the rectangle follow the standard data entry order. The data entry order for the remaining objects adjusts as necessary.
Excluding an object from the entry order
By default, all objects that support the focusable property are included in the entry order. To exclude an object from the entry order:
-
Select the Entry order mode, then
-
shift-click on the object
-
right-click on the object and select Remove from entry order option from the context menu
CSS Preview
The Form editor allows you to view your forms with or without applied CSS values.
When style sheets have been defined, forms (including inherited forms and subforms) are opened in the CSS Preview mode for your operating system by default.
Selecting CSS Preview Mode
The Form editor toolbar provides a CSS button for viewing styled objects:

Select one of the following preview modes from the menu:
| Toolbar Icon | CSS Preview Mode | Description |
|---|---|---|
| None | No CSS values are applied in the form and no CSS values or icons displayed in the Property List. | |
| Windows | CSS values for Windows platform are applied in the form. CSS values and icons displayed in the Property List. | |
| macOS | CSS values for macOS platform are applied in the form. CSS values and icons displayed in the Property List. |
If a font size too large for an object is defined in a style sheet or JSON, the object will automatically be rendered to accommodate the font, however the size of the object will not be changed.
The CSS preview mode reflects the priority order applied to style sheets vs JSON attributes as defined in the JSON vs Style Sheet section.
Once a CSS preview mode is selected, objects are automatically displayed with the styles defined in a style sheet (if any).
When copying or duplicating objects, only the CSS references (if any) and the JSON values are copied.
CSS support in the Property List
In CSS Preview mode, if the value of an attribute has been defined in a style sheet, the attribute's name will appear with a CSS icon displayed next to it in the Property List. For example, the attribute values defined in this style sheet:
.myButton {
font-family: comic sans;
font-size: 14;
stroke: #800080;
}
are displayed with a CSS icon in the Property List:
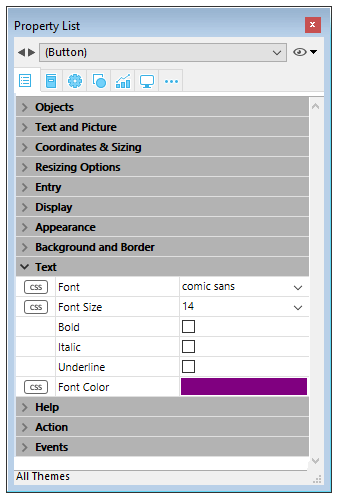
An attribute value defined in a style sheet can be overridden in the JSON form description (except if the CSS includes the !important declaration, see below). In this case, the Property List displays the JSON form value in bold. You can reset the value to its style sheet definition with the Ctrl + click (Windows) or Command + click (macOs) shortcuts.
If an attribute has been defined with the
!importantdeclaration for a group, an object within a group, or any object within a selection of multiple objects, that attribute value is locked and cannot be changed in the Property List.
Property List CSS Icons
| Icon | Description |
|---|---|
| Indicates that an attribute value has been defined in a style sheet | |
Indicates that an attribute value has been defined in a style sheet with the !important declaration | |
| Displayed when an attribute value defined in a style sheet for at least one item in a group or a selection of multiple objects is different from the other objects |
List Box Builder
You can create new entity selection list boxes quickly with the List box builder. The new list box can be used immediately or it can be edited via the Form Editor.
The List box builder lets you create and fill entity selection list boxes in a few simple operations.
Using the List Box Builder
- In the Form Editor toolbar, click on the List box builder icon:

The List box builder is displayed:

- Select a table from the Table dropdown list:

- Select the fields for the list box in the Fields area:
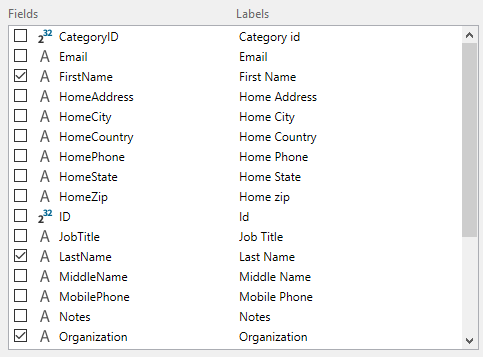
By default, all fields are selected. You can select or deselect fields individually or use Ctrl+click (Windows) or Cmd+click (macOS) to select or deselect them all at once.
You can change the order of the fields by dragging them and dropping them.
- The expression to fill the list box's rows from the entity selection is prefilled:

This expression can be changed if necessary.
- Clicking on the Copy button will copy the expression for loading all records into memory:

- Click the the Build widget button to create the list box.
![]()
The final list box:

Insert fields
The Insert fields button inserts all fields (except object and blob type fields) of the form table in the form, along with their labels and with respect to interface standards. This wizard is a shortcut to design basic entry forms or list forms.
The Insert fields button is only available with table forms.
The design of the resulting form depends on the form type:
- Detail form: clicking on the Insert fields button generates a form with a page design:
- List form: clicking on the Insert fields button generates a list form design with fields organized on a single line and area markers:

Shields
The 4D Form Editor uses shields to make viewing object properties easier. You can find them on the form toolbar:
This function works as follows: Each shield is associated with a property (for example, Views, which means the object “is in the current view”). When you activate a shield, 4D displays a small icon (shield) in the upper left of each object of the form where the property is applied.

Using shields
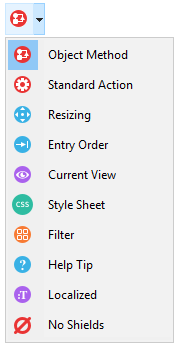
To activate a shield, click the Shield icon from the toolbar until the desired shield is selected. You can also click on the right side of the button and select the type of shield to display directly in the associated menu:
If you don't want to display shields, select No Shields in the selection menu.
You can set which shields to display by default on the Forms Page of the application Preferences.
Shield descriptions
Here is a description of each type of shield:
| Icon | Name | Is displayed ... |
|---|---|---|
| Object Method | For objects with an associated object method | |
| Standard Action | For objects with an associated standard action | |
| Resizing | For objects with at least one resizing property, indicates the combination of current properties | |
| Entry Order | For enterable objects, indicates the number of entry order | |
| Current View | For all objects in the current view | |
| Style Sheet | For objects with one or more attribute values overridden by a style sheet. | |
| Filter | For enterable objects with an associated entry filter | |
| Help Tip | For objects with an associated tip | |
| Localized | For objects whose label comes from a reference (label beginning with “:”). The reference can be of the resource (STR#) or XLIFF type | |
| No Shields | No shields appear |
Views
The 4D Form Editor enables you to build complex forms by distributing form objects among separate views that can then be hidden or shown as needed.
For example, you can distribute objects according to type (fields, variables, static objects, etc.). Any type of form object, including subforms and plug-in areas, can be included in views.
There is no limit on the number of views per form. You can create as many different views as you need. Additionally, each view can be displayed, hidden, and/or locked.
View management is handled via the View palette.

Accessing the View palette
There are three ways to access the View palette:
- Toolbar: Click on the Views icon in the Form Editor toolbar. (This icon appears gray when at least one object belongs to a view other than the default view.)
| Default view only | With additional views |
|---|---|
- Context menu (form or object): Right-click anywhere in the Form Editor or an object, and select Current View

The current view is indicated with a check mark (e.g., "Work Address" in the image above)
- Form menu: Click on the Form menu and select View List

Before you begin
Here are a few important things to know before you start working with views:
-
Context of use: Views are a purely graphic tool which can only be used in the Form Editor; you cannot access views programmatically or in the Application environment.
-
Views and pages: Objects of the same view can belong to different form pages; only objects of the current page (and of page 0 if it is visible) can be displayed, regardless of the view configuration.
-
Views and levels: Views are independent of object levels; there is no display hierarchy among different views.
-
Views and groups: Only objects belonging to the current view can be grouped.
-
Current and Default views: The Default view is the first view of a form and cannot be deleted; the Current view is the view that is being edited and the name is displayed in bold text.
Managing views
Creating views
Any object created in a form is placed in the first view ("View 1") of the form. The first view is always the default view, indicated by (Default) after the name. The view's name can be changed (see Renaming views), however it remains the default view.

There are two ways to add additional views:
- Click on the Add a new view button at the bottom of the View palette:

- Right-click on an existing view and select Insert view:

There is no limitation on the number of views.
Renaming views
By default views are named as "View" + the view number, however you can change these names to improve readability and better suit your needs.
To rename a view, you can use either:
- Double-click directly on the view name (the selected view in this case). The name then becomes editable:

- Right-click on the view name. The name then becomes editable:

Reordering views
You can change the display order of views by dragging/dropping them within the View palette.
Note that the Default view does not change:

Deleting views
To rename a view, you can use either:
- Click on the Delete the selected view button at the bottom of the View palette:

- Right-click on the view name, and select Delete View:

If a view is deleted, any objects in it are automatically moved to the Default view.
Using views
Once views are created, you can use the View palette to:
- Add object to views,
- Move objects from one view to another,
- Select all objects of the same view in a single click,
- Display or hide objects for each view,
- Lock the objects of a view.
Adding objects to views
An object can only belong to a single view.
To create an object in another view, simply select the view in the View palette (prior to creating the object) by clicking its name (an Edit icon is displayed for the Current view and the name appears in bold text):

Moving objects between views
It's also possible to move one or more objects from one view to another. In the form, select the object(s) whose view you wish to change. The view list indicates, using a symbol, the view to which the selection belongs:

The selection can contain several objects belonging to different views.
Simply select the destination view, right-click, and select Move to:

OR
Select the destination view of the selection and click Move to button at the bottom of the View palette:

The selection is then placed in the new view:

You can also move an object to another view via the object's context menu. Right-click on the object, select Move to view, and select a view from the list of available views:
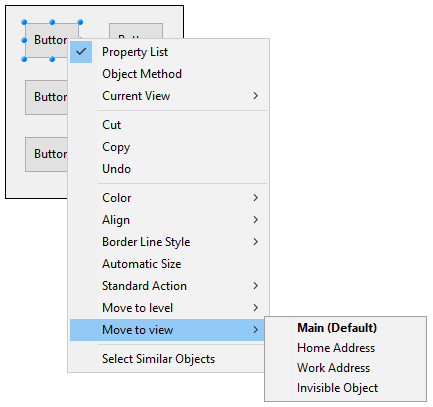
The Current view is shown in bold text.
Select all objects of a view
You can select all objects belong to the same view in the current page of the form. This function is useful for applying global changes to a set of objects.
To do this, right-click on the view in which you wish to select all the objects, click on Select All:

You can also use the button at the bottom of the View palette:

Show or hide objects of a view
You can show or hide objects belonging to a view at any time in the form's current page. This way you can focus on certain objects when editing the form, for example.
By default, all views are shown, as indicated by the Show/Hide icon:

To hide a view, click the Show/Hide icon. It is then dimmed and objects of the corresponding view are no longer shown in the form:

The Current view cannot be hidden.
To show a view that is hidden, simply select it or click on the Show/Hide icon for that view.
Locking objects of a view
You can lock the objects of a view. This prevents them from being selected, changed, or deleted from the form. Once locked, an object cannot be selected by a click, a rectangle, or the Select Similar Objects command of the context menu. This function is useful for preventing handling errors.
By default, all views are unlocked, as indicated by the Lock/Unlock icon next to each view:

To lock the objects of a view, click the Lock/Unlock icon. The padlock is shut, which means that the view is now locked:

The Current view cannot be locked.
To unlock a view that is locked, simply select it or click on the Lock/Unlock icon for that view.
Zoom
You can zoom in the current form. Switch to “Zoom” mode by clicking on the magnifying glass icon or clicking directly on the desired percentage bar (50%, 100%, 200%, 400% and 800%):
![]()
- When you click on the magnifying glass, the cursor changes into one. You can then click in the form to increase the display or hold down Shift and click to reduce the display percentage.
- When you click on a percentage bar, the display is immediately modified.
In Zoom mode, all Form editor functions remain available(*).
(*) For technical reasons, it is not possible to select list box elements (headers, columns, footers) when the Form editor is in Zoom mode.