Qodly Studio for 4D
Qodly Studio is an interface builder for web applications. It provides developers with a graphical page editor to design applications running in web browsers or smartphones. It supports natively the ORDA objects.
You can use Qodly Studio directly from your 4D environment to build modern and sophisticated interfaces that you can easily integrate to your existing 4D projects and deploy on premise.
Qodly Studio can also be used in the Qodly Cloud platform, dedicated to the development of web business applications.
Qodly Studio proposes a full-featured web UI, allowing you to:
- create Qodly pages by placing components on a canvas
- map components to Qodly Sources
- trigger 4D code by configuring events
- and much more.
Configuration
Requirements
Browser
Qodly Studio supports the following web browsers:
- Chrome
- Edge
- FireFox
The recommended resolution is 1920x1080.
4D application
- Development: 4D v20 R2 or higher
- Deployment: 4D Server v20 R2 or higher
- Qodly Studio only works with 4D projects (binary databases are not supported).
- Web sessions (aka Scalable sessions) must be enabled.
- The 4D code called by Qodly forms must be thread-safe.
Enabling access to Qodly Studio
By default, access to Qodly Studio is not granted.
Qodly Studio is served by the WebAdmin web server and displays data from 4D projects handled by the 4D web server.
To enable access to Qodly Studio, you must explicitly allow it at two levels:
- at 4D application level
- at project level
If one of the two levels (or both) are not enabled, access to Qodly Studio is denied (a 403 page is returned).
At 4D level
As a first security level, you need to allow access to Qodly Studio on the WebAdmin web server. This setting applies to the 4D application (4D or 4D Server) on the host machine. All projects opened with that 4D application take this setting into account.
Keep this option unchecked if you want to make sure no access to Qodly Studio is allowed on the application. Check this option to make it possible to access Qodly Studio. However, you still need to enable it at every project level.
Additionally, you can configure the WebAdmin web server's HTTP/HTTPS port used.
After any change to these settings, you must restart the WebAdmin web server for the new configuration to be effective.
At project level
After you have enabled access to Qodly Studio at the 4D level, you need to explicitly designate every project that can be accessed. The Enable access to Qodly Studio option must be enabled on the Web Features page of the 4D application's Settings.
Keep in mind that user settings can be defined at several levels, and that priorities apply.
Activating authentication
Authentication on the WebAdmin web server is granted using an access key. For more details, see Access key.
Development and deployment
In accordance with the management of 4D projects, only the following usages are supported:
- development with Qodly Studio must be done using 4D (single-user).
- deployment of 4D applications powered with Qodly pages must be done using 4D Server.
You can open Qodly Studio, debug and edit Qodly pages directly on a 4D Server machine when a project is running in interpreted mode. This feature is only provided for testing and debugging purposes, for example to evaluate the application flow with actual data, or in multi-user environment. It must NOT be considered as a regular way to develop applications since it does not provide any control over concurrent accesses.
Opening Qodly Studio
The Qodly Studio page is available when the WebAdmin web server is running and authentication is activated (see above).
There are two ways to access Qodly Studio:
-
by selecting the Qodly Studio... menu command from the Design menu (4D single-user) or the Window menu (4D Server). If the WebAdmin web server is already running, depending on its configuration, your default browser opens at
IPaddress:HTTPPort/studioorIPaddress:HTTPSPort/studio. Otherwise, you will be prompted if you want to start the WebAdmin web server first. -
on a browser, with the WebAdmin web server running (launched from 4D or 4D Server), enter the following address:
IPaddress:HTTPPort/studioor:
IPaddress:HTTPSPort/studioFor example, after launching a local web server on port 7080, type this address in your browser:
localhost:7080/studioYou will then be prompted to enter the access key to access Qodly Studio.
Developing with Qodly Studio
Documentation
The Qodly Studio documentation is available on the Qodly documentation website.
You can rely on this documentation and its associated resources for developing web applications powered by Qodly pages. However, depending on implementation stage, 4D developers will either use Qodly Studio or 4D IDE (see Feature comparison).
Code examples are provided in QodlyScript, but since QodlyScript inherits from the 4D Language, you won't be lost. For more information, see the From QodlyScript to 4D Language page.
There is no direct compatibility between apps implemented with 4D and apps implemented with Qodly.
Feature comparison
| Qodly Studio in 4D | Qodly Studio in Qodly Cloud platform | |
|---|---|---|
| View and edit tables (dataclasses), attributes and relations | 4D Structure Editor(1) | Qodly Studio Model Editor |
| Qodly pages | Qodly Studio Page Editor | Qodly Studio Page Editor |
| Desktop forms | 4D IDE | not supported |
| Programming language | 4D Language featuring ORDA | QodlyScript featuring ORDA |
| Coding IDE | 4D IDE code editor or VS Code with 4D-Analyzer extension 4D Server only: Qodly Studio code editor (see (2)) | Qodly Studio code editor |
| Debugger | 4D IDE debugger 4D Server only: Qodly Studio debugger (see this paragraph) | Qodly Studio debugger |
| REST/Web roles and privileges | roles.json direct edit/Qodly Studio roles and privileges editor | Qodly Studio role and privileges editor |
(1) The Model item is disabled in Qodly Studio.
(2) In 4D Server, opening 4D code with the Qodly Studio code editor is supported for testing and debugging purposes (see this paragraph). Note that in 4D single-user, if you open some 4D code with the Qodly Studio code editor, syntax coloring is not available and a "Lsp not loaded" warning is displayed.
Language
The following commands and classes are dedicated to the server-side management of Qodly pages:
Web Formcommand: returns the Qodly page as an object.Web Eventcommand: returns events triggered within Qodly page components.WebFormclass: functions and properties to manage the rendered Qodly page.WebFormItemclass: functions and properties to manage Qodly page components.
Using project methods
We recommend using class functions over project methods. Only class functions can be called from components. However, you can still use your project methods in Qodly Studio in two ways:
- You can call your methods from class functions.
- You can directly execute your methods from the Qodly Explorer.
Offline use
You can develop with Qodly Studio while your computer is not connected to the internet. In this case however, the following features are not available:
- Templates: the Template library is empty
- UI tips: they are not displayed when you click on
 icons.
Deployment
Enabling rendering
Qodly Studio encapsulates Qodly pages, including layout, data connections, and event-driven logic, in a structured JSON file. This JSON file is processed on-the-fly by the Qodly renderer to serve a fully functional web page.
See this page for detailed information on how to render Qodly pages in Qodly.
To enable the rendering of Qodly pages, the following options must be set.
- The 4D project's Settings > Web > Web Features > Expose as REST server option must be activated.
- The 4D web server must be running.
Renderer buttons are not available if the configuration options are not activated.
Scope of Qodly forms
When rendering Qodly forms in the Qodly Studio, the renderer will connect to the 4D web server through HTTP or HTTPS, depending on the settings, following the same HTTP/HTTPS connection pattern as for the 4D WebAdmin web server. See also this paragraph about URL schemes and license usage.
Keep in mind that Qodly Studio runs through the 4D WebAdmin web server. When you use Qodly Studio as a developer, even when you preview a Qodly Page in the studio, you're using the 4D WebAdmin web server. This allows you to see dataclasses, functions and attributes that are not exposed as REST resources for example (they are greyed out).
However, page rendering happens outside Qodly Studio, and is served by the standard 4D web server. In this situation, your web application cannot access assets that are not exposed as REST resources. See Exposed vs non-exposed functions and Exposing tables for more information on how to expose assets.
Accessing Qodly pages
For deployment, the WebAdmin server is not necessary. End-user access to your web application made with Qodly Studio is based on the 4D REST protocol, and as such, it works as through a conventional 4D remote application.
Your Qodly pages are available through the following url:
IP:port/$lib/renderer/?w=QodlyPageName
...where IP:port represents the address of the web server and QodlyPageName is the name of the Qodly page.
For example:
https://www.myWebSite.com/$lib/renderer/?w=welcome
Preview Qodly Application
You can preview your Qodly application at any moment by selecting the Preview Qodly Application... command in the Windows menu (4D Server) or in the Design menu (4D single-user).
This command launches the Qodly renderer on a local address in your default browser and displays the start page defined in the Application settings of Qodly Studio.
Using Qodly debugger on 4D Server
When using Qodly pages in a deployed 4D Server application (interpreted mode), you might encounter some cases where you need to debug your pages on the server, for example when a specific user configuration is required. In this case, you can attach the Qodly Studio debugger to the 4D Server and then, benefit from its features when executing your Qodly pages.
Note that in this case, the Qodly Studio debugger will display all the code executed on the server, in accordance with the attached debugger rule on 4D Server.
To attach the Qodly Studio debugger to your running 4D Server application:
- Open Qodly Studio from 4D Server.
The project must be running in interpreted mode so that Qodly Studio menu item is available.
- In the Qodly Studio toolbar, click on the Debug button.

If the debug session starts successfully, a green bullet appears on the button label ![]() and you can use the Qodly Studio debugger.
and you can use the Qodly Studio debugger.
If the debugger is already attached to a another machine or another Qodly Studio page, an error is displayed. You have to detach it beforehand from the other location.
To detach the Qodly Studio debugger from your running 4D Server application:
- Click the Debug button in the Qodly Studio toolbar while a debug session is active. A warning dialog box will prompt you to confirm whether you want to detach the debugger.
- Select Keep in progress to continue evaluating the code until the end of the current method or function before detaching the debugger, or Stop to detach the debugger immediately.
Force login
With Qodly Studio for 4D, the "force login" mode allows you to control the number of opened web sessions that require 4D Client licenses. You can also logout the user at any moment to decrement the number of retained licenses.
Configuration
Make sure the "force login" mode is enabled for your 4D application in the Roles and Privileges page, using the Force login option:
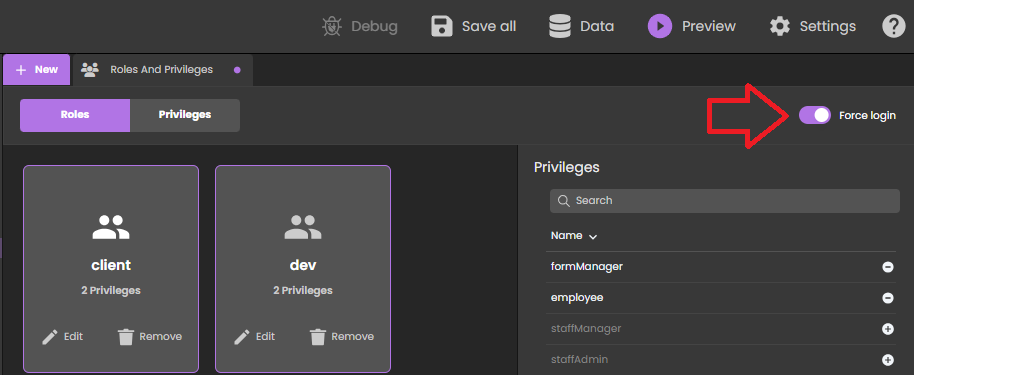
You can also set this option directly in the roles.json file.
You just need then to implemented the authentify() function in the datastore class and call it from the Qodly page. A licence will be consumed only when the user is actually logged.
When the legacy login mode (deprecated as of 4D 20 R6) is enabled, any REST request, including the rendering of an authentication Qodly page, creates a web session on the server and gets a 4D Client license, whatever the actual result of the authentication. For more information, refer to this blog post that tells the full story.
Example
In a simple Qodly page with login/password inputs, a "Submit" button calls the following authentify() function we have implemented in the DataStore class:
exposed Function authentify($credentials : Object) : Text

var $salesPersons : cs.SalesPersonsSelection
var $sp : cs.SalesPersonsEntity

$salesPersons:=ds.SalesPersons.query("identifier = :1"; $credentials.identifier)
$sp:=$salesPersons.first()

If ($sp#Null)
	If (Verify password hash($credentials.password; $sp.password))

		Session.clearPrivileges()
		Session.setPrivileges("") //guest session

		return "Authentication successful"
	Else
		return "Wrong password"
	End if
Else
	return "Wrong user"
End if
This call is accepted and as long as the authentication is not successful, Session.setPrivileges() is not called, thus no license is consumed. Once Session.setPrivileges() is called, a 4D client licence is used and any REST request is then accepted.
Logout
When the "force login" mode is enabled, Qodly Studio for 4D allows you to implement a logout feature in your application.
To logout the user, you just need to execute the Logout standard action from the Qodly page. In Qodly Studio, you can associate this standard action to a button for example:

Triggering the logout action from a web user session has the following effects:
- the current web user session loses its privileges, only descriptive REST requests are allowed,
- the associated 4D license is released,
- the
Session.storageis kept until the web session inactivity timeout is reached (at least one hour). During this period after a logout, if the user logs in again, the same session is used and theSession.storageshared object is available with its current contents.
About license usage for rendering
In default mode when any page is rendered, or in "force login" mode when a page handling data or calling a function is rendered, you must have an available license, as rendering Qodly forms targets the project database's main web server.
URL Schemes
Qodly Studio's URL scheme configuration (HTTP and HTTPS) determines how many licenses are retained when rendering Qodly forms. With the appropriate configuration, you can avoid unnecessary license retaining.
As explained in the configuration section, the WebAdmin web server provides a secured web access to Qodly Studio. On the other hand, the renderer communicates with the 4D web server of the database using REST requests. As such, it behaves like a conventional 4D Client.
If you run the renderer from the Qodly Studio and these two web servers are not reached through the same URL scheme (HTTP or HTTPS), it might lead to wrong licence counting.
Using different schemes might also lead to session issues, such as losing privileges after a page refresh.
Example
-
You run the Qodly Studio on an HTTPS URL scheme (e.g.
https://127.0.0.1:7443/studio/) -
The web server of your database is started only on an HTTP port.

- In Qodly Studio, you click on the Preview icon. You are warned that the two web servers are started on different schemes, but despite this you click on the Confirm button.
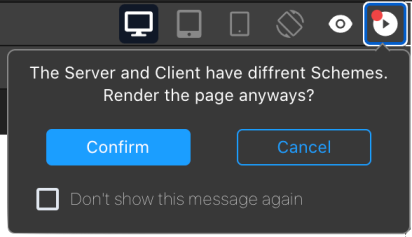
As a result, two licenses are retained.
You can enable/disable the display of the renderer pop over using a Qodly Studio user setting.
SameSite attribute
The behavior previously described is due to the session cookie of the 4D web server. This session cookie has a SameSite attribute that determines if the session cookie is sent to the web server.
If the SameSite attribute's value is Strict (default), the session cookie is not sent to the web server, so a new session is opened each time a page is rendered or refreshed.
For more information on the SameSite attribute, check out this blog post.
Recommendations
To avoid using more licenses than necessary, we recommend doing one of the following:
- Run the renderer on another browser tab (by entering the rendered URL of your Qodly page:
IP:port/$lib/renderer/?w=QodlyPageName). - Ensure the Qodly Studio and your database are reached on the same URL scheme.
- Use the
Laxvalue for the session cookie of your project database's web server.