Administration
4D provides several integrated tools to start, stop, or monitor the integrated web server.
Starting the 4D Web Server
To be able to launch the web server of 4D or 4D Server, you must have a "4D Web Application" license. For more information, please refer to the 4D Web site.
A 4D project can start and monitor a web server for the main (host) application as well as for each hosted component.
The main 4D web server can be started in different ways:
-
Using a button/menu command.
- 4D: Run>Start Web Server menu

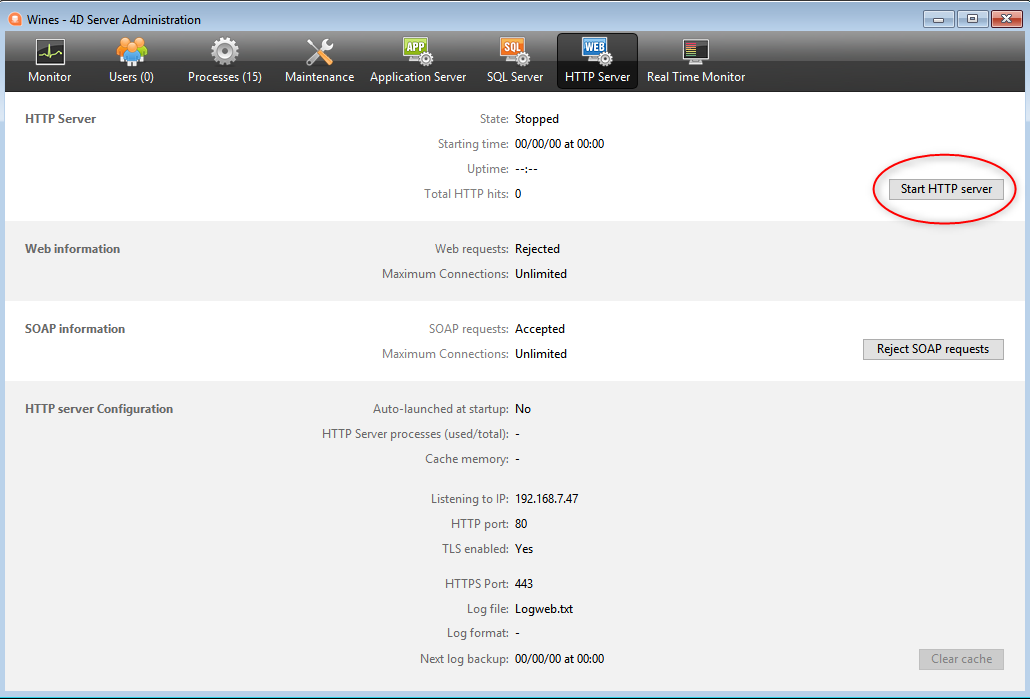
- 4D Server: Start HTTP server button of the HTTP Server page
- 4D: Run>Start Web Server menu
-
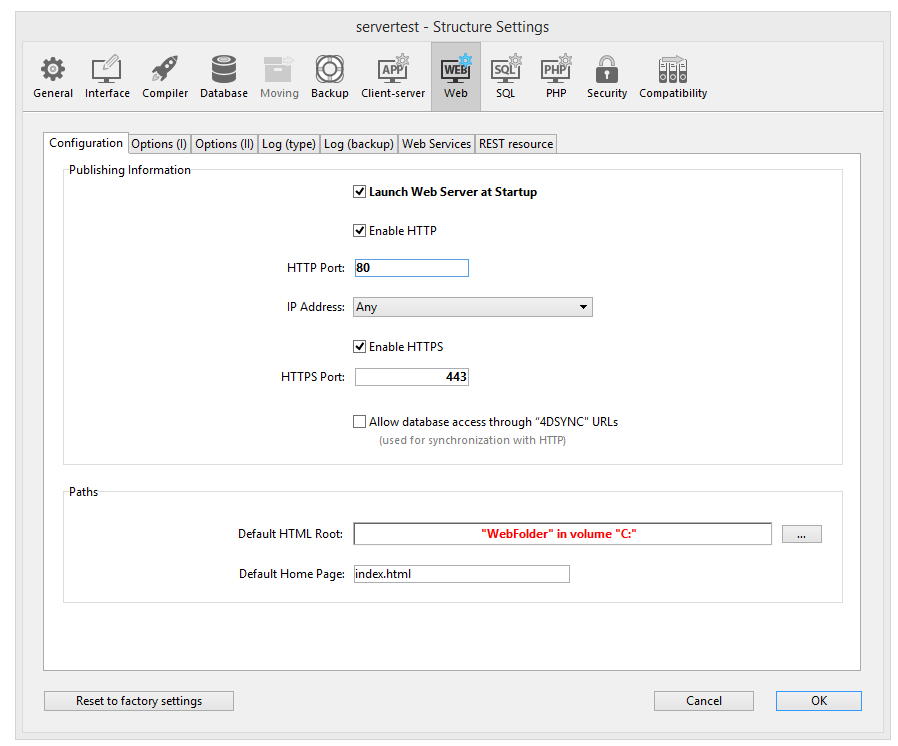
Automatically starting it each time the 4D application is opened. To do this, display the Web/Configuration page of the Settings and select the Launch Web Server at Startup check box:
-
Programmatically, by calling the
webServer.start()function orWEB START SERVERcommand.
The web server of any component can be launched by calling the webServer.start() function on the component's web server object.
You do not need to relaunch the 4D application to start or stop the web server.
Stopping the 4D Web Server
The main 4D web server can be stopped in different ways:
-
Using the Run>Stop Web Server menu of 4D or the Stop HTTP server button of the HTTP Server page of 4D Server (both items show Start... when the server is not already started).
-
Programmatically, by calling the
webServer.stop()function orWEB STOP SERVERcommand.
The web server of any component can be stopped by calling the webServer.stop() function on the component's web server object.
Testing the 4D Web Server
The Test Web Server command can be used to make sure the built-in web server is functioning correctly (4D only). This command is accessible in the Run menu when the web server is launched:

When you select this command, the home page of the website published by the 4D application is displayed in a window of your default web browser:
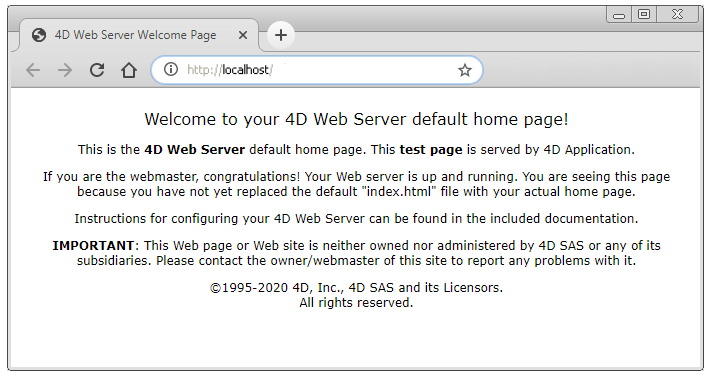
This command lets you verify that the web server, home page display, etc. work correctly. The page is called using the localhost URL, which is the standard shortcut designating the IP address of the machine on which the web browser is executed. The command takes into account the TCP publication port number specified in the settings.
Clearing the Cache
At any moment, you can clear the cache of the pages and images that it contains (if, for example, you have modified a static page and you want to reload it in the cache).
To do so, you can:
- 4D: click on the Clear Cache button in the Web/Options (I) page of the Settings dialog box.
- 4D Server: click on the Clear Cache button in the HTTP page of the 4D Server Administration window.
The cache is then immediately cleared.
You can also use the /4DCACHECLEAR URL.
Runtime Explorer
The Watch page (Web heading) in the Runtime Explorer displays web server information, particularly:
-
Web Cache Usage: indicates the number of pages present in the web cache as well as its use percentage. This information is only available if the web server is active and if the cache size is greater than 0.
-
Web Server Elapsed Time: indicates the duration of use (in hours:minutes:seconds format) of the Web server. This information is only available if the web server is active.
-
Web Hits Count: indicates the total number of HTTP requests received since the web server boot, as well as an instantaneous number of requests per second (measure taken between two Runtime Explorer updates). This information is only available if the web server is active.
Administration URLs
Website administration URLS allow you to control the website published on your server. 4D Web Server accepts four particular URLs: /4DSTATS, /4DHTMLSTATS, /4DCACHECLEAR and /4DWEBTEST.
/4DSTATS, /4DHTMLSTATS and /4DCACHECLEAR are only available to the Designer and Administrator of the database. If the 4D password system has not been activated, these URLs are available to all the users. /4DWEBTEST is always available.
/4DSTATS
The /4DSTATS URL returns several items of information in an HTML table (displayable in a browser):
| Item | Description |
|---|---|
| Cache Current Size | Current size of web server cache (in bytes) |
| Cache Max Size | Maximum size of cache (in bytes) |
| Cached Object Max Size | Maximum size of each object in the cache (in bytes) |
| Cache Use | Percentage of cache used |
| Cached Objects | Number of objects found in the cache, including pictures |
This information can allow you to check the functioning of your server and eventually adapt the corresponding parameters.
The
WEB GET STATISTICScommand allows you to also obtain information about how the cache is being used for static pages.
/4DHTMLSTATS
The /4DHTMLSTATS URL returns, also as an HTML table, the same information as the /4DSTATS URL. The difference is that the Cached Objects field only counts HTML pages (without counting picture files). Moreover, this URL returns the Filtered Objects field.
| Item | Description |
|---|---|
| Cache Current Size | Current size of web server cache (in bytes) |
| Cache Max Size | Maximum size of cache (in bytes) |
| Cached Object Max Size | Maximum size of each object in the cache (in bytes) |
| Cache Use | Percentage of cache used |
| Cached Objects | Number of objects found in the cache, without pictures |
| Filtered Objects | Number of objects in cache not counted by URL, in particular, pictures |
/4DCACHECLEAR
The /4DCACHECLEAR URL immediately clears the cache of the static pages and images. It allows you to therefore “force” the update of the pages that have been modified.
/4DWEBTEST
The /4DWEBTEST URL is designed to check the web server status. When this URL is called, 4D returns a text file with the following HTTP fields filled:
| HTTP Field | Description | Example |
|---|---|---|
| Date | current date at the RFC 822 format | Mon, 7 Dec 2020 13:12:50 GMT |
| Server | 4D/version number | 4D/18.5.0 (Build 18R5.257368) |
| User-Agent | name and version @ IP client address | Mozilla/5.0 (Windows NT 10.0; Win64; x64) AppleWebKit/537.36 (KHTML, like Gecko) Chrome/86.0.4240.183 Safari/537.36 @ 127.0.0.1 |
Logs
4D allows you to generate two logs of web requests:
- a debug log, useful in the web server development phase (HTTPDebugLog.txt),
- a standardized web request log, rather used for statistic purposes (logweb.txt).
Both log files are automatically created in the Logs folder of the application project.
HTTPDebugLog.txt
The http debug file can be enabled using the web server object or the WEB SET OPTION command.
This log file records each HTTP request and each response in raw mode. Whole requests, including headers, are logged; optionally, body parts can be logged as well.
The following fields are logged for both Request and Response:
| Field name | Description |
|---|---|
| SocketID | ID of socket used for communication |
| PeerIP | IPv4 address of host (client) |
| PeerPort | Port used by host (client) |
| TimeStamp | Timestamp in milliseconds (since system startup) |
| ConnectionID | Connection UUID (UUID of VTCPSocket used for communication) |
| SequenceNumber | Unique and sequential operation number in the logging session |
logweb.txt
The web log recording file can be enabled using the web server object, the WEB SET OPTION command, or the Web/Log (type) page of the settings. You need to select the log format.
CLF/DLF
Each line of the file represents a request, such as: host rfc931 user [DD/MMM/YYYY:HH:MM:SS] "request" state length Each field is separated by a space and each line ends by the CR/LF sequence (character 13, character 10).
DLF (Combined Log Format) format is similar to CLF (Common Log Format) format and uses exactly the same structure. It simply adds two additional HTTP fields at the end of each request: Referer and User-agent. Here is the description of CLF/DLF formats (not customizable):
| Field name | Description |
|---|---|
| host | IP address of the client (ex. 192.100.100.10) |
| rfc931 | information not generated by 4D, it’s always - (a minus sign |
| user | user name as it is authenticated, or else it is - (a minus sign). If the user name contains spaces, they will be replaced by _ (an underscore). |
| DD/MMM/YYYY:HH:MM:SS | DD: day, MMM: a 3-letter abbreviation for the month name (Jan, Feb,...), YYYY: year, HH: hour, MM: minutes, SS: seconds. The date and time are local to the server. |
| request | request sent by the client (ex. GET /index.htm HTTP/1.0 |
| state | reply given by the server |
| length | size of the data returned (except the HTTP header) or 0 |
| Referer | DLF only- Contains the URL of the page pointing to the requested document. |
| User-agent | DLF only- Contains the name and version of the browser or software of the client at the origin of the request |
ELF/WLF
The ELF (Extended Log Format) format is very widespread in the world of HTTP browsers. It can be used to build sophisticated logs that meet specific needs. For this reason, the ELF format can be customized: it is possible to choose the fields to be recorded as well as their order of insertion into the file.
The WLF (WebStar Log Format) was developed specifically for the 4D WebSTAR server.
Configuring the fields
When you choose the ELF or WLF format, the “Web Log Token Selection” area displays the fields available for the chosen format. You will need to select each field to be included in the log. To do so, check the desired fields.
You cannot select the same field twice.
The following table lists the fields available for each format (in alphabetical order) and describes its contents:
| Field | ELF | WLF | Value |
|---|---|---|---|
| BYTES_RECEIVED | X | Number of bytes received by the server | |
| BYTES_SENT | X | X | Number of bytes sent by the server to the client |
| C_DNS | X | X | IP address of the DNS (ELF: field identical to the C_IP field) |
| C_IP | X | X | IP address of the client (for example 192.100.100.10) |
| CONNECTION_ID | X | Connection ID number | |
| CS(COOKIE) | X | X | Information about cookies contained in the HTTP request |
| CS(HOST) | X | X | Host field of the HTTP request |
| CS(REFERER) | X | X | URL of the page pointing to the requested document |
| CS(USER_AGENT) | X | X | Information about the software and operating system of the client |
| CS_SIP | X | X | IP address of the server |
| CS_URI | X | X | URI on which the request is made |
| CS_URI_QUERY | X | X | Request query parameters |
| CS_URI_STEM | X | X | Part of request without query parameters |
| DATE | X | X | DD: day, MMM: 3-letter abbreviation for month (Jan, Feb, etc.), YYYY: year |
| METHOD | X | X | HTTP method used for the request sent to the server |
| PATH_ARGS | X | CGI parameters: string located after the “$” character | |
| STATUS | X | X | Reply provided by the server |
| TIME | X | X | HH: hour, MM: minutes, SS: seconds |
| TRANSFER_TIME | X | X | Time requested by server to generate the reply |
| USER | X | X | User name if authenticated; otherwise - (minus sign). If the user name contains spaces, they are replaced by _ (underlines) |
| URL | X | URL requested by the client |
Dates and times are given in GMT.
Backup Frequency
Since a logweb.txt file can become considerably large, it is possible to set up an automatic archiving mechanism. The triggering of a backup can be based on a certain period of time (expressed in hours, days, week or months), or based on the file size; when the set deadline (or file size) is reached, 4D automatically closes and archives the current log file and creates a new one.
When the web log file backup is triggered, the log file is archived in a folder named "Logweb Archives," which is created at the same level as the logweb.txt file.
The archived file is renamed based on the following example: “DYYYY_MM_DD_Thh_mm_ss.txt.” For instance, for a file archived on September 4, 2020 at 3:50 p.m. and 7 seconds: “D2020_09_04_T15_50_07.txt.”
Backup Parameters
The automatic backup parameters for the logweb.txt are set on the Web/Log (backup) page of the Settings:
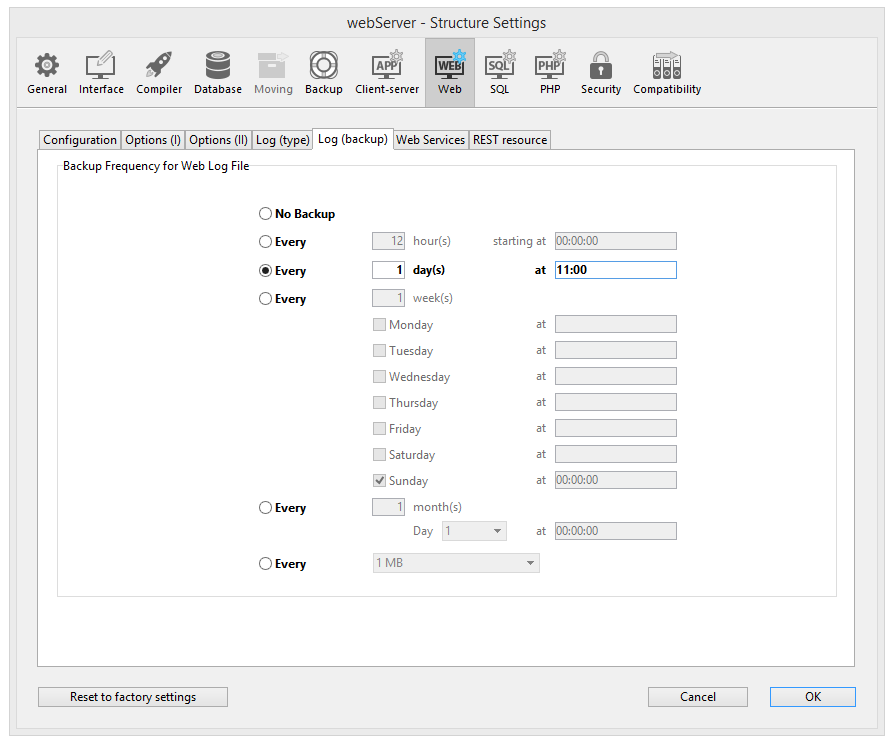
First you must choose the frequency (days, weeks, etc.) or the file size limit criterion by clicking on the corresponding radio button. You must then specify the precise moment of the backup if necessary.
-
No Backup: The scheduled backup function is deactivated.
-
Every X hour(s): This option is used to program backups on an hourly basis. You can enter a value between 1 and 24 .
- starting at: Used to set the time at which the first back up will begin.
-
Every X day(s) at X: This option is used to program backups on a daily basis. Enter 1 if you want to perform a daily backup. When this option is checked, you must indicate the time when the backup must be started.
-
Every X week(s), day at X: This option is used to program backups on a weekly basis. Enter 1 if you want to perform a weekly backup. When this option is checked, you must indicate the day(s) of the week and the time when each backup must be started. You can select several days of the week if desired. For example, you can use this option to set two weekly backups: one on Wednesdays and one on Fridays.
-
Every X month(s), Xth day at X: This option is used to program backups on a monthly basis. Enter 1 if you want to perform a monthly backup. When this option is checked, you must indicate the day of the month and the time when the backup must be started.
-
Every X MB: This option is used to program backups based on the size of the current request log file. A backup is automatically triggered when the file reaches the set size. You can set a size limit of 1, 10, 100 or 1000 MB.