インデックス
頻繁に検索や並び替えで使用されるフィールドに、インデックスを設定できます。例えば姓、会社名、製品名などの属性(フィールド)を使用してエンティティ(レコード)の検索や並び替えを行う場合、これらのフィールドにインデックスを設定することができます。またこのプロパティはテーブル間でのリレーションを確立するためにも使用されます。
フィールドにインデックスが設定されると、4D はそのフィールド用に内部的なインデックステーブルを作成します。このテーブルを使用して、4D はそのフィールドに対する素早い検索や並び替えを実行できるようになります。インデックスが設定されていないフィールドを使用して検索や並び替えを行う場合、4D はシーケンシャルにデータをロードし、レコード毎順番に評価します。インデックスを使用すれば、4D はすべてのレコードを読み込むことなく検索や並び替えを行えます。
インデックスは文字、テキスト、日付、時間、ブール、整数、倍長整数、64bit 整数、実数、ピクチャー、そしてオブジェクト型に設定できます。レコードの作成、削除、編集を行うと、4D は自動でそのインデックステーブルを更新します。既に存在するフィールドにインデックスを作成すると、4D は自動で既存のデータをインデックス化します。必要なだけフィールドにインデックスを設定できます。データベースを上位バージョンに変換する際やデータ圧縮 時など、特定の処理を行った際にもインデックスが再構築されます。
各インデックステーブルの上限は次のとおりです:
- 文字、テキスト、フロートインデックスのキー: 1280億
- そのほかのインデックスタイプ (スカラーデータ) のキー: 2560億
すべてのフィールドにインデックスを設定するようなことはしないでください。インデックスはデータベースのサイズを増大させ、ディスク上のスペースを消費します。またインデックスを設定すればするほど、レコードの保存に時間を要するようになる点に留意してください。4D はレコードを受け入れるたびにインデックステーブルを更新しなければならないためです。
ストラクチャーエディター中で、インデックスが設定されたフィールドは太字で表示されます。
インデックスのタイプ
4D では4種類のインデックスタイプを提供しています。そのいずれを選択するかは一般的に期待する結果と、フィールドに現れるデータに基づきます。各インデックスタイプの説明は以下の通りです:
- 標準インデックス: これは1つのフィールドで構成されるインデックスで、標準のデータベース処理 (検索や並び替え) の速度を向上するために使用します。 4Dではさらにこのタイプのインデックスに対し、BツリーまたはクラスターBツリーを選択できます(ただしオブジェクトフィールドを除く)。
- 複合インデックス: このインデックスは、しばしばともに検索条件に使用される2つ以上のフィールドの合成値(例えば LastName+FirstName) を格納します。
- キーワードインデックス: このインデックスは文字、テキストおよびピクチャーフィールドでのみ使用できます。テキスト内部の検索を容易にする目的で使用されます。またピクチャーの場合は、ピクチャーに割り当てたキーワードで検索を行うために使用できます。
- ベクトルインデックス: このインデックスは、埋め込み を保存しているオブジェクトフィールドに対するAI ベースのクエリの速度を向上させるために設計されています。
標準インデックス
標準インデックスはデータベース処理の速度を向上する目的で使用されます(標準のインデックスは、キーワードインデックスや複合インデックスとは異なり、一般的なインデックスを参照します)。 4D は2つのタイプの標準インデックス、BツリーとクラスターBツリーを提供します。
- Bツリー: 標準のBツリータイプインデックス。この汎用目的のインデックスはほとんどのインデックスの要件を満たします。
- クラスターBツリー: クラスターを使用したBツリータイプのインデックス。このアーキテクチャーはインデックスに含まれるキーの量が少ない場合 (例えば同じ値がデータ中に繰り返し現れる場合) に有効です。
テキストタイプのフィールドに割り当てたBツリーインデックスは、フィールドの最初の1024文字 (最大) を格納します。そのため、このコンテキストにおいては、1024文字を超える検索をインデックスを使用して行うと失敗します。
インデックスアーキテクチャーの選択を容易にするために、自動オプションを選択できます。この場合4D は自動でデータのタイプに応じインデックスのタイプを選択します。オブジェクト型のフィールドでは、選択できるオプションは自動 オプションのみです(ただしそのフィールドに4D.Vector クラスを割り当てた場合を除く(以下参照))。この場合、自動 オプションを使用すれば、全ての属性パスは自動的にインデックスされます。
複合インデックス
複合インデックスでは、レコード毎に2つ以上のフィールドの値の合成値を格納します。よく見られる例はFirstName+LastName フィールドの複合インデックスです。この場合、“Peter Smith”の検索は標準の検索(まず“Smith”を検索し次に“Peter”を検索する) よりも速くなります。
4D は検索や並び替えの際に自動で複合インデックスを利用します。例えば複合インデックス “City+ZipCode” が存在するとき、“lastname=carter & city=new york & zipcode =102@”のような検索を行うと、自動でその複合インデックスが利用されます。
ストラクチャーエディターでは、複合インデックスはインデックス作成ダイアログでのみ作成することができます。このダイアログボックスについては後述の“インデックスの作成”を参照してください。
Keywords index
You can use a specific type of index with Alpha, Text and Picture fields: a keyword index.
-
When you associate this type of index with an Alpha or Text field, the text stored in the field will be indexed word by word. All the words will be indexed even if they have only 1 or 2 characters. This type of index will accelerate subsequent keyword searches among text fields in a dramatic manner.
It is possible to associate both a standard index and a keyword index with Alpha and Text fields (when stored in the records). 4D will use the appropriate index depending on the context. -
When you associate this type of index with a Picture field, searches among keywords associated with pictures (metadata) are greatly accelerated. Warning: Picture keyword indexes are exclusively based on metadata of the IPTC/Keywords type. These types of metadata are supported in particular by the TIFF and JPEG formats (note that BMP, PNG and GIF do not support them). Other types of metadata are not managed by indexing.
Keyword indexes for pictures are updated automatically by 4D each time the Picture field is saved (when a record is created or modified, when data is imported, and so on). Metadata of the IPTC/Keywords type are indexed automatically by 4D when they are found in the picture (you do not have to call theSET PICTURE METADATAcommand to include them in the index of the Picture field).
You can use the DISTINCT VALUES command to get the list of keywords contained in an keywords index.
You use picture or text keyword indexes through the % operator: this operator must be placed in the query or sort formulas in order to specifically use an index value. 例:
QUERY([PICTURES];[PICTURES]Photos %"cats")
// look for photos associated with the cats keyword
This works the same way for all the query and order by commands: QUERY BY FORMULA, QUERY SELECTION, ORDER BY, etc.
Vector index
A vector index can be associated to an Object type field that was configured as a 4D.Vector class. In this case, the following options are available:
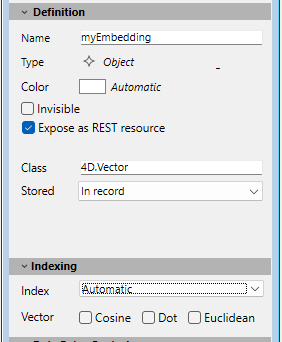
- Cosine: the vector index is optimized for cosine similarity computations.
- Dot: the vector index is optimized for dot similarity computations.
- Euclidean: the vector index is optimized for euclidean distance computations.
- Automatic: standard object index type (see above). You can select this index type to handle null vectors, it will be automatically used in this case.
You can select one or more index types for your vector fields, the appropriate index will be automatically used depending on the actual computation. For optimization reasons, it is recommended to only select necessary index types.
Vector indexes are not compatible with transaction processing. When vector-indexed records are inserted, updated, or deleted within a transaction, the corresponding index changes are not committed or rolled back with the transaction. As a result, the vector index may become inconsistent with the database state after a rollback, and search results may not reflect the persisted data.
Index List
The  button of the toolbar in the Structure editor displays the Index List window. This window displays the list of all the indexes of the structure, regardless of their type:
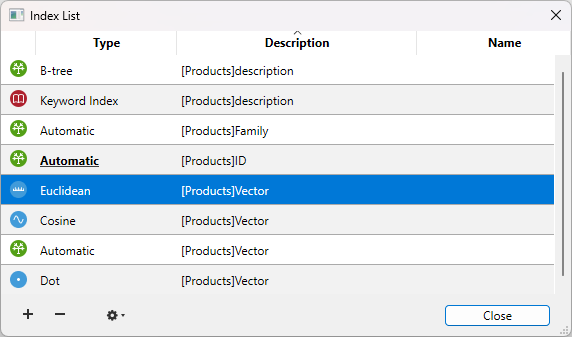
The Index List can be used to view the main properties of the indexes:
- Type: Index type. Each type of index (B-tree, Cluster B-tree, Keyword, Euclidean, Cosine, Dot) is depicted with a different icon.
- Description: Table and field(s) of index. For a composite index, this list contains all the fields of the index.
- Name: Index name. This property is used in particular by the language commands. You can change or add an index name by double-clicking in this column.
The [+] button displays the index property dialog box and allows you to edit the selected index or to add a new index when no index was selected.
The [-] button deletes the selected index (a confirmation dialog box appears).
This button can be used more particularly to delete composite indexes.
Two additional commands are available in the menu associated with the tool button (enabled when an index is selected:
- Edit: Displays the properties of the selected index in the index property dialog box (see next paragraph). This command has the same effect as double-clicking on a row of the list (except for in the name area).
- Rebuild: Can be used to delete and rebuild the selected index. A confirmation dialog box appears when you select this command.
Creating an index
To create a standard index directly:
- Select a field then choose a value from the "Index" menu of the Inspector palette.
OR
Right-click on the field then select a value from the Index> submenu of the context menu.
To create a composite index or any other type of index using the index creation dialog box:
- Select several fields while holding down the Shift key (for adjacent selection) or Ctrl (Windows) or Command (macOS) button then right click on one of the fields and select New Composite Index... in the context menu.
OR
Select the New Index... in the context menu of the table or select Index in the add objects menu of the Structure editor tool bar.
The index configuration dialog box then appears.

It contains the following elements:
- Table: List of all the database tables. Choose the table to which the index will belong from this menu.
- Name: Index name entry area. This name is used by the 4D language commands.
- Type: Selection menu for type of index to be created. If you keep the "Automatic" option, 4D will automatically choose the index type according to the contents of the field.
- List of Fields: This area is used to specify the field(s) associated with the index. It can contain a field by default depending on the current selection in the editor.
To add a field to the index, click on the [+] button. The list of fields of the selected table is displayed so that you can indicate the field to be added to the index.
- If you want to create a composite index, add each field to be included in the index successively. Once the list is completed, you can reorder the fields using the arrow buttons or using drag and drop.
- If you create a composite index based on primary key fields, make sure you put the fields in the same order in the primary key and in the index.
- If you have chosen the “Keyword Index” type, only Alpha or Text fields can be selected. Also in this case, you cannot include only one field in the index.
To delete a field from the index, select it in the list and click on the [-] button.
Once the index has been configured, click on OK to generate the index.
Deleting an index in the Structure editor
You can delete indexes that are no longer useful at any time. This can be carried out directly in the Structure editor or using the Index List window.
To delete a standard index in the Structure editor:
- Select the field associated with the index you want to delete, then choose the None or uncheck the Keyword Index option (for a keyword index) in the Index menu of the Inspector palette
OR
Right-click on the field associated with the index, then choose the None or uncheck the Keywords option from the Index> submenu of the context menu.
The deletion (and viewing) of a composite index can only be carried out from the List Index window, see above.
Reindexing a field
You can reindex a field at any time; in other words, rebuild the index table(s) associated with it, in accordance with the data present. This can be useful in the case of application maintenance.
Reindexing can be carried out using the Rebuild command in the Index List window.
Note that modifying the data language or maintenance operations such as compacting will also cause the indexes to be rebuilt.