Client-server page
The Client-server pages group together parameters related to the use of the database in client-server mode. Naturally, these settings are only taken into account when the database is used in remote mode.
Network options page
Network
Publish database at startup
This option lets you indicate whether or not the 4D Server database will appear in the list of published databases.
- When this option is checked (default), the database is made public and appears in the list of published databases (Available tab).
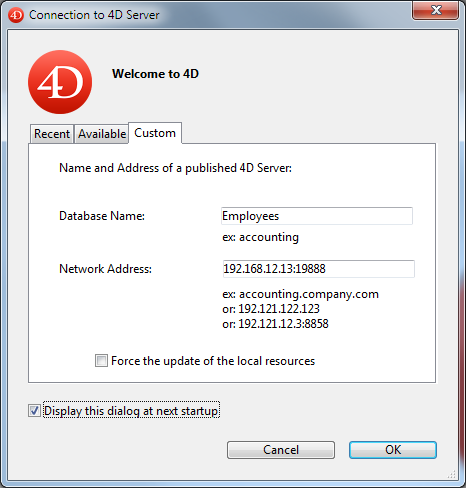
- When the option is not checked, the database is not made public and it does not appear in the list of published databases. To connect, users must manually enter the address of the database on the Custom tab of the connection dialog box.
If you modify this parameter, you must restart the server database in order for it to be taken into account.
Publication name
This option lets you change the publication name of a 4D Server database, i.e., the name displayed on the dynamic Available tab of the connection dialog box (see the Opening a remote project paragraph). By default, 4D Server uses the name of the project file. You can enter any custom name you want.
This parameter is not taken into account in custom client-server applications. In theory, the client application connects directly to the server application, without passing by the connection dialog box. However, in the event of an error, this dialog box can appear; in this case, the publication name of the server application is the name of the compiled project.
Port Number
This option lets you change the TCP port number on which 4D Server publishes the database. This information is stored in the project and on each client machine. By default, the TCP port number used by 4D Server and 4D in remote mode is 19813.
Customizing this value is necessary when you want to use several 4D applications on the same machine; in this case, you must specify a different port number for each application. When you modify this value from 4D Server or 4D, it is automatically passed on to all the 4D machines connected to the database.
To update any other client machines that are not connected, you just need to enter the new port number (preceded by a colon) after the IP address of the server machine on the Custom tab of the connection dialog box at the time of the next connection. For example, if the new port number is 19888:
Only databases published on the same port as the one set in 4D client are visible on the TCP/IP dynamic publication page.
4D Server and port numbers
4D Server uses three TCP ports for communications between internal servers and clients:
- SQL Server: 19812 by default (can be modified via the "SQL/Configuration" page of the Preferences).
- Application Server: 19813 by default (can be modified via the "Client-Server/Configuration" page of the Preferences, see above).
- DB4D Server (database server): 19814 by default. This port number cannot be modified directly but it always consists of the application server port number + 1.
When a 4D client connects to 4D Server, it uses the TCP port of the application server (19813 or the port indicated after the colon ':' in the IP address shown in the connection dialog box). Connection to other servers via their respective ports is then automatic; it is no longer necessary to specify them.
Note that in the case of access via a router or a firewall, the three TCP ports must be opened explicitly. - Remote Debugger: 19815 by default. This port number cannot be modified directly but it always consists of the application server port number + 2.
Authentication of user with domain server
This option allows you to implement SSO (Single Sign On) capabilities in your 4D Server database on Windows. When you check this option, 4D transparently connects to the Active directory of the Windows domain server and gets the available authentication tokens. This option is described in the Single Sign On (SSO) on Windows section.
Service Principal Name
When Single Sign On (SSO) is enabled (see above), you must fill in this field if you want to use Kerberos as your authentication protocol. This option is described in the Single Sign On (SSO) on Windows section.
Network Layer
This drop-down box contains the available network layers, which are used to handle communications between 4D Server and remote 4D machines (clients).
-
QUIC (projects only): Enables the QUIC network layer on the server.
Notes about QUIC:
- You can know if a 4D application is running with the QUIC network layer using the
Application infocommand. - Since QUIC uses the UDP protocol, make sure UDP is allowed in your network security settings.
- QUIC automatically connects to the port 19813 for both application server and DB4D server.
- When the QUIC layer option is selected:
- Client-server Connections Timeout settings are hidden
- The Encrypt Client-Server communication checkbox is hidden (QUIC communications are always in TLS, whatever your secured mode is).
- Compatibility: You need to deploy your client/server applications with 4D 20 or higher before switching to the QUIC network layer.
- You can know if a 4D application is running with the QUIC network layer using the
-
ServerNet (only option available for binary databases): Enables the ServerNet network layer on the server.
Using QUIC network layer is recommended for projects.
In case of a modification, you need to restart the application for the change to be taken into account. Any client applications that were logged must also be restarted to be able to connect with the new network layer.
Client-Server Connections Timeout
This option is not available when the QUIC network layer is selected.
This device is used to set the timeout (period of inactivity beyond which the connection is closed) between 4D Server and the client machines connecting to it. The Unlimited option removes the timeout. When this option is selected, client activity control is eliminated.
When a timeout is selected, the server will close the connection of a client if it does not receive any requests from the latter during the specified time limit.
Client-Server Communication
Register Clients at Startup For Execute On Client
When this option is checked, all the 4D remote machines connecting to the database can execute methods remotely. This mechanism is detailed in the section Stored procedures on client machines.
Encrypt Client-Server Communications
This option is not available when the QUIC network layer option is selected.
This option lets you activate the secured mode for communications between the server machine and the 4D remote machines. This option is detailed in the Encrypting Client/Server Connections section.
Update Resources folder during a session
This setting can be used to globally set the updating mode for the local instance of the Resources folder on the connected 4D machines when the Resources folder of the database is modified during the session (the Resources folder is automatically synchronized on the remote machine each time a session is opened). Three settings are available:
- Never: The local Resources folder is not updated during the session. The notification sent by the server is ignored. The local Resources folder may be updated manually using the Update Local Resources action menu command (see Using the Resources explorer).
- Always: The synchronization of the local Resources folder is automatically carried out during the session whenever notification is sent by the server.
- Ask: When the notification is sent by the server, a dialog box is displayed on the client machines, indicating the modification. The user can then accept or refuse the synchronization of the local Resources folder.
The Resources folder centralizes the custom files required for the database interface (translation files, pictures, etc.). Automatic or manual mechanisms can be used to notify each client when the contents of this folder have been modified. For more information, please refer to the Managing the Resources folder section.
IP configuration page
Allow-Deny Configuration Table
This table allows you to set access control rules for the database depending on 4D remote machine IP addresses. This option allows reinforcing security, for example, for strategic applications.
This configuration table does not control Web connections.
The behavior of the configuration table is as follows:
- The "Allow-Deny" column allows selecting the type of rule to apply (Allow or Deny) using a pop-up menu. To add a rule, click on the Add button. A new row appears in the table. The Delete button lets you remove the current row.
- The "IP Address" column allows setting the IP address(es) concerned by the rule. To specify an address, click in the column and enter the address in the following form: 123.45.67.89 (IPv4 format) or 2001:0DB8:0000:85A3:0000:0000:AC1F:8001 (IPv6 format). You can use an * (asterisk) character to specify "starts with" type addresses. For example, 192.168.* indicates all addresses starting with 192.168.
- The application of rules is based on the display order of the table. If two rules are contradictory, priority is given to the rule located highest in the table. You can re-order rows by modifying the current sort (click the header of the column to alternate the direction of the sort). You can also move rows using drag and drop.
- For security reasons, only addresses that actually match a rule will be allowed to connect. In other words, if the table only contains one or more Deny rules, all addresses will be refused because none will match at least one rule. If you want to deny only certain addresses (and allow others), add an Allow * rule at the end of the table. For example:
- Deny 192.168.* (deny all addresses beginning with 192.168)
- Allow * (but allow all other addresses)
By default, no connection restrictions are applied by 4D Server: the first row of the table contains the Allow label and the * (all addresses) character.