Documentar um projecto
In application projects, you can document your methods as well as your forms, tables, or fields. Creating documentation is particularly appropriate for projects being developed by multiple programmers and is generally good programming practice. Documentation can contain a description of an element as well as any information necessary to understand how the element functions in the application.
Os seguintes elementos do projeto aceitam documentação:
- Methods (database methods, component methods, project methods, form methods, 4D Mobile methods, triggers, and classes)
- Classes
- Formulários
- Tabela
Your documentation files are written in Markdown syntax (.md files) using any editor that supports Markdown. São armazenados como ficheiros independentes na pasta do seu projeto.
Documentation is displayed in the preview area (right-side panel) of the Explorer:

También se puede exponer parcialmente como consejos del editor de código.
Ficheiros documentação
Nome do ficheiro de documentação
Documentation files have the same name as their attached element, with the ".md" extension. Por ejemplo, el archivo de documentación adjunto al método proyecto myMethod.4dm se llamará myMethod.md.
In the Explorer, 4D automatically displays the documentation file with the same name as the selected element (see below).
Arquitetura dos ficheiros de documentação
Todos los archivos de documentación se almacenan en la carpeta Documentación, situada en el primer nivel de la carpeta Package.
La arquitectura de la carpeta Documentation es la siguiente:
-
DocumentationClasses- myClass.md
DatabaseMethods- onStartup.md
- ...
Formulários- loginDial.md
- ...
Página Métodos- myMethod.md
- ...
TableForms- 1
- input.md
- ...
- ...
- 1
Triggers- table1.md
- ...
-
A project form and its project form method share the same documentation file for form and method.
-
A table form and its table form method share the same documentation file for form and method.
Renaming or deleting a documented element in your project will also rename or delete the element's associated Markdown file.
Documentação no Explorador
Ver a documentação
Para visualizar a documentação na janela do Explorer:
- Certifique-se de que a área de pré-visualização é mostrada.
- Selecione o elemento documentado na lista do Explorador.
- Haga clic en el botón Documentation situado debajo del área de vista previa.

-
Si no se ha encontrado ningún archivo de documentación para el elemento seleccionado, se muestra un botón Crear (ver más abajo).
-
Otherwise, if a documentation file exists for the selected element, the contents are displayed in the area. Os conteúdos não são diretamente editáveis no painel.
Editar o ficheiro de documentação
You can create and/or edit a Markdown documentation file from the Explorer window for the selected element.
Se não houver um arquivo de documentação para o elemento selecionado, você poderá:
- haga clic en el botón Crear en el panel
Documentationo, - elija la opción Modificar la documentación... en el menú contextual o el menú de opciones del Explorador.

4D automatically creates an appropriately named .md file with a basic template at the relevant location and opens it with your default Markdown editor.
Si ya existe un archivo de documentación para el elemento seleccionado, puede abrirlo con su editor de Markdown eligiendo la opción Modificar la documentación... del menú contextual o del menú de opciones del Explorador.
Ver a documentação no editor de código
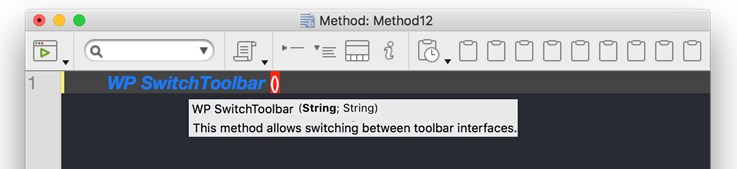
The 4D code editor displays a part of a method's documentation in its help tip.
Si existe un archivo llamado \<MethodName>.md en la carpeta \<package>/documentation, el editor de código muestra (por prioridad):
-
Todo texto introducido en una etiqueta de comentario HTML (
<!-- command documentation -->) en la parte superior del archivo markdown. -
Or, if no html comment tag is used, the first sentence after a
# Descriptiontag of the markdown file.
Nesse caso, a primeira linha contém o protótipo do método, gerado automaticamente pelo analisador de código 4D.
En caso contrario, el editor de código muestra el comentario del bloque en la parte superior del código del método.
Definição do ficheiro de documentação
4D usa um modelo básico para criar ficheiros de documentação. Esta plantilla sugiere las funcionalidades específicas que permiten mostrar la información en el editor de código.
Sin embargo, puede utilizar todas las etiquetas Markdown soportadas.
New documentation files are created with the following default contents:

| Linha | Descrição |
|---|---|
<!-- Escreva aqui o seu resumo --> | Comentário HTML. Se utiliza prioritariamente como descripción del método en los consejos del editor de código |
| ## Description | Título de nível 2 em Markdown. The first sentence after this tag is used as the method description in the code editor tips if HTML comment is not used |
| ## Exemplo | No nível 2 do cabeçalho, você pode usar essa área para mostrar um código de amostra |
```4d Type here your example``` | Utilizado para formatar exemplos de código 4D (utiliza a biblioteca highlight.js) |
Markdown suportado
- A etiqueta de título é suportada:
# Title 1
## Title 2
### Title 3
- As etiquetas de estilo (itálico, negrito, riscado) são suportadas:
_italic_
**bold**
**_bold/italic_**
~~strikethrough~~
- A tag do bloco de código (`4d ... `) é suportado com destaque de código 4D:
```4d
	var $txt : Text
	$txt:="Hello world!"
```
- A etiqueta de tabela é suportada:
| Parâmetro | Tipo | Descrição |
| --------- | ------ | ------------ |
| wpArea | String |Área de escrita profissional|
| toolbar | String |Nome da barra de ferramentas |
- A etiqueta de ligação é suportada:
// Case 1
The [documentation](https://doc.4d.com) of the command ....

// Case 2
[4D blog][1]

[1]: https://blog.4d.com
- As etiquetas de imagem são suportadas:


[](https://blog.4d.com)

Para más información, consulte la guía Markdown de GitHub.
Exemplo
En el archivo WP SwitchToolbar.md, puede escribir:
<!-- This method returns a different logo depending on the size parameter -->


GetLogo (size) -> logo


| Parameter | Type   | in/out | Description |
| --------- | ------ | ------ | ----------- |
| size      | Longint | in | Logo style selector (1 to 5)  |
| logo      | Picture | out | Selected logo |


## Description

This method returns a logo of a specific size, depending on the value of the *size* parameter.
1 = smallest size, 5 = largest size.

## Example

```4d
C_PICTURE($logo)
C_LONGINT($size)

//Get the largest logo
$logo:=GetLogo(5)
```
- Explorer view:
- Code editor view:
