General
This page allows you to define your app's main information.
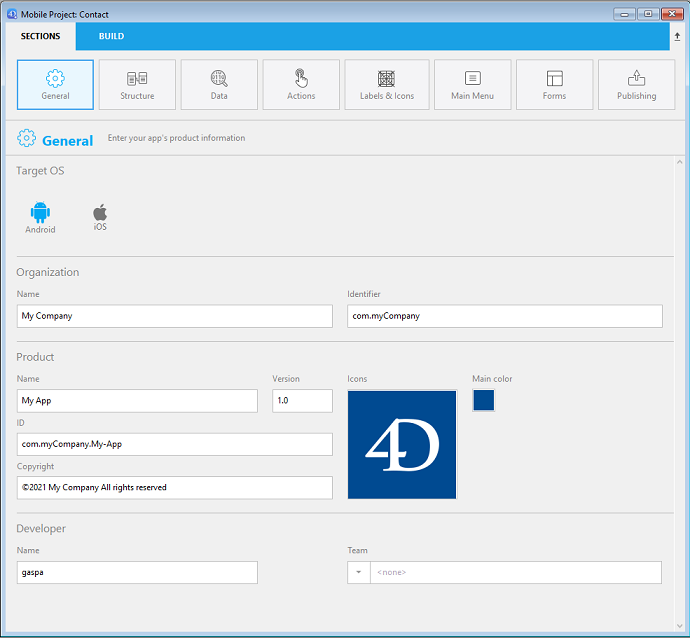
Target OS
Select the mobile OS for which you want to build the app. This setting will define the available mobile editor options.
- On macOS, you can select Android, iOS, or both targets
- On Windows, you can only select the Android target.
Organization
Name: Name of your company, or your name.
Identifier: Enter your organization’s bundle identifier. This will be used to identify your application. The product name you enter is concatenated to create the "Bundle ID" using reverse domain name service notation (see ID below). This bundle ID must be unique to your app.
For example, if your company’s name is "MyCompany" and your app’s name is "MyApp", you could choose "com. MyCompany" as your organization’s bundle identifier and your App bundle ID would be "com. MyCompany. MyApp".
:::nota
The Bundle ID name must not contain space or special characters such as "*,%,/". They are automatically filtered and replaced with -.
:::
Product
Name: Your app’s name. As described above, the product name is used to create the "Bundle ID". This Bundle ID must be the same as the Bundle ID you created in your Apple Development account.
:::nota
The Bundle ID name must not contain space or special characters such as "*,%,/". They are automatically filtered and replaced with -.
:::
Version: The version of your app. Add version numbers in ascending, sequential order starting with 1.0.
ID: (Bundle ID): This area is automatically generated as a composition of your organization identifier and product name. It is not editable.
Copyright: Your app's copyright. The mobile editor suggests a copyright format but you can create your own.
Icons: Master icon that will be used in various locations in you app. You just need to designate your icon and the mobile editor generates all of the required formats for you, in accordance with standard mobile guidelines.
To select an icon:
- Drag and drop a picture directly into the icon area, or
- Use the image menu to select or copy your picture.

You can also double-click the area to display the picture selection dialog box.
:::nota
On Windows, you must use an "image file" (*.public.image).
:::
Once the icon is selected, the mobile editor automatically creates all required icons for the app. You can access the generated icon formats by selecting Show the icons folder in the image menu.
Main color
This menu allows you to select how to define the main color of your app. The main color is used to generate a custom color scheme for your app.

- Use the system color selector: displays the system color picker in which you can designate the main color
- Use the main color of the icon: let the mobile editor determine automatically the main color from your app's icon.
At any time, you can reset the main color and get back to the icon's preset main color, by clicking on "Use the main color of the icon".
Developer
Name: This field is automatically prefilled with your user account name. You can enter any name.
Team: Your Developer Account Team ID, that will be used during the deployment phase. This ID can be get from your Developer Account.